How To Automate API Testing With Postman

Email Newsletter
Weekly tips on front-end & UX.
Trusted by 200,000+ folks.


 Register!
 Flexible CMS. Headless & API 1st
One of my favorite features in Postman is the ability to write automated tests for my APIs. So if you are like me and you use Postman and you are tired of manually testing your APIs, this article will show how to harness the test automation feature provided by Postman.
In case you don’t know what Postman is or you are entirely new to Postman, I will recommend you check out the Postman getting started documentation page and then come back to this article to learn how to automate testing your API with Postman.
APIs or Web APIs pretty much drive most of the user-facing digital products. With that said, as a backend or front-end developer being able to test these APIs with ease and more efficiently will allow you to move quickly in your development lifecycle.
Postman allows you to manually test your APIs in both its desktop and web-based applications. However, it also has the ability for you to automate these tests by writing JavaScript assertions on your API endpoints.
Why You Should Automate API Tests
Testing in software development is used to ascertain the quality of any piece of software. If you are building APIs as a backend for a single frontend application or you are building APIs to be consumed by several services and clients, it’s important that the APIs work as expected.
Setting up automated API tests to test the different endpoints in your API will help catch bugs as quickly as possible.
It will also allow you to move quickly and add new features because you can simply run the test cases to see if you break anything along the way.
Steps To Automating API Tests
When writing API tests in Postman, I normally take a four step approach:
- Manually testing the API;
- Understand the response returned by the API;
- Write the automated test;
- Repeat for each endpoint on the API.
For this article, I have a NodeJS web service powered by SailsJS that expose the following endpoints for:
/— the home of the API./user/signup— Signs up a new user./user/signin— Signs in an exiting user./listing/new— Creates a new listing(a listing is details of a property owned by the user) for an existing user.
I have created and organized the endpoints for the demo service that we will be using in this article in a Postman collection so you can quickly import the collection and follow along.
<div class="postman-run-button"
data-postman-action="collection/fork"
data-postman-var-1="4151223-681e8daf-3e97-453b-b719-5994a4aea085"
data-postman-collection-url="entityId=4151223-681e8daf-3e97-453b-b719-5994a4aea085&entityType=collection&workspaceId=62d358dc-8d51-4542-9579-0d2af8157c25"></div>
<script type="text/javascript">
  (function (p,o,s,t,m,a,n) {
    !p[s] && (p[s] = function () { (p[t] || (p[t] = [])).push(arguments); });
    !o.getElementById(s+t) && o.getElementsByTagName("head")[0].appendChild((
      (n = o.createElement("script")),
      (n.id = s+t), (n.async = 1), (n.src = m), n
    ));
  }(window, document, "_pm", "PostmanRunObject", "https://run.pstmn.io/button.js"));
</script>
Now let’s follow my four steps to automating API tests in Postman.
1. Test The API Manually
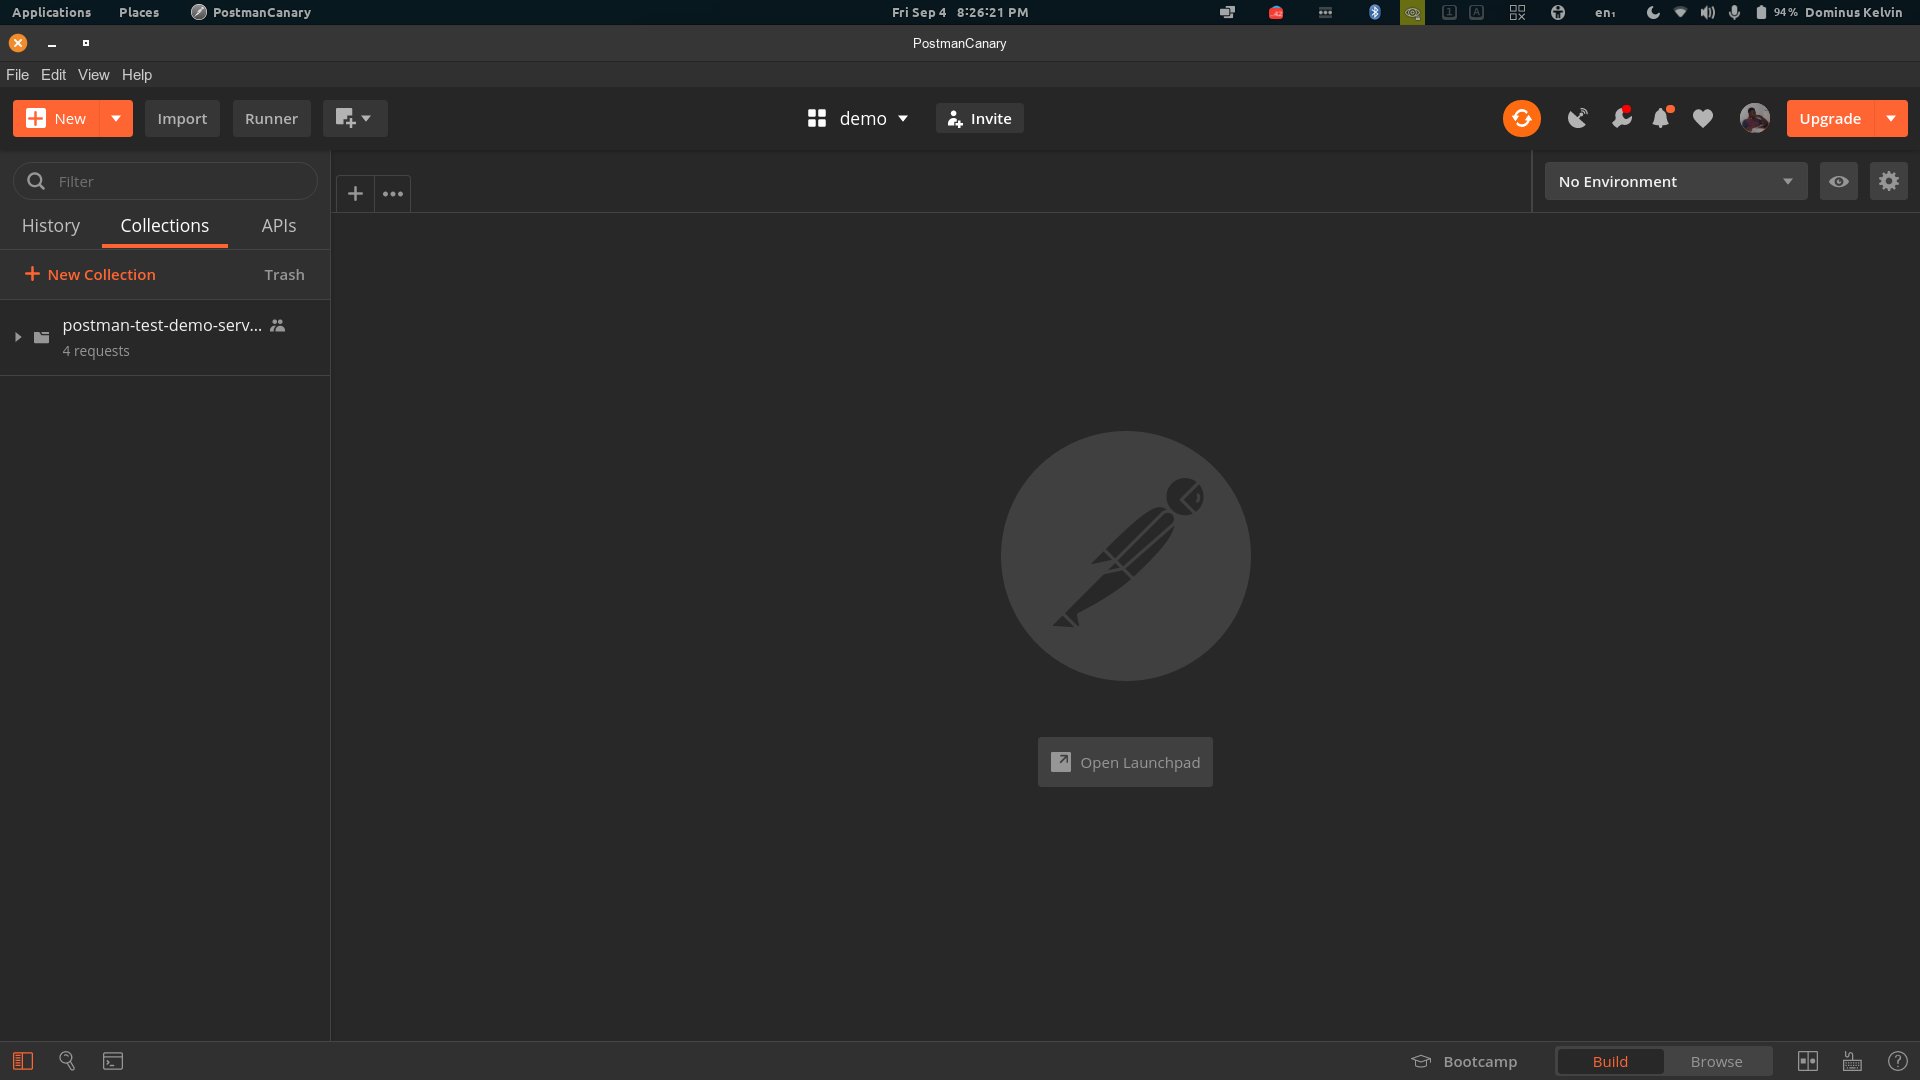
I will open Postman and switch over to a workspace I created called demo which has the postman-test-demo-service collection. You will also have access to the collection if you imported it from above. So my postman would look like this:
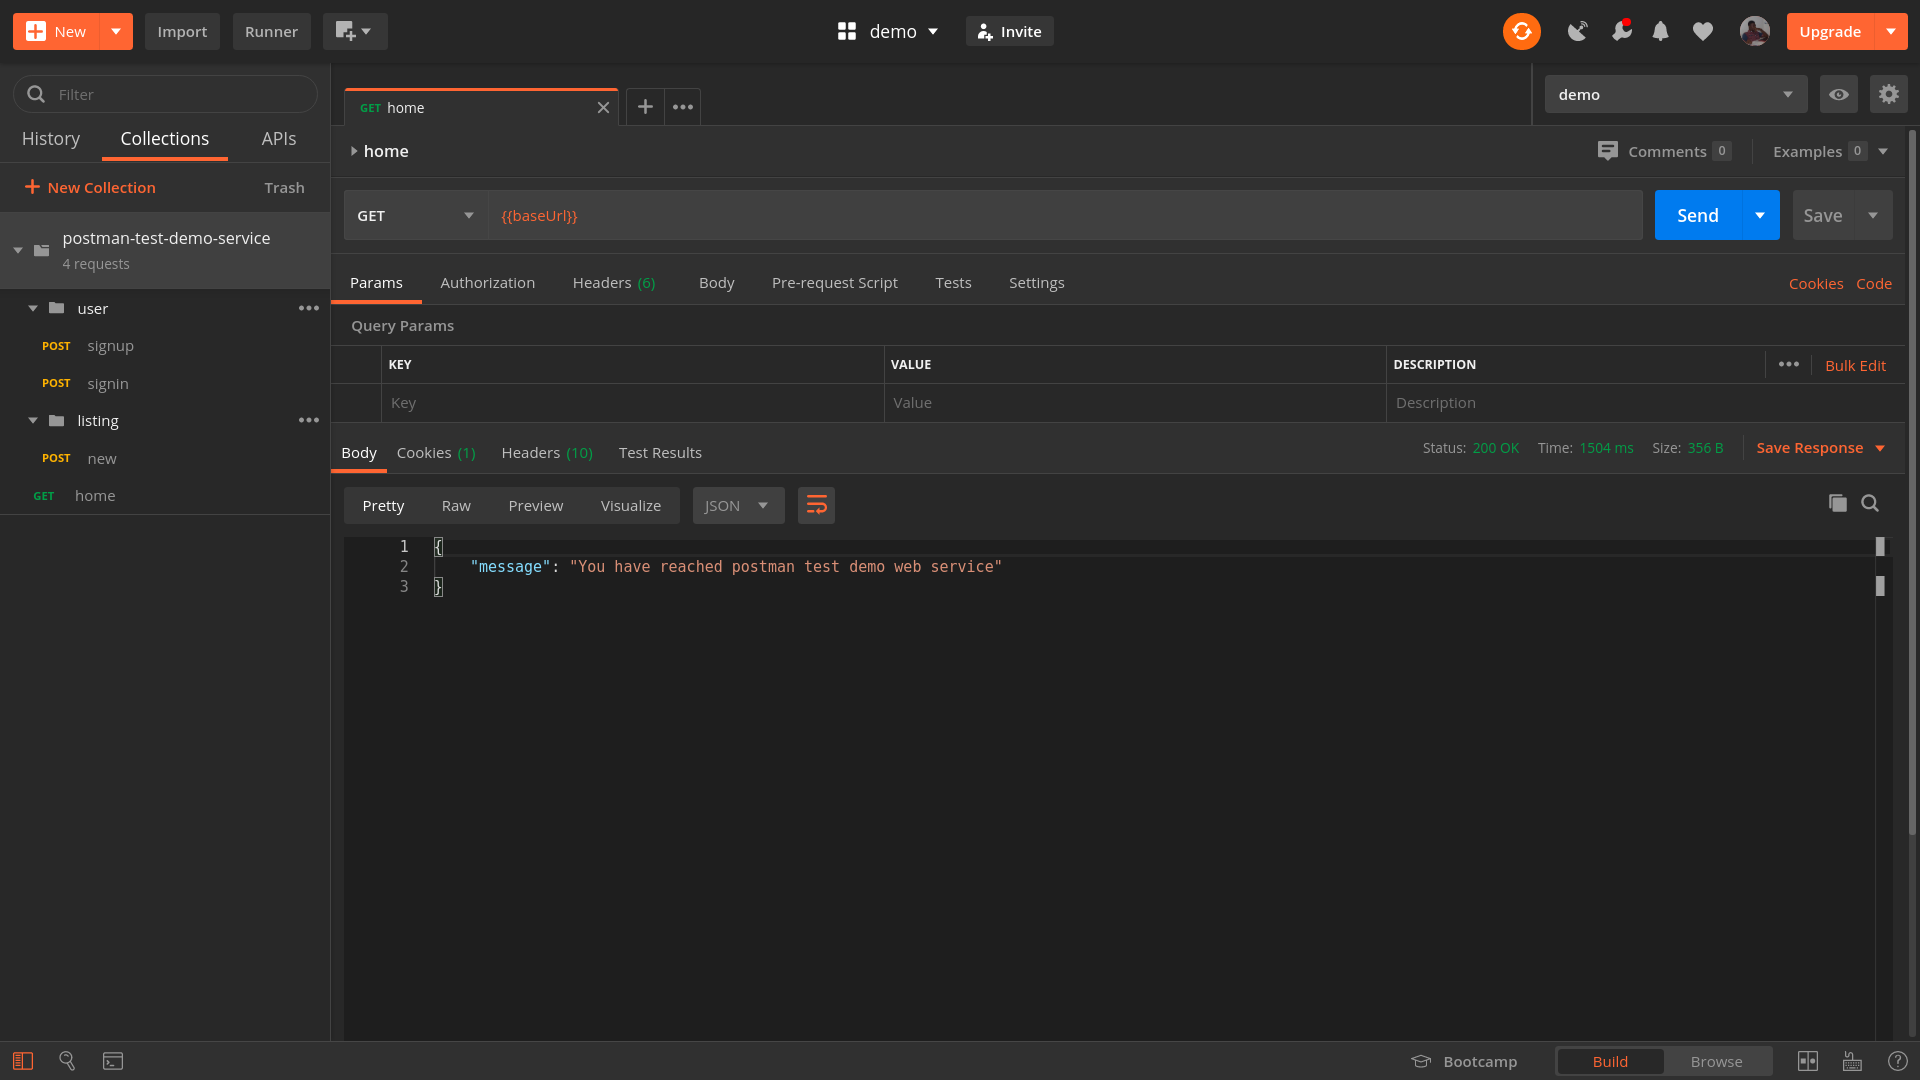
Our first test is to test the home endpoint(/) of the API. So I would open the request on the sidebar called home you can see it’s a Get request and by simply pressing Enter, I would send a GET request to the web service to see what it responds with. The image below shows that response:
2. Understand The Response Returned By The API
If you are following along and also from the screenshot above you will see the response came back with a status code of 200 OK and also a JSON body with a message property with the value of You have reached postman test demo web service
Knowing this is the expected response of the / endpoint on our service, we can proceed to step 3 — writing the actual automated test.
3. Write The Automated Test
Postman comes out of the box with a powerful runtime based on Node.js which gives it’s users the ability to write scripts in the JavaScript language.
In Postman, you add scripts to be executed during two events in the Postman workflow:
- Before you make a request.
These scripts are called pre-request script and you can write them under the Pre-request Script tab. - After you’ve received a response from the request you made.
These scripts are called Test scripts and it is this set of scripts that are our focus in this article. You write test scripts under the Tests tab in a Postman request.
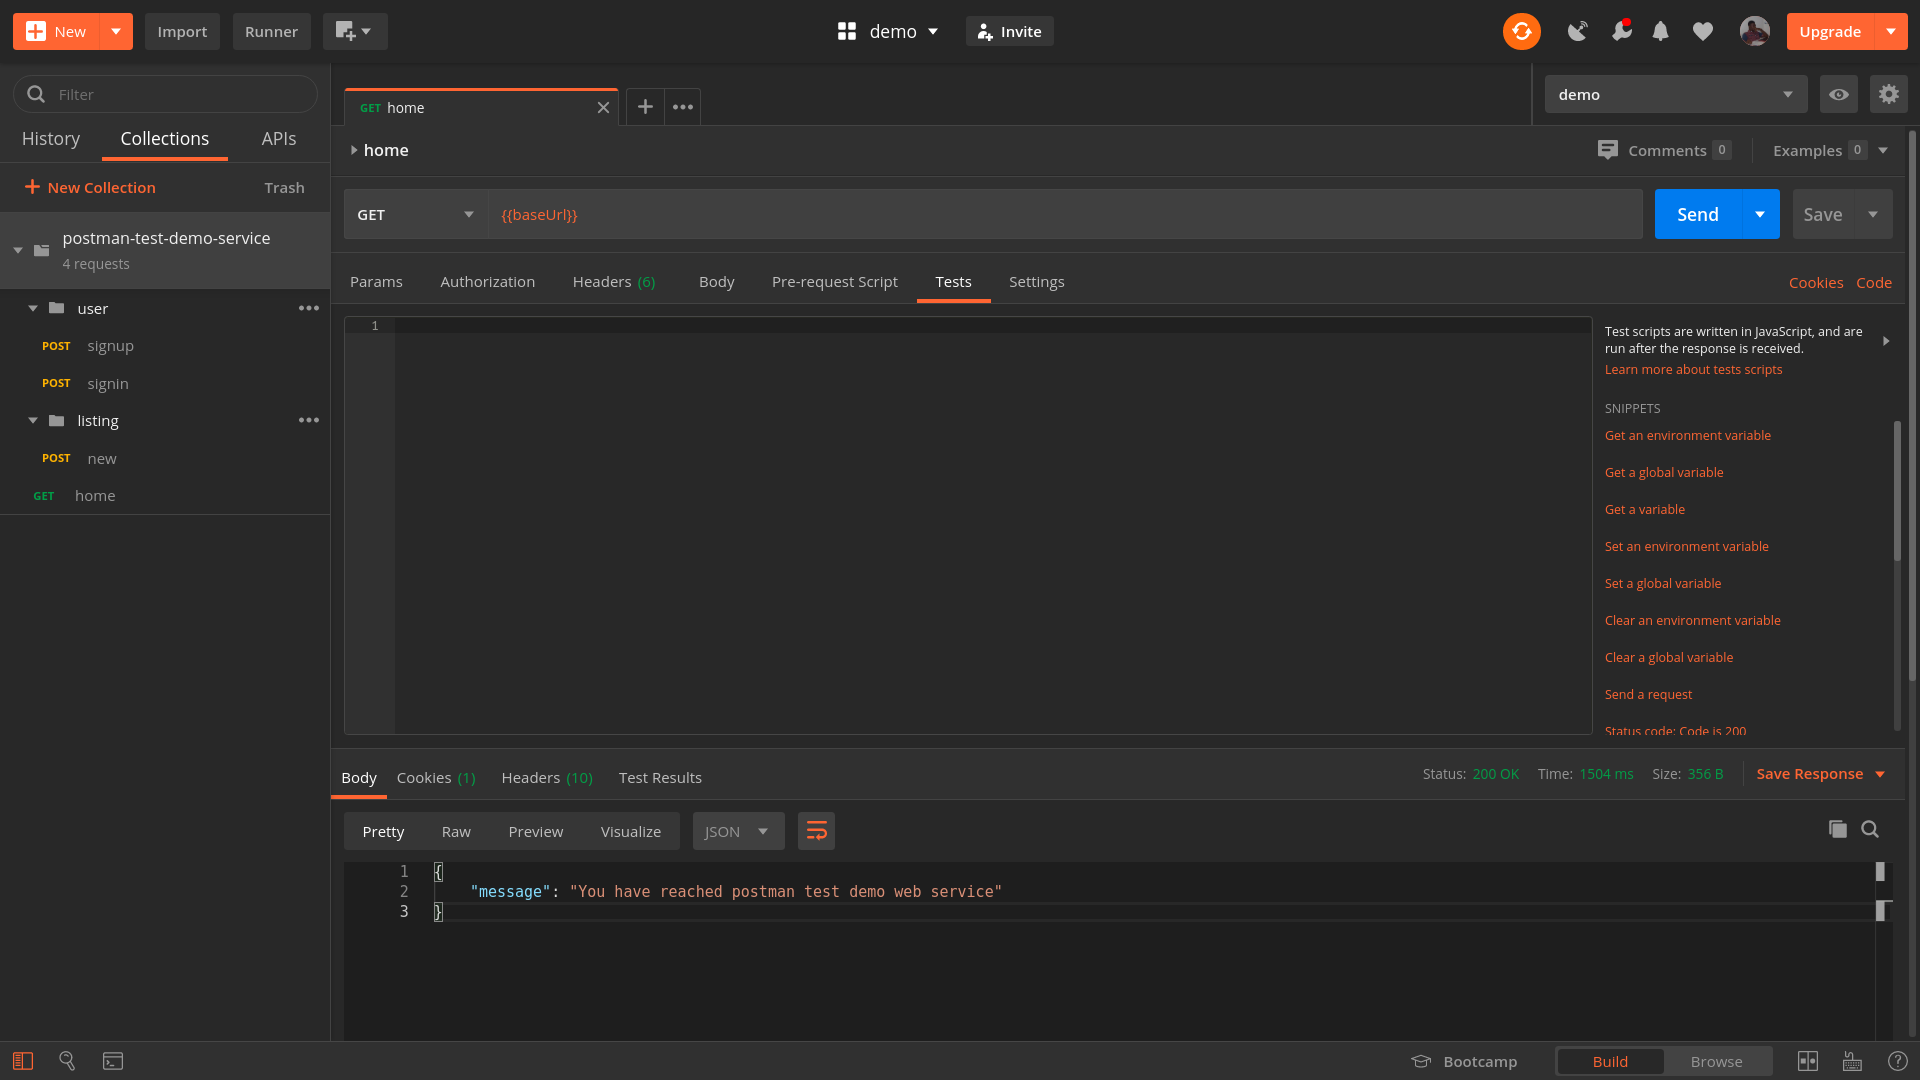
The image below shows the Tests tab opened in Postman:
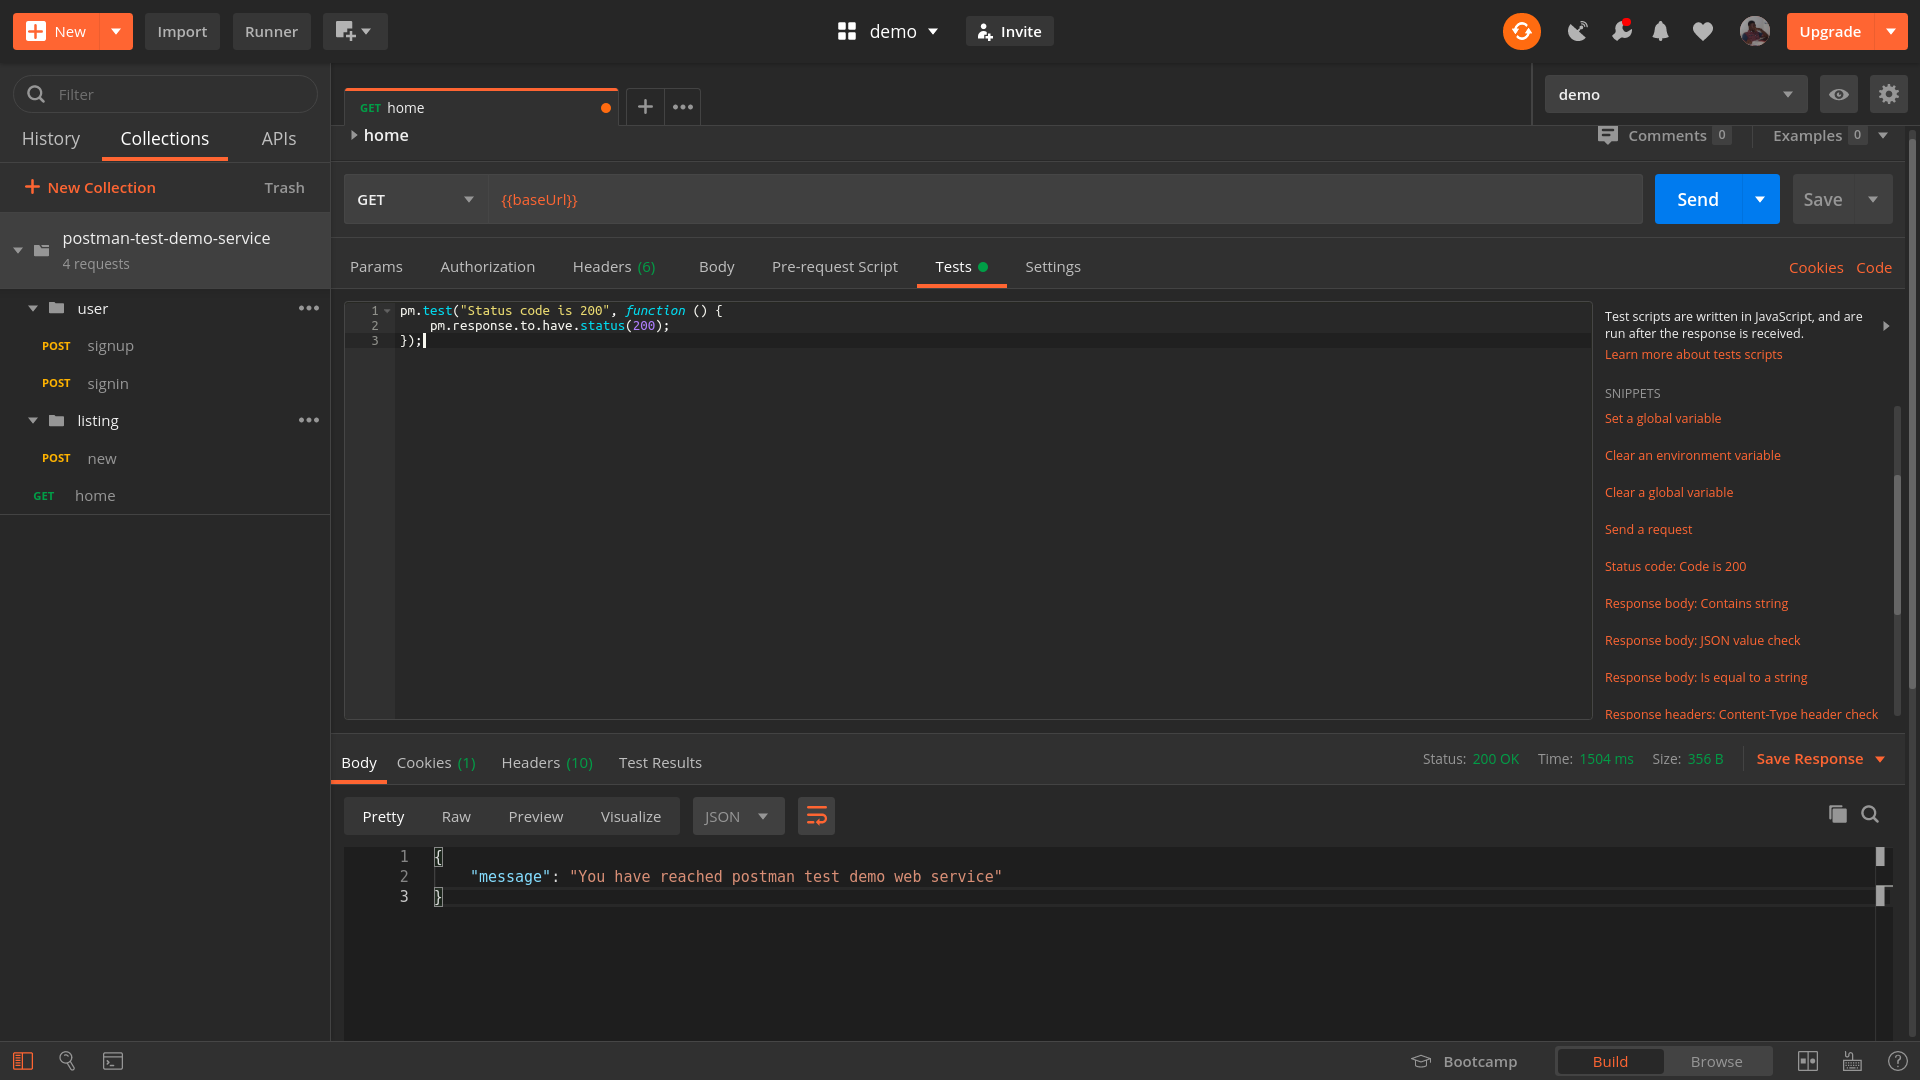
If you look to your right in the already opened request Tests tab, you will notice a list of snippets available to quickly get you started writing tests. Most of the time, these snippets are sufficient for quite a number of test scenarios. So I would select the snippet title Status code: Code is 200. This will generate the code below in the Tests editor:
pm.test("Status code is 200", function () {
    pm.response.to.have.status(200);
});
Here is also how Postman would look like after clicking on that test snippet:
If you’ve written any form of tests in JavaScript using some of the testing frameworks out there like Jest, then the snippet above will seem familiar. But let me explain: All postman test suits or scenario begins with test() function which is exposed in the pm(short for Postman) global object provided by Postman for you. The test method takes two arguments: the first is the test description which in our test suite above reads: Status code is 200, the second argument is a callback function. It’s in this function you make your assertions or verification of the response on the particular request being tested.
You will notice we have a single assertion right now but you can have as many as you want. However, I like keeping assertions in separate tests most of the time.
Our assertion above simply asks Postman if the response return has a status code of 200. You could see how it reads like English. This is intentional in order to allow anyone to write these tests with ease.
Running Our Test
To run our test we will send a request to the endpoint again. Only this time around, when Postman receives the response from that request, it will run your tests. Below is an image showing the passing test in Postman (You can access test result on the Test Results tab of the response section in postman):
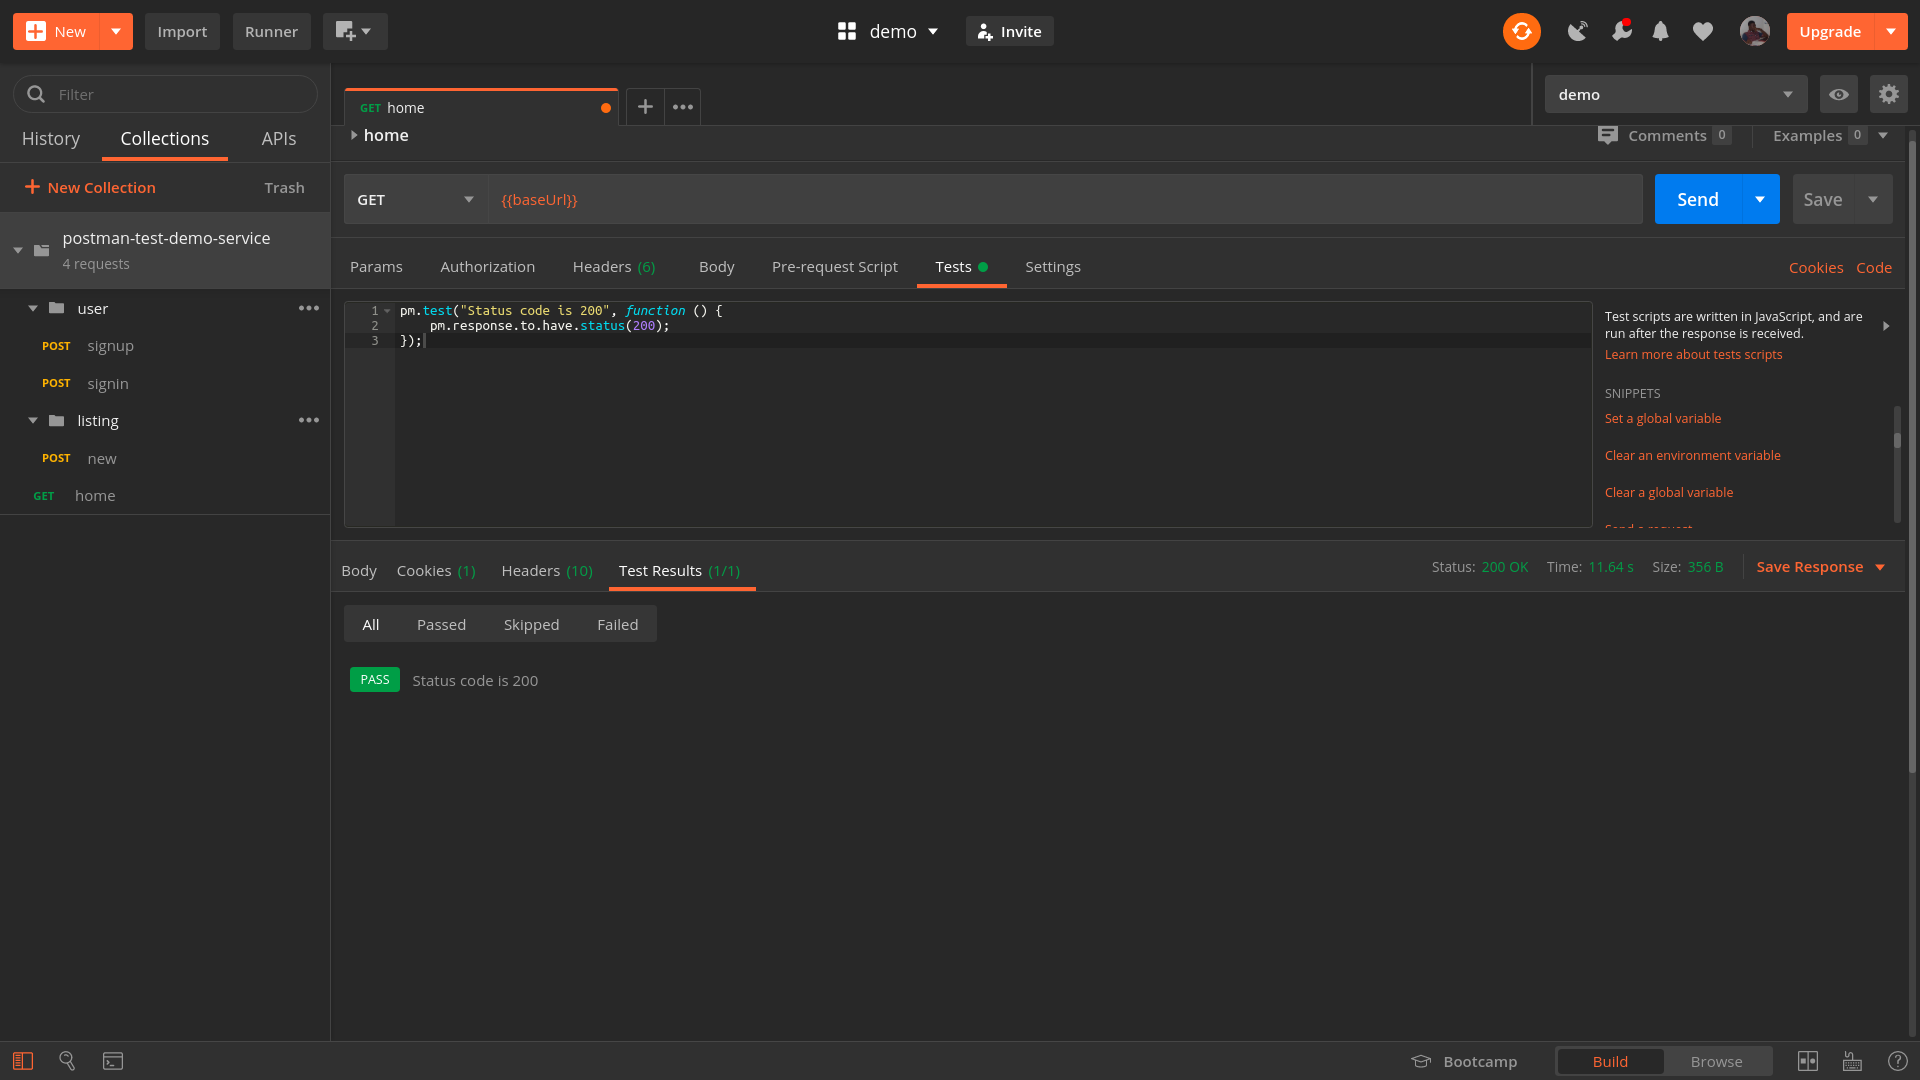
So our test passed! However, it’s crucial that we make our test scenario fail first, and then make it pass; this will help make sure that the scenario you are testing is not affected by any external factor, and that the test passes for the reason you are expecting it to pass — not something else. A good test should be predictable and the end result should be known beforehand.
To make our test pass, I will make a typo in the URL we are currently sending the GET request to. This will lead to a 404 Not Found status code which will make our test fail. Let’s do this. In the address bar currently having the variable of our baseUrl, I will add /a to it (it could be anything random actually). Making the request again and our test will fail like seen below:
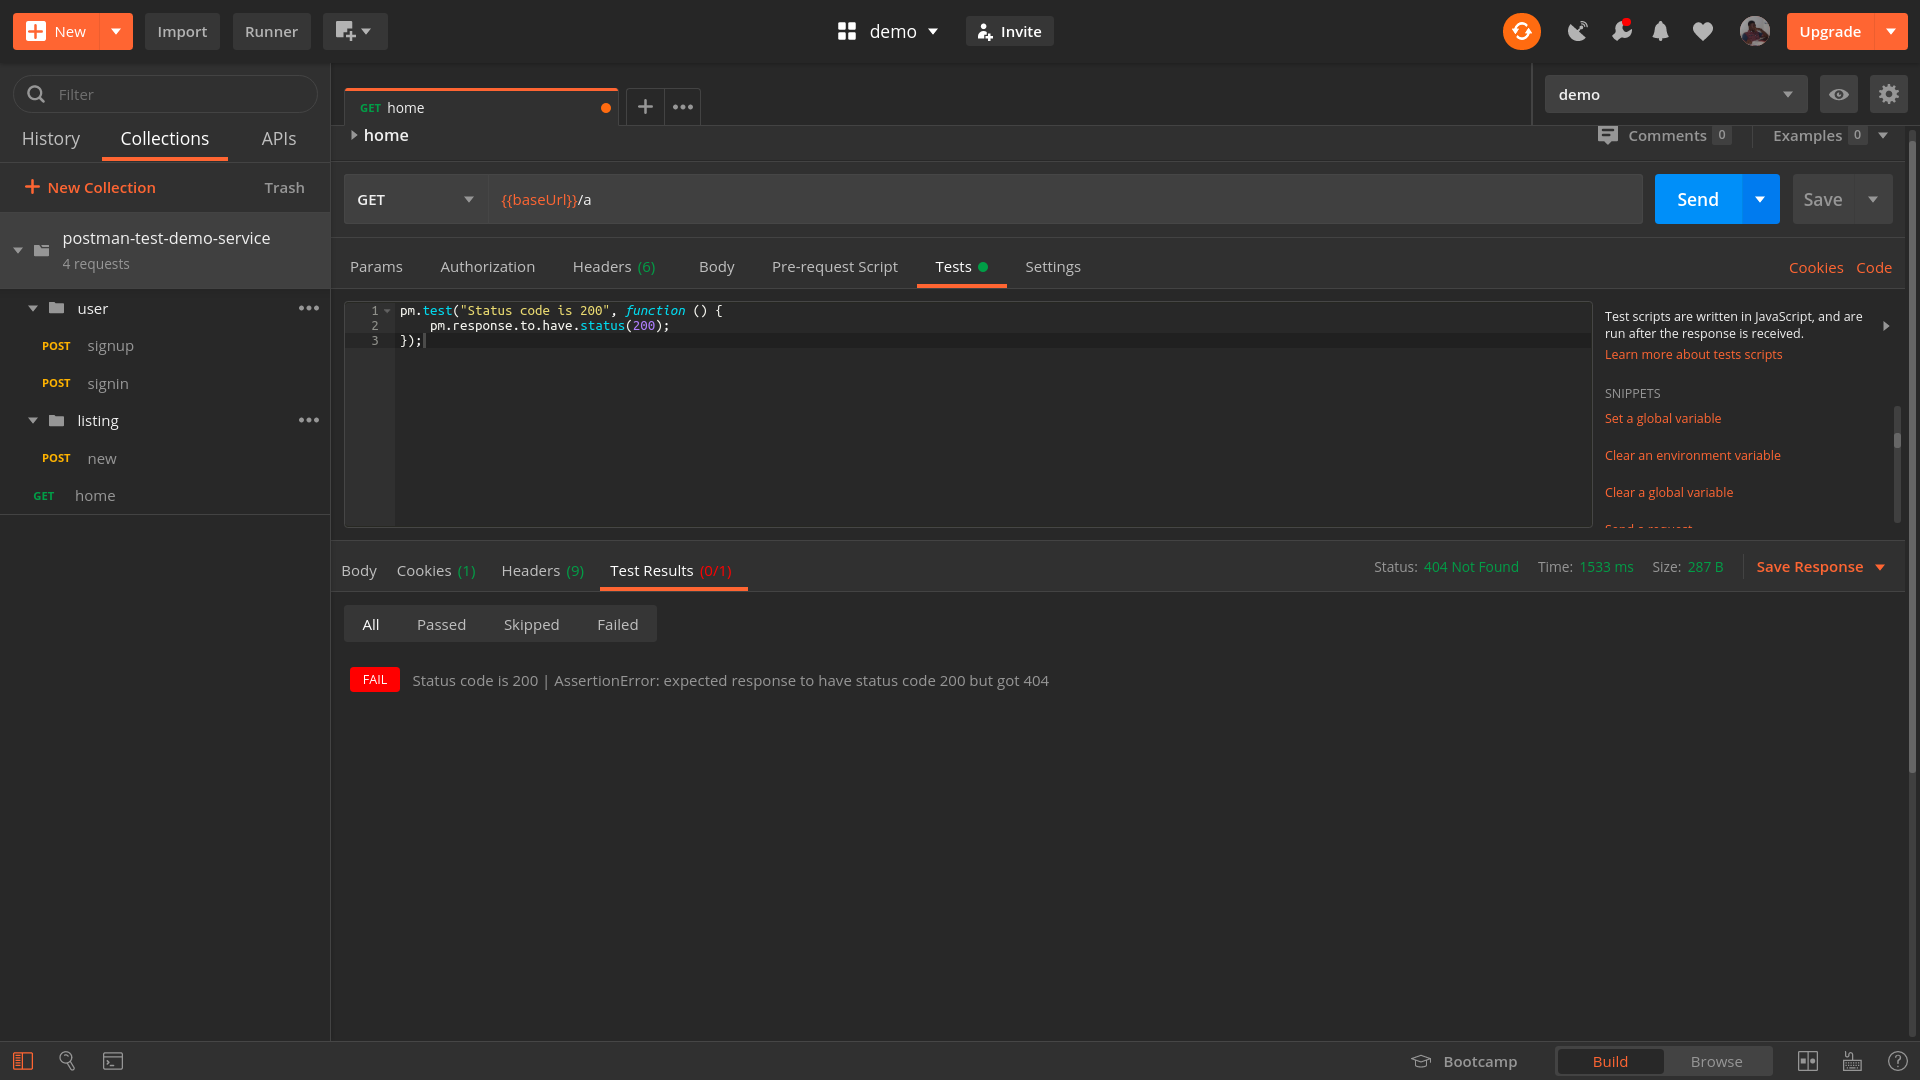
Removing the string /a will make the test pass again.
We have written an automated test for the home route of our demo web service. At the moment we have a test case checking the status of the response. Let’s write another test case checking if the response body contains a message property as we have seen in the response and the value is ‘You have reached postman test demo web service’. Add the below code snippet to the test editor:
pm.test("Contains a message property", function() {
    let jsonData = pm.response.json();
    pm.expect(jsonData.message).to.eql("You have reached postman test demo web service");
})
Your Postman window should look like this:
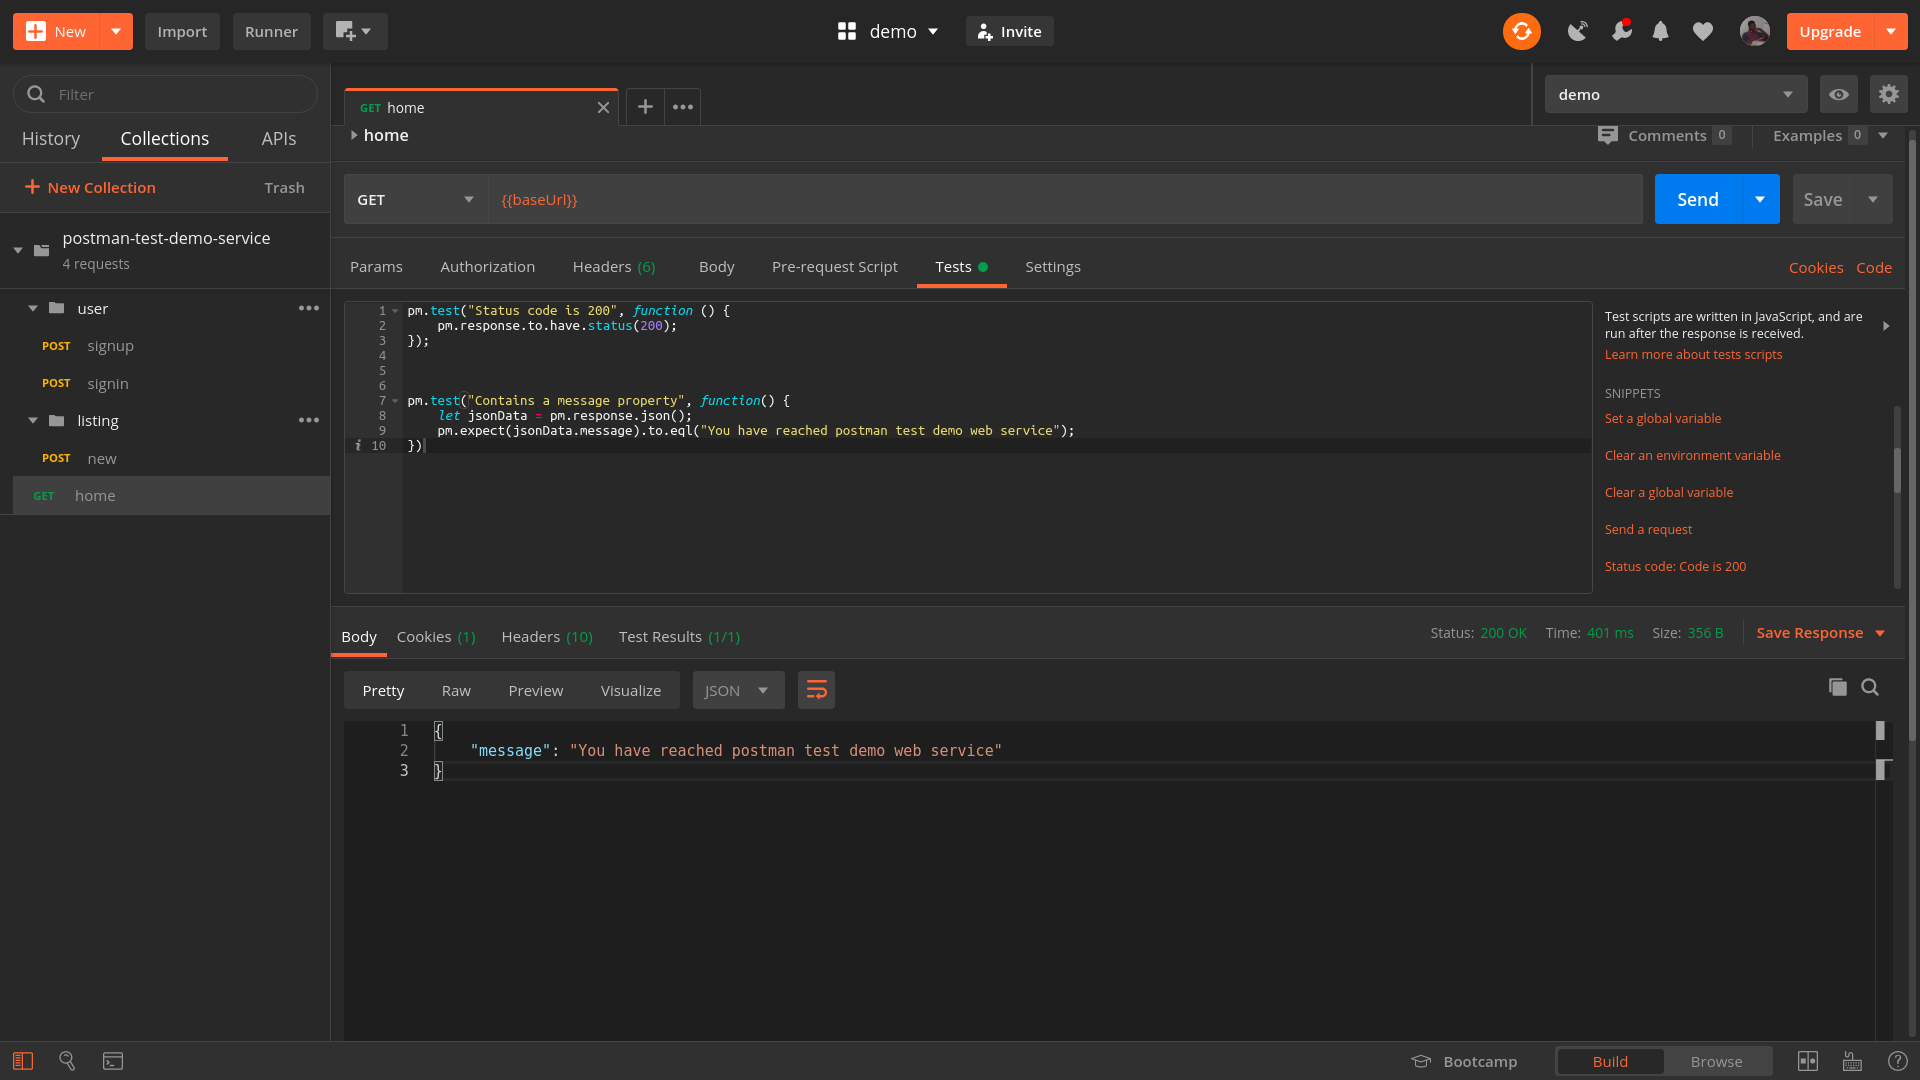
In the snippet above, we are creating a test case and getting the JavaScript object equivalent of the response body of the request which is originally in JSON by calling json() on it. Then we use the expect assertion method to check if the message property has a value of “You have reached postman test demo web service.”
4. Repeat!
I believe from the above first iteration of our 4 steps to writing API tests that you’ve seen the flow. So we would be repeating this flow to test all requests in the demo web service. Next up is the signup request. Let’s test on!
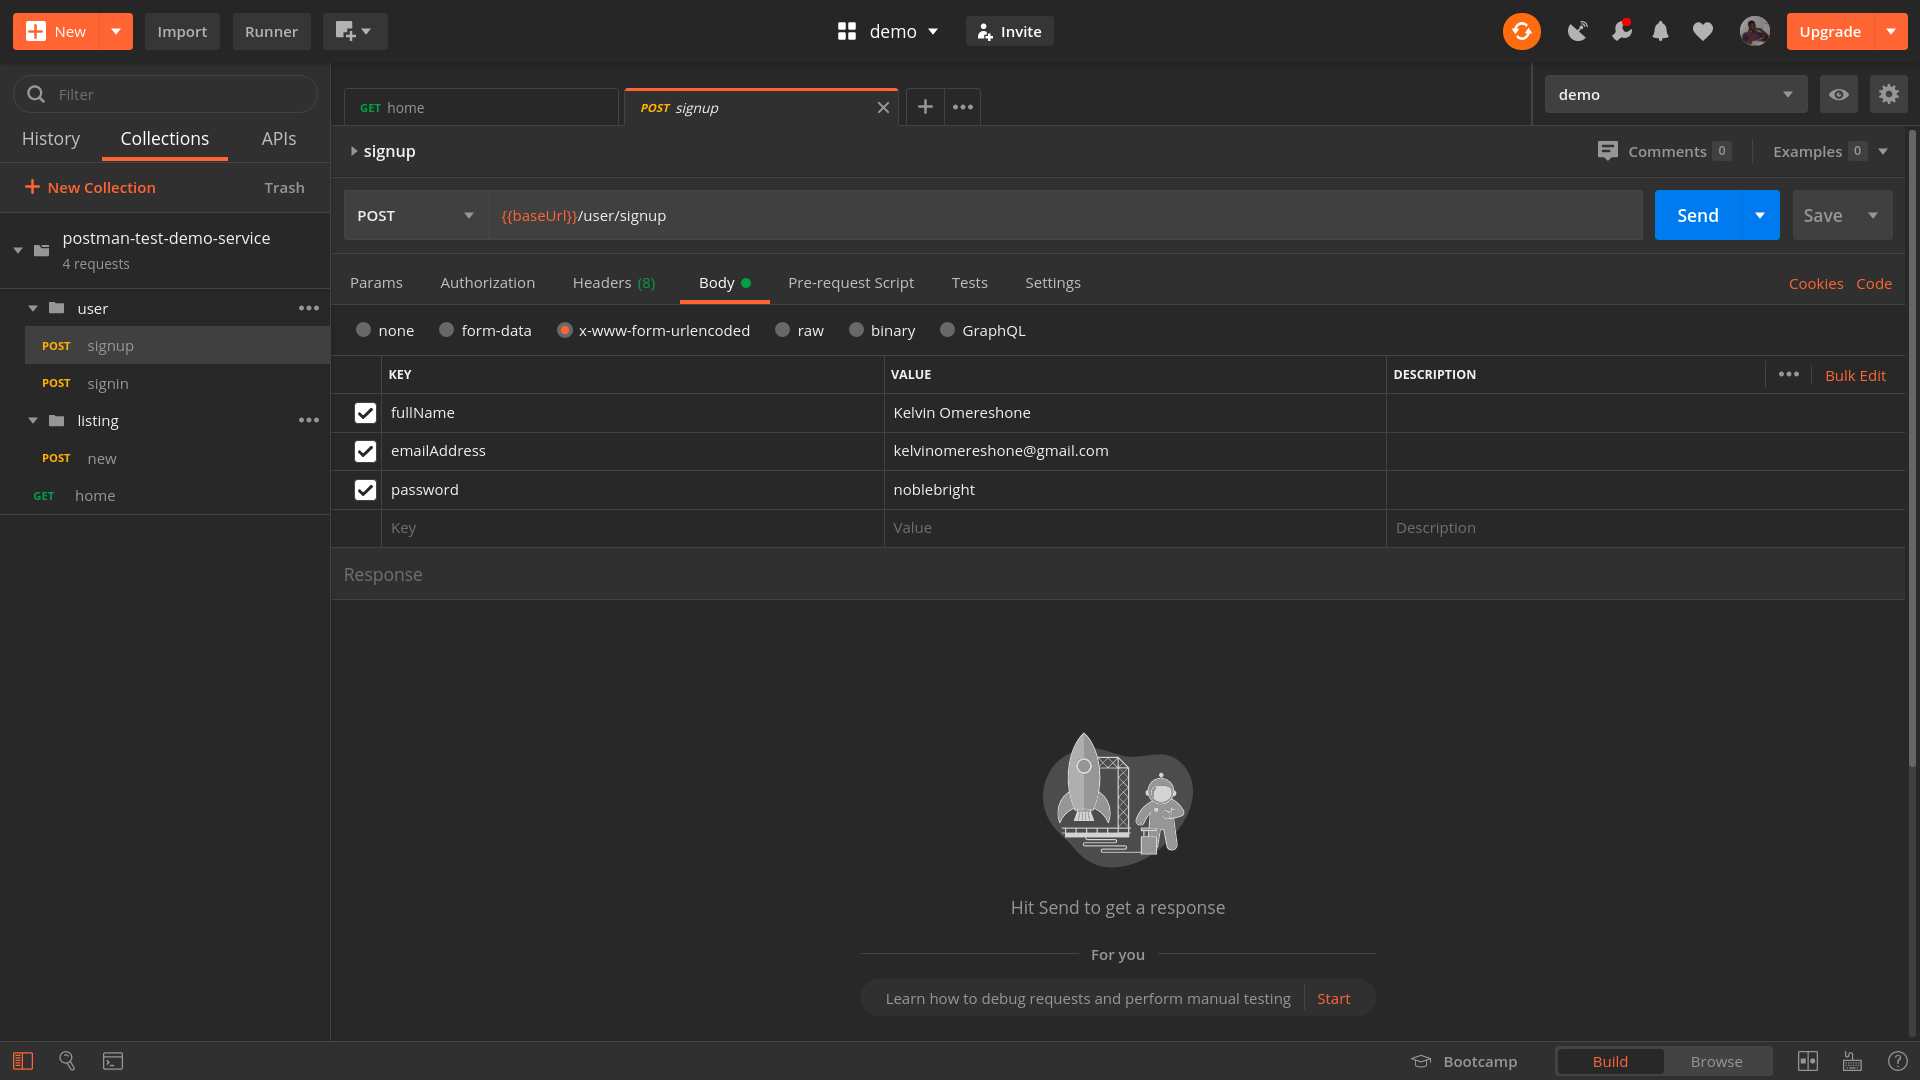
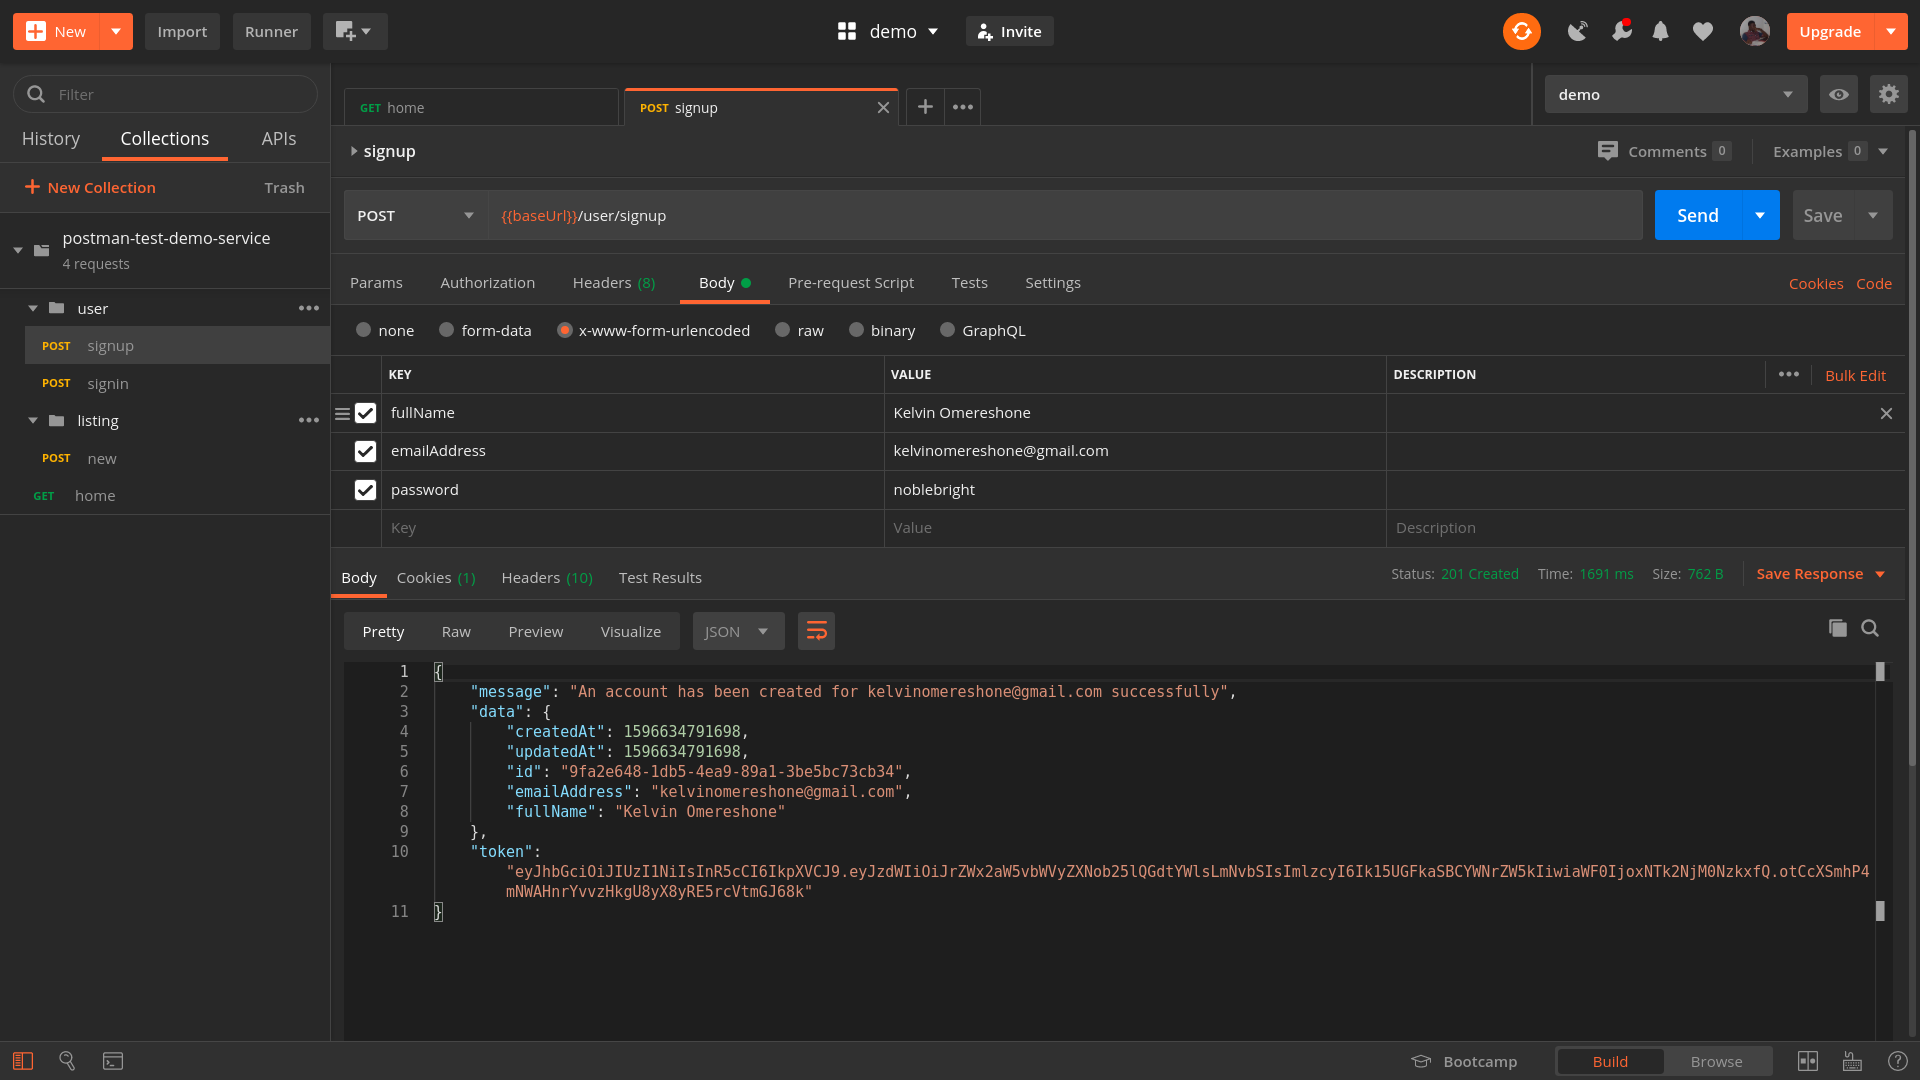
Signup Request
The signup request is a POST request expecting the fullName, emailAddress, and password of a user. In postman, you can add these parameters in many ways however we would opt into x-www-form-urlencoded method in the Body tabs of the request section. The image below gives an example of the parameters:
Here is the response with the above request:
{
    "message": "An account has been created for kelvinomereshone@gmail.com successfully",
    "data": {
        "createdAt": 1596634791698,
        "updatedAt": 1596634791698,
        "id": "9fa2e648-1db5-4ea9-89a1-3be5bc73cb34",
        "emailAddress": "kelvinomereshone@gmail.com",
        "fullName": "Kelvin Omereshone"
    },
    "token": "eyJhbGciOiJIUzI1NiIsInR5cCI6IkpXVCJ9.eyJzdWIiOiJrZWx2aW5vbWVyZXNob25lQGdtYWlsLmNvbSIsImlzcyI6Ik15UGFkaSBCYWNrZW5kIiwiaWF0IjoxNTk2NjM0NzkxfQ.otCcXSmhP4mNWAHnrYvvzHkgU8yX8yRE5rcVtmGJ68k"
}
From the above response body, you will notice a token property is returned with the response body. So we would write a test case to assert if a JSON response body was returned and if it contains the property token. Also, we would check for the status code as well which returns 201 Created. So open the Tests tab and add the following snippets:
pm.test("Status code is 201", function () {
    pm.response.to.have.status(201);
});


pm.test("Response has a JSON body", function () {
    pm.response.to.be.json;
});

pm.test("Response has a token property", function () {
    var jsonData = pm.response.json();
    pm.expect(jsonData.token).to.be.a('string');
});
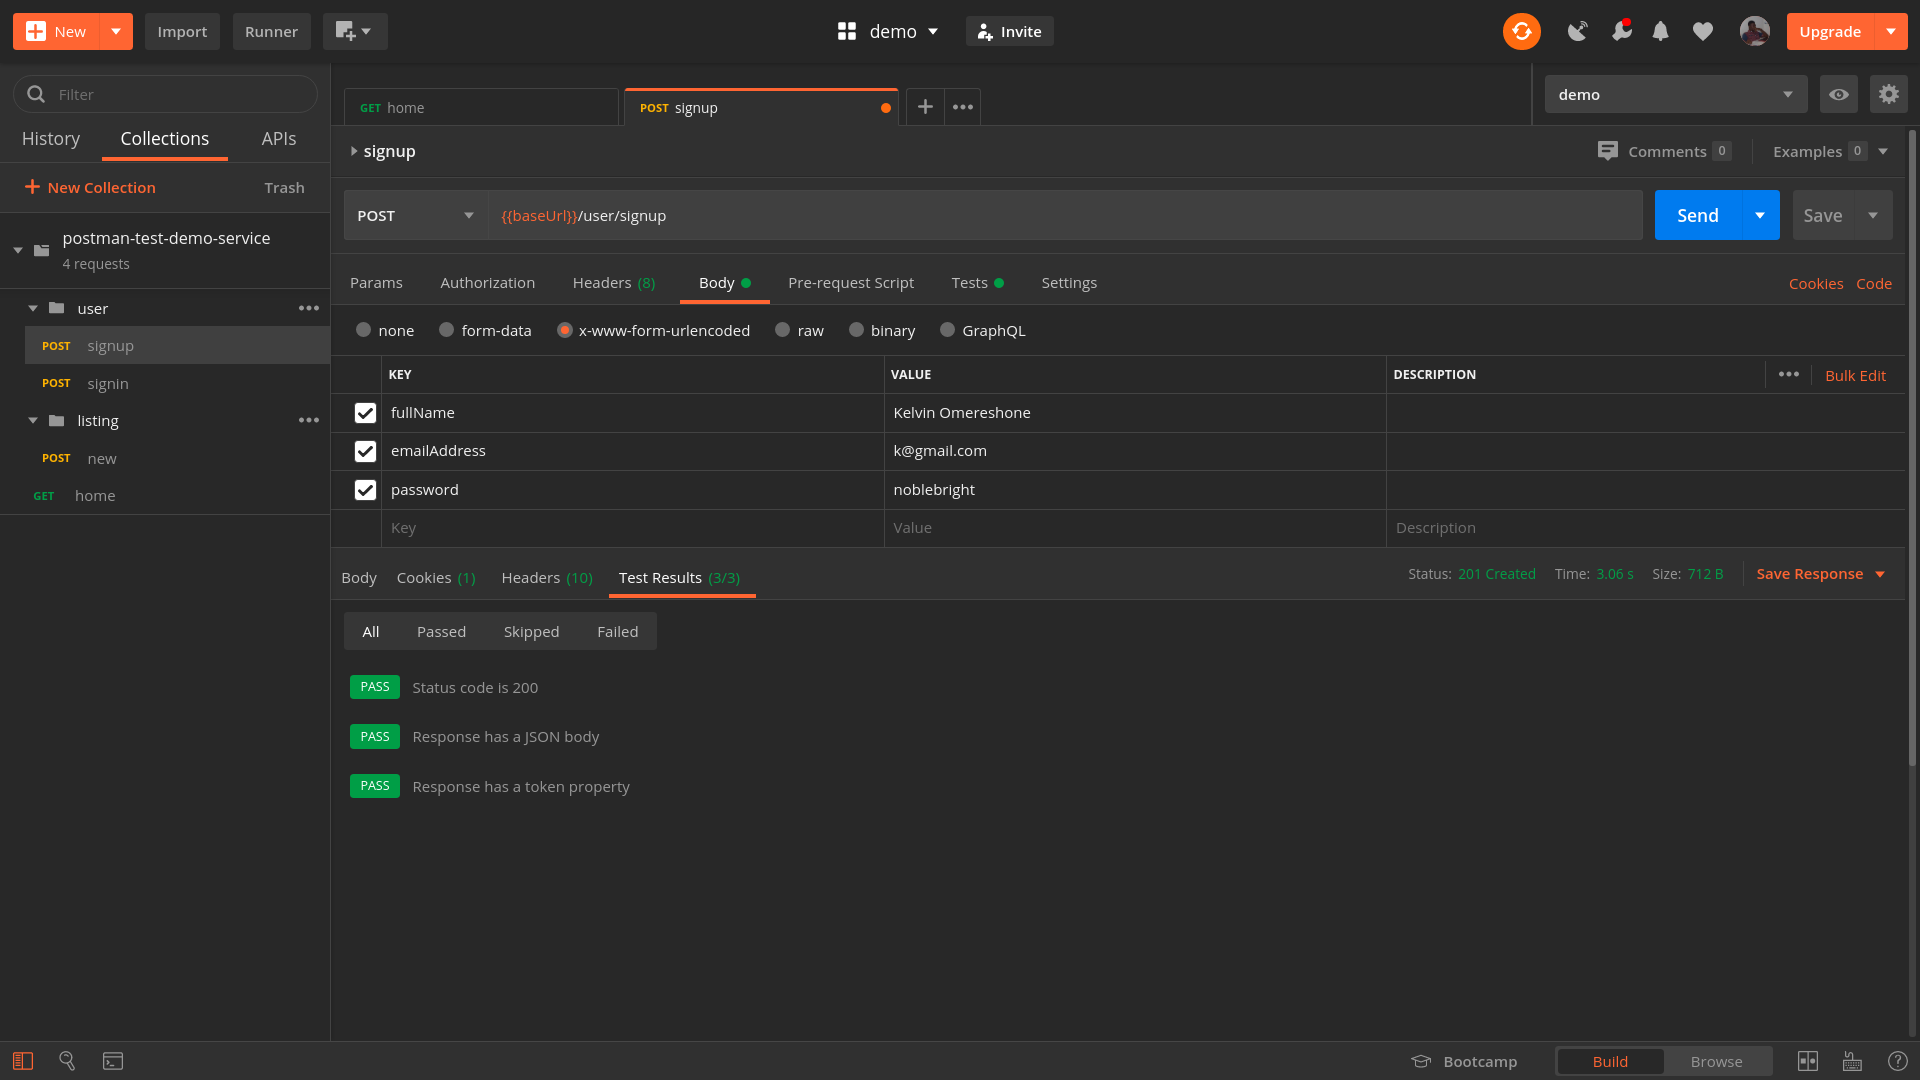
What each test case does should be obvious enough from the test description. From top to bottom, we check if the response is a 201 Created status code, we assert also if the response body is JSON and lastly we assert if the token property has a value of type string. Let’s run our tests.
Note: Make sure you change at least the email address of the new user as the Web service won’t allow for duplicate emails.
Our tests should pass and when you check the Test Results tab of the Response section you should get 3 passing tests as shown below:
Let’s move onward to testing the signin endpoint…
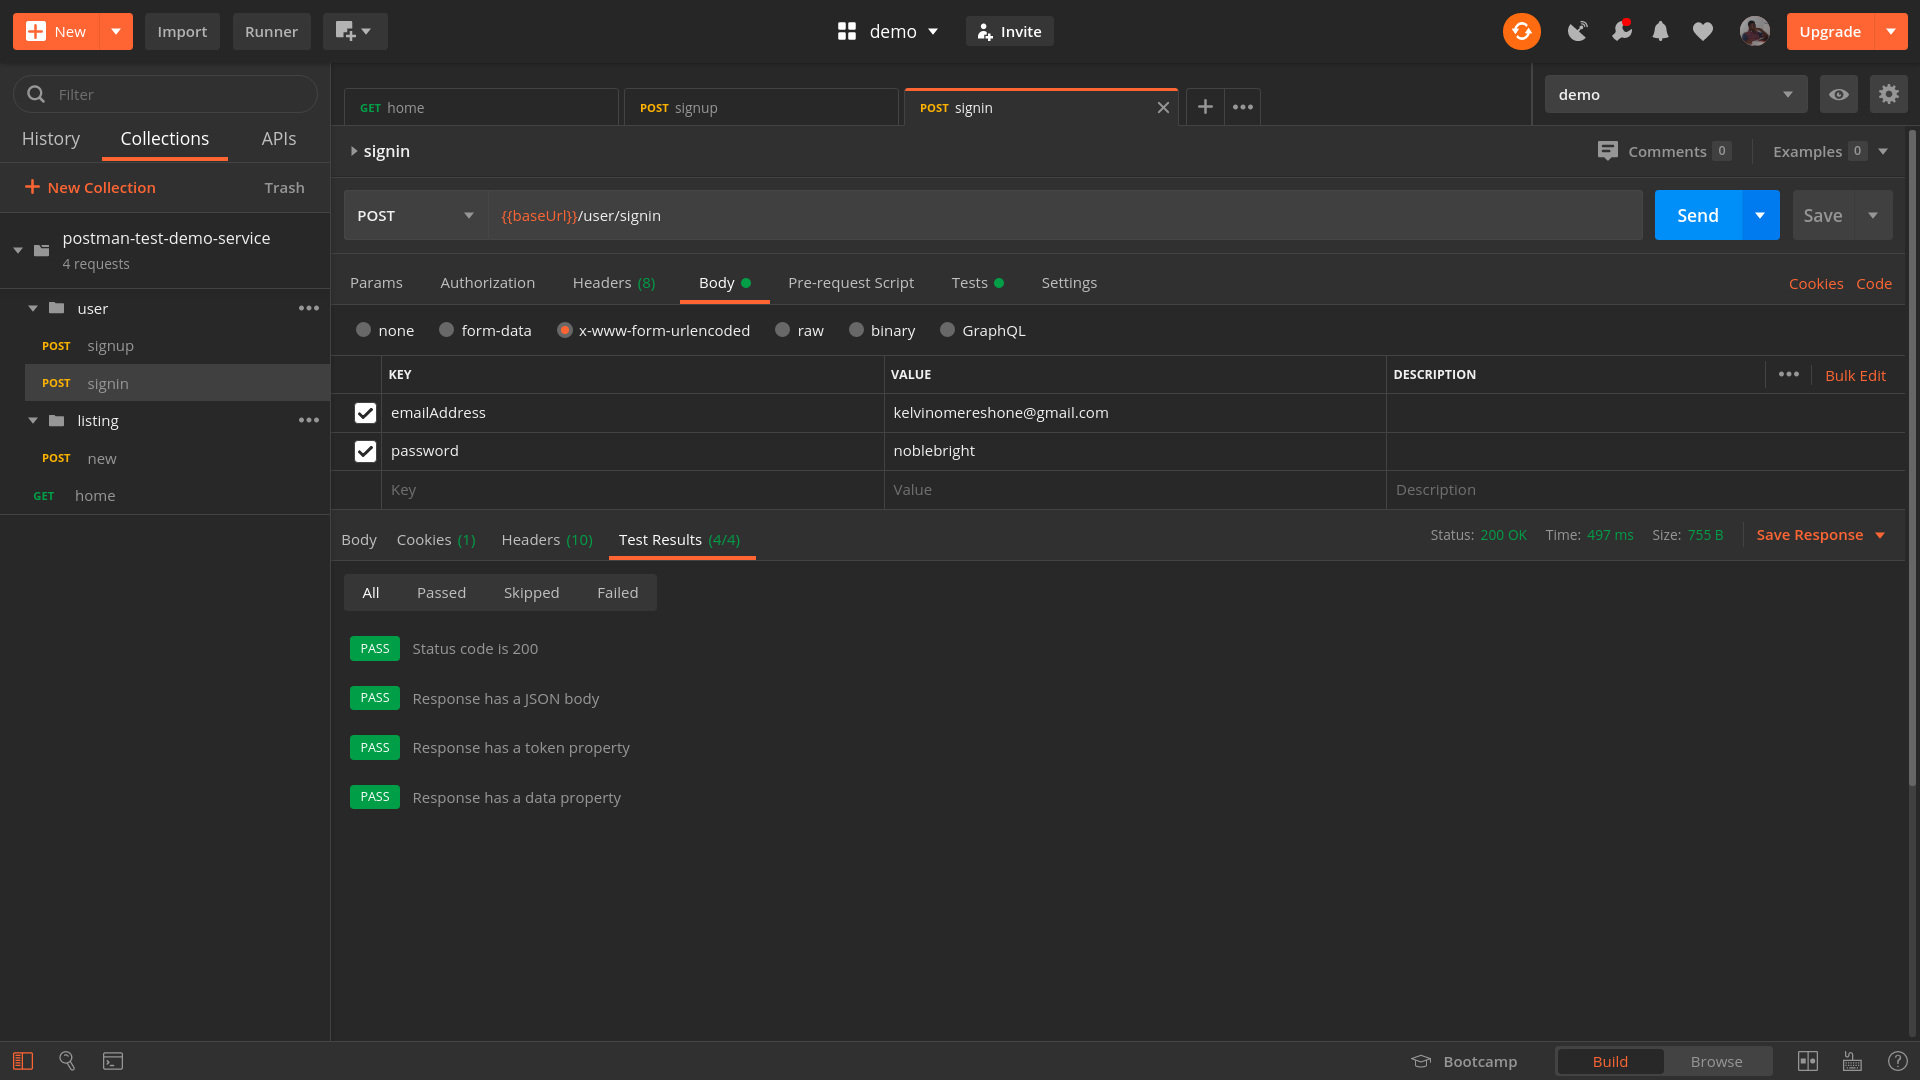
Signin Request
The signin request’s response body is similar to the signup request. You could verify that by hitting the endpoint with user credentials - emailAddress and Password - you signed up already. After you have done that, add the following test cases to the tests editor:
pm.test("Status code is 200", function () {
    pm.response.to.have.status(200);
});

pm.test("Response has a JSON body", function () {
    pm.response.to.be.json;
});

pm.test("Response has a token property", function () {
    var jsonData = pm.response.json();
    pm.expect(jsonData.token).to.be.a('string');
});

pm.test("Response has a data property", function () {
    var jsonData = pm.response.json();
    pm.expect(jsonData.data).to.be.a('object');
});
Make the request to signin with a valid user credential and your test should pass and Postman should look like so:
Finally, we would be testing the listing/new endpoint of our demo API.
Listing/New Request
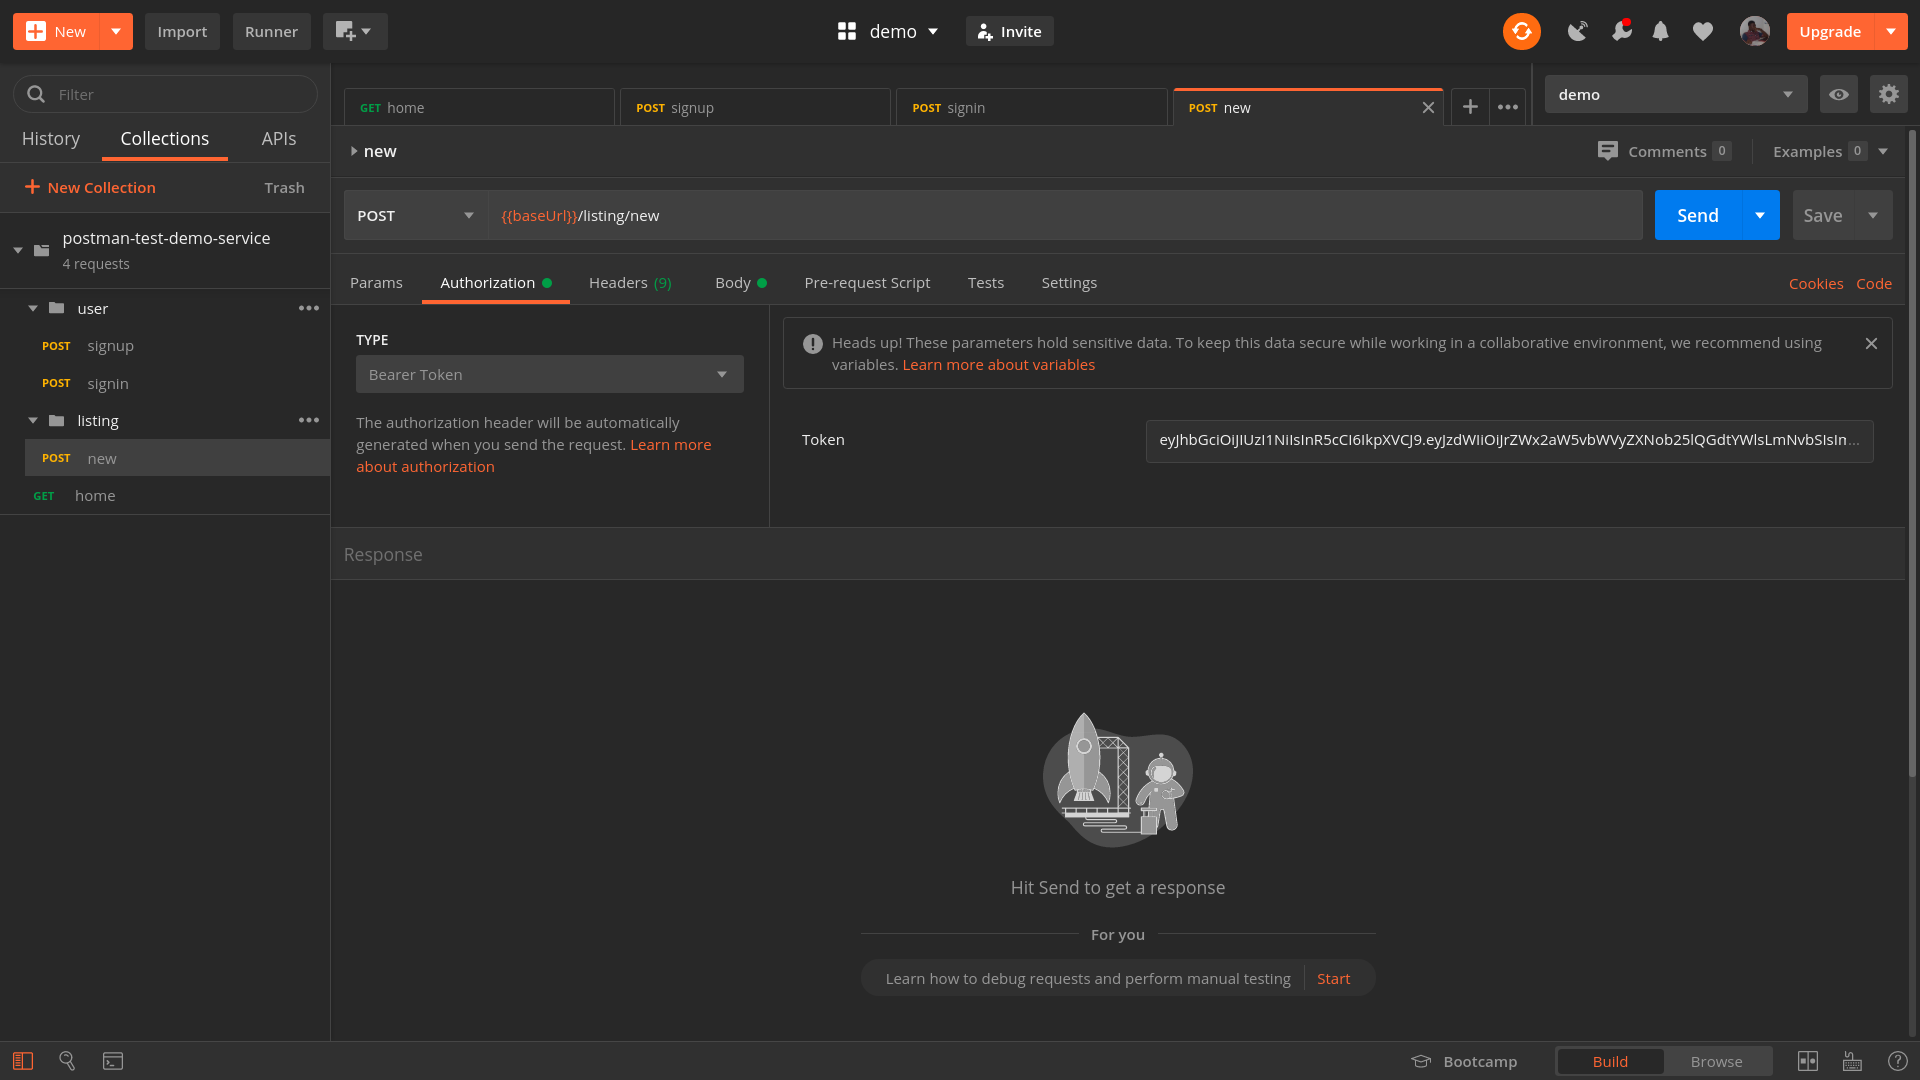
This test would be a little different. According to the requirement of our fictitious API, only logged in users can create listings. So we would need a way to authenticate the request.
Recall when signing in a JWT token was returned we can use that token as the authorization header for the create listing request.
To do this in postman, simply copy the token you got from signing in and go over to the Authorization tab of the Request section in Postman and select the type to be Bearer Token from the Type dropdown. You can then paste the token in the box to your right labeled Token. So the new request Authorization tab should look like this:
You can then go on and add the parameters in the Body tab of the request. You will notice the fields name are already there with sample values which you can choose to edit or not. Let’s make a request first before writing our test. A successful response will look like so:
{
    "message": "New listing created successfully",
    "data": {
        "createdAt": 1596637153470,
        "updatedAt": 1596637153470,
        "id": "41d922ce-7326-43eb-93c8-31658c59e45d",
        "name": "Glorious Lounge",
        "type": "Hotel",
        "address": "No 1. Something street",
        "rent": "$100k per year",
        "lister": "9fa2e648-1db5-4ea9-89a1-3be5bc73cb34"
    }
}
We can see we get a JSON response body back. We can test for that and also make sure data is not empty. Add the following test case to the Test tab:
pm.test("Status code is 200", function () {
pm.response.to.have.status(200);
});
pm.test("Response has a JSON body", function () {
pm.response.to.be.json;
});
pm.test("Response has a message property", function () {
var jsonData = pm.response.json();
pm.expect(jsonData.message).to.be.a('string');
});
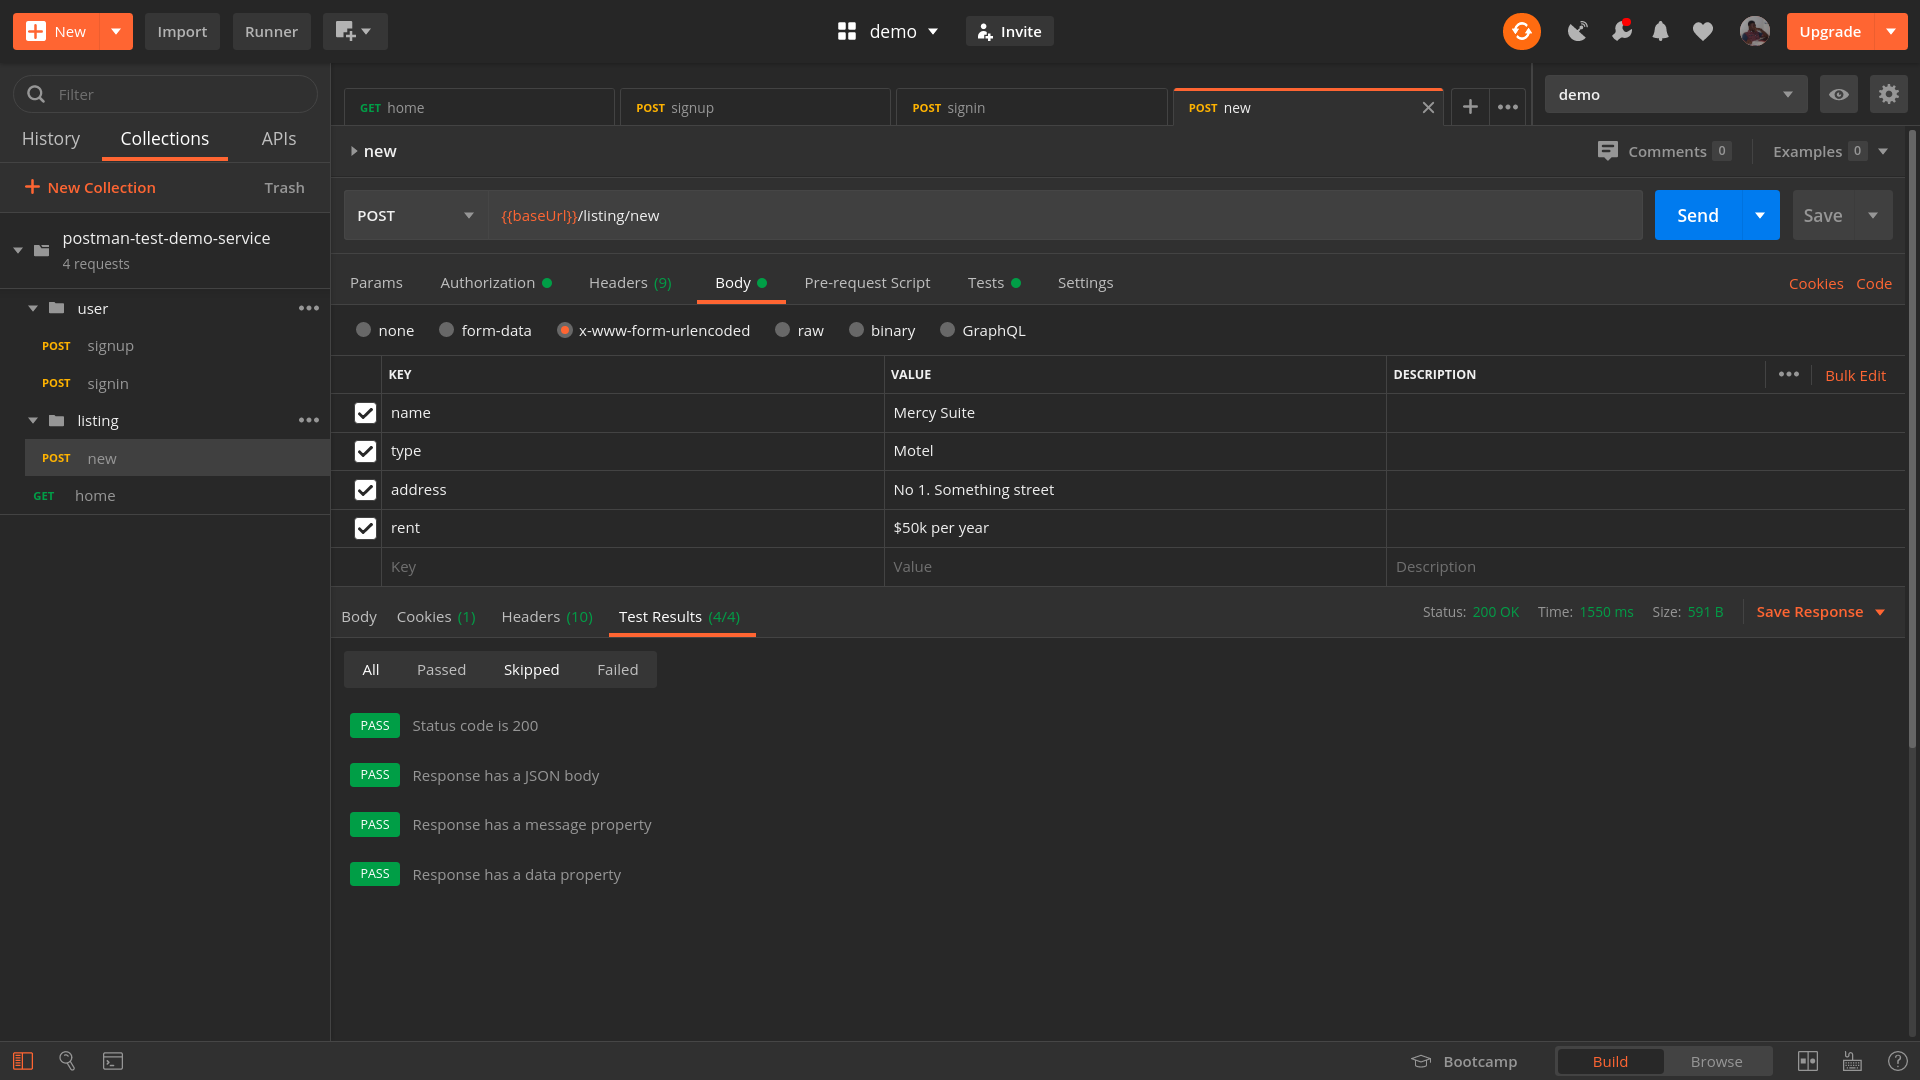
pm.test("Response has a data property", function () {
var jsonData = pm.response.json();
pm.expect(jsonData.data).to.be.a('object');
});With that added, make another request and the tests should all pass as shown below:
Conclusion
This article aims at showing you how to utilize Postman to write automated tests for your APIs which will allow you to bridge the gap between development and quality assurance, and also minimize the surface area of bugs in your API.
Additional Resources
- Automated Testing With Postman (Official Postman website)
- “Snapshot Testing For APIs Using Postman,” Prashant Agrawal, Medium
- “From Manual To Automated Testing: The Roadblocks And The Journey,” Kaustav Das Modak, Medium


