Deploying a Cloud Spanner-based Node.js application
Stefan Serban
Software Engineering Manager
Cloud Spanner is Google’s fully managed, horizontally scalable relational database service. Customers in financial services, gaming, retail and many other industries trust it to run their most demanding workloads, where consistency and availability at scale are critical. In this blog post, we illustrate how to build and deploy a Node.js application on Cloud Spanner using a sample stock chart visualization tool called OmegaTrade. This application stores the stock prices in Cloud Spanner and renders visualizations using Google Charts. You will learn how to set up a Cloud Spanner instance and how to deploy a Node.js application to Cloud Run, along with a few important Cloud Spanner concepts.
We begin by describing the steps to deploy the application on Cloud Run, and end with a discussion of best practices around tuning sessions, connection pooling & timeouts for applications using Cloud Spanner in general, which were adopted in OmegaTrade as well.
Deployment steps
We’re going to deploy the application completely serverless - with the frontend and backend services deployed on Cloud Run and Cloud Spanner as the data store. We chose Cloud Run because it abstracts away infrastructure management and scales up or down automatically almost instantaneously depending on traffic.
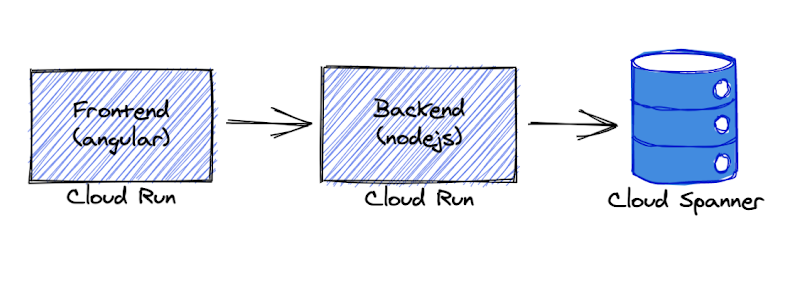
The backend service uses the Node.js Express framework and connects to Cloud Spanner with default connection pooling, session, and timeout capabilities.
As prerequisites, please ensure that you have:
Access to a new or existing GCP project with one of the sets of permissions below:
Owner
Editor + Cloud Run Admin + Storage Admin
Cloud Run Admin + Service Usage Admin + Cloud Spanner Admin + Storage Admin
Enabled billing on the above GCP project
Installed and initialized the Google Cloud SDK
Installed and configured Docker on your machine
Git installed and set up on your machine
Note - Please ensure that your permissions are not restricted by any organizational policies, or you may run into an issue at the Deployment stage later on.
Let’s begin!
First, let's set up our gcloud configuration as default and set a GCP project to this configuration. gcloud is the command-line interface for GCP services.
Output:
Choose your Google account with access to the required GCP project and enter the Project ID when prompted.
Next, we need to ensure the default gcloud configuration is set correctly. Below we are enabling authentication, unsetting any API endpoint URL set previously, and setting the GCP project we intend to use in the default gcloud configuration.
Now let’s enable Google Cloud APIs for Cloud Spanner, Container Registry, and Cloud Run.
Provision Cloud Spanner: Instance, database & tables
Let’s create a Spanner instance and a database using gcloud commands.
We will also create 4 tables that are required by the OmegaTrade application:
- Users
- Companies
- CompanyStocks (tracks the stock values)
- Simulations (tracks the state of each simulation)
Verify if these tables were successfully created by querying INFORMATION_SCHEMA in the Cloud Spanner instance. The INFORMATION_SCHEMA, as defined in the SQL spec, is the standard way to query metdata about database objects.
Now that the Cloud Spanner instance, database, and tables are created from the above step, let’s build and deploy OmegaTrade.
Deploy app backend to Cloud Run
We will now walk through the steps to deploy the omegatrade/frontend and omegatrade/backend services to Cloud Run. We will first deploy the backend and then use the backend service URL to deploy the frontend.
First, we’ll clone the repository:
Let’s edit some env variables we need for the app to work. Add your project ID in the placeholder [Your-Project-ID].
Now, let’s build the image from the dockerfile and push it to GCR. As above, we will need to change the command to reflect our GCP project ID.
Note - In case you face issues with authentication, follow the steps mentioned in the Google Cloud documentation suggested at runtime, and retry the below commands.
Next, let's deploy the backend to Cloud Run. We will create a Cloud Run service and deploy the image we have built with some environment variables for Cloud Spanner configuration. This may take a few minutes.
Now we have OmegaTrade backend up and running. The Service URL for the backend is printed to the console. Note down this URL as we will use it to build the frontend.
Import sample stock data to the database
To import sample company and stock data, run the below command in the backend folder.The above command will migrate sample data into the connected database.
Once this is successful, you will get a `Data Loaded successfully` message.
Note: You may run this migration only on an empty database, to avoid duplication.
Now, let’s deploy the frontend.
Deploy the app frontend to Cloud Run
Before we build the front-end service, we need to update the following file from the repo with the back-end URL from the back-end deployment step, i.e. the Service URL.
Note - If you’d like to enable Sign In With Google for the application, now would be a good time to set up OAuth. To do so, please follow the steps in part 6 of the readme.
Change the base URL to the Service URL (append the /api/v1/ as it is). If you enabled OAuth, make sure the clientId matches the value that you got from the OAuth console flow.
If you skipped creating any OAuth credentials, set clientId to an empty string. All other fields remain the same.
Go back to the frontend folder. Build frontend service and push the image to GCR. This process may take a few minutes.
Now, Let’s deploy the frontend to Cloud Run
Now, we have the front end deployed. You can go to this Service URL in your browser to access the application.
Optionally, we can add the frontend URL in the OAuth web application, to enable sign-in using a Google account.
Under OAuth 2.0 Client IDs, open the application you have created (OmegaTrade-Test). Add the frontend URL under Authorised JavaScript origins and save.
Note - Please ensure that cookies are enabled in your browser to avoid being blocked from running the app.
A few screenshots
Congratulations! If you’ve been following along, the app should now be up and running in Cloud Run. You should be able to go to the frontend URL and play around with the application! Try adding your favorite company tickers and generating simulations. All data writes and reads are being taken care of by Cloud Spanner.
Here are a few screenshots from the app:
1. Login and Registration View: The user can register and authenticate using a Google account (via OAuth, if you enabled it) or using an email address. On successful login, the user is redirected to the Dashboard.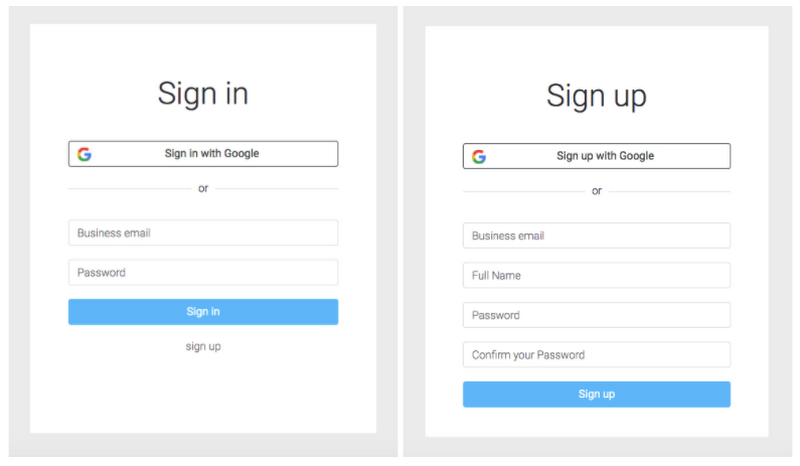
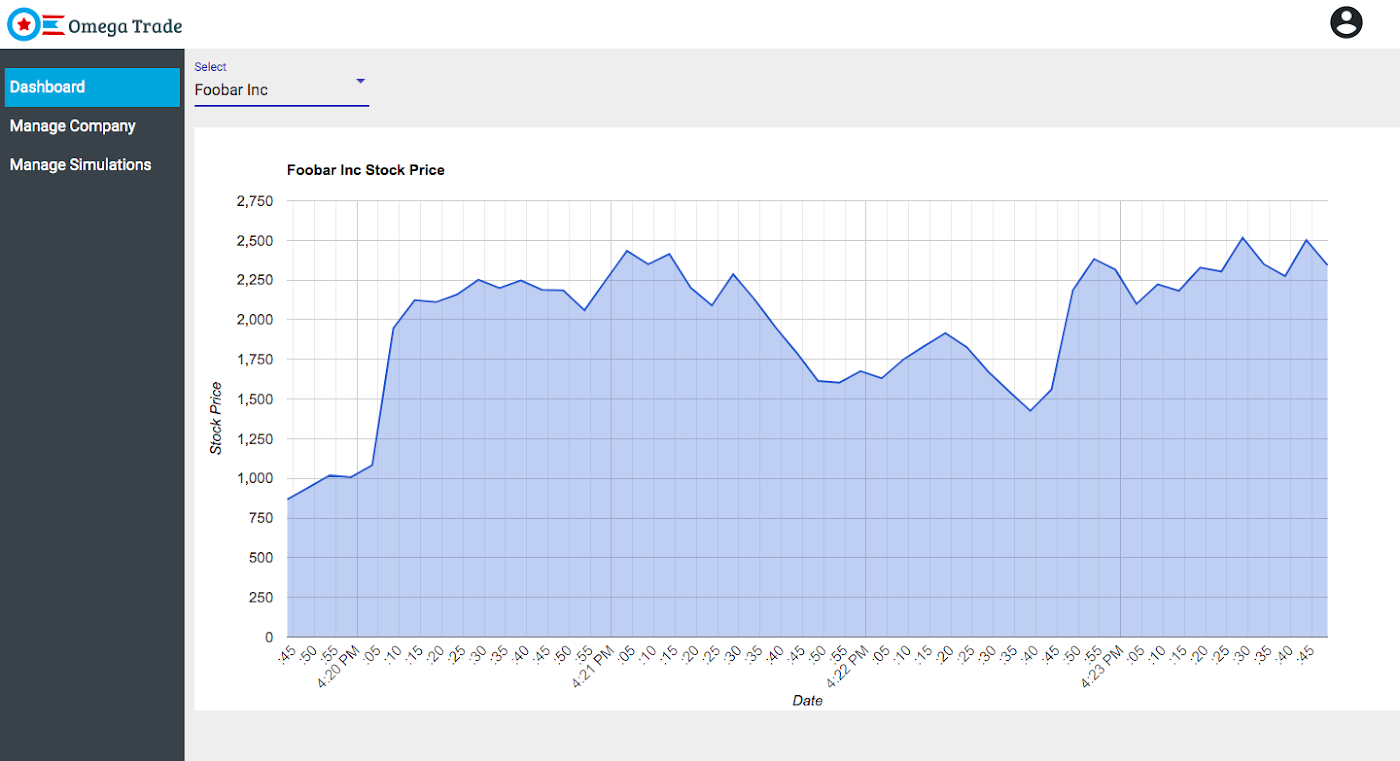
2. Dashboard View: The app is pre-configured with simulated stock values for a few fictitious sample companies. The dashboard view renders the simulated stock prices in a graph.
3. Manage Company View: Users can also add a new company and its ticker symbol using this view.
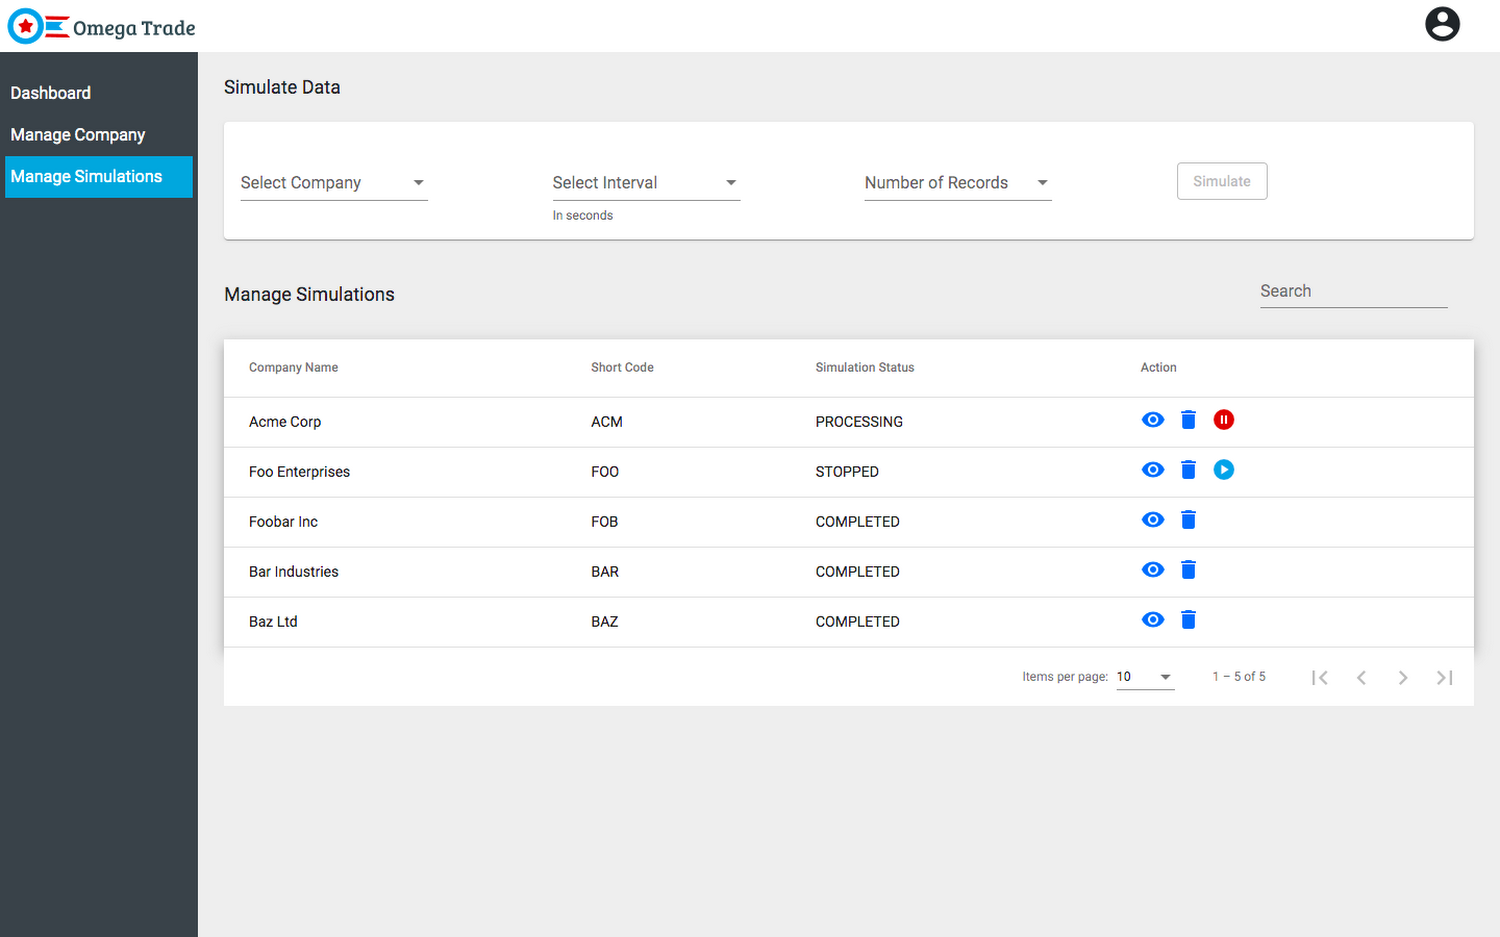
4. Simulate Data View: This view allows the user to simulate data for any existing or newly added company. The backend service simulates data based on a couple of parameters: the interval chosen and the number of rows. The user can also pause, resume and delete the running simulations.
Now that we’ve got the application deployed, let’s cover a few important Spanner concepts that you’re likely to come across, both as you explore the application’s code, and in your own applications.
Sessions
A Session represents a communication channel with the Cloud Spanner database service. It is used to perform transactions that read, write, or modify data in a Cloud Spanner database. A session is associated with a single database.
Best Practice - It is very unlikely you will need to interact with sessions directly. Sessions are created and maintained by client libraries internally and they are optimized by these libraries for best performance.
Connection (session) pooling
In Cloud Spanner, a long-lived "connection"/"communication channel" with the database is modeled by a "session" and not aDatabaseClient object. The DatabaseClient object implements connection (session) pooling internally in a SessionPool object which can be configured via SessionPoolOptions.The default Session Pool options are
Best Practice - It is recommended to use the default session pool options as it is already configured for maximum performance.
NOTE - You can set min = max if you want the pool to be its maximum size by default. This helps to avoid the case where your application has already used up min sessions and then it blocks waiting for the next block of sessions to be created.
Timeouts and retries
Best Practice - It is recommended to use the default timeout and retry configurations [1] [2] [3] because setting more aggressive timeouts and retries could cause the backend to start throttling your requests.
In the following example, a custom timeout of 60 seconds is set explicitly (see the totalTimeoutMillis setting) for the given operation. If the operation takes longer than this timeout, a DEADLINE_EXCEEDED error is returned.
Conclusion
Congratulations! If you’ve been following along, you should now have a functional OAuth-enabled Node.js application based on Spanner deployed to Cloud Run. In addition, you should have a better understanding of the various parameters related to sessions, connection pooling, timeouts, and retries that Cloud Spanner exposes. Feel free to play with the application and explore the codebase at your leisure.
To learn more about the building blocks for implementing Node.js applications on Cloud Spanner, visit