
If you remember from the Marvel Avengers movies, one of the most critical and universe-defining events is “the blip” or “the snap.” This article will show you how to build a simple web app using Node.js that shows all the Marvel characters and their “blip” status, giving us the ability to update each character’s blip state on the database by clicking a button.
We use Express.js as our framework and Pug for page templates and seed the database with character data from the official Marvel API while referencing our list of blipped and non-blipped characters to add a flag to the data. And, of course, CockroachDB Serverless is our database. Finally, we deploy our app to Heroku.

Setting Up the App
Before we get to coding, we need to get access to set up CockroachDB Serverless and our project and access the Marvel API.
Creating a CockroachDB Serverless Cluster
- If you haven’t already, sign up for a CockroachDB Cloud account.
- Log in to your CockroachDB Cloud account.
- On the Clusters page, click Create Cluster.
- On the Create your cluster page, select Serverless. Unless you change your monthly budget, this cluster will be free.
- Click Create cluster. Your cluster will be created in a few seconds and the Connection info dialog will display.
- Follow the instructions on the Connection info panel (choose your OS, download the CockroachDB client, and download your CA certificate).
- The CA certificate downloads to
~/.postgres/root.crt. Moveroot.crtto your project folder. - Run the command displayed in Step 3 on the Connection info panel to connect to your database.
Setting Up Our Node.js Project
First, create your project folder:
mkdir marvel-app
Next, we must initialize our Node.js project, so open a command prompt or terminal to your project folder and run:
npm init
and fill in the information however you would like with app.js as the main entry point file.
The npm packages we use in this project are:
- Express.js
- Pug template engine
- PostgreSQL libraries (pg and pg-hstore)
- Sequelize, an ODM for Node.js supporting multiple protocols including PostgreSQL
- node-fetch, a Node.js implementation of fetch to make HTTP requests
- dotenv for keeping environment variables safe and local
Install these dependencies with the command:
npm install express pug pg pg-hstore sequelize node-fetch dotenv
And to finish setting up the project, create an app.js file with this basic starter code:
require( "dotenv" ).config();

const fs= require( "fs" );
const express = require( "express" );
const app = express();
const port = process.env.PORT || 3000;

app.set( "view engine", "pug" );

app.get( "/", async ( req, res ) => {
    res.json( { success: true } );
});

app.listen( port, () => {
    console.log( `App listening at http://localhost:${port}` );
});
Now, sign up for the Marvel API for free here. Once you confirm your email address, you should be able to access your account page to get both a public key and a private key. Create a .env file in your project folder and add these keys as environment variables inside this file like this:
MARVEL_PUBLIC_KEY=<public_key>
MARVEL_PRIVATE_KEY=<private_key>
Then we can check that the server is running properly by running:
node app.js
and opening http://localhost:3000.
I like using nodemon to automatically detect code changes when saving a file and restarting the server, so if you would like to do this, run:
npm install -g nodemon
and then
nodemon
Getting Marvel Characters Data
Accessing the Marvel API requires a little bit of cryptography, as the endpoints want a unique timestamp for each call and a matching MD5 hash generated from the timestamp and the public and private keys.
Start by importing node-fetch and crypto modules at the top of the code in the app.js file:
const fetch = require( "node-fetch" );
const crypto = require( "crypto" );
Here is a utility function I’ve created to call the characters API with the hashing process that uses the Marvel API keys with the timestamp to get batches of up to 100 characters at a time:
// Get character data using the Marvel API
async function getCharacters( offset = 0 ) {
    const baseUrl = "https://gateway.marvel.com";
    const ts = new Date().getTime();
    // Generate MD5 hash
    const hash = crypto.createHash( "md5" ).update(\
  \`${ts}${process.env.MARVEL_PRIVATE_KEY}${process.env.MARVEL_PUBLIC_KEY}\`).digest(\
  "hex" );

 let result = await fetch(\
  `${baseUrl}/v1/public/characters?ts=${ts}&hash=${hash}&apikey=${process.env.MARVEL_\
  PULIC_KEY}&limit=100&offset=${offset}` ).then( r => r.json() );
     return result;
  }
And here are two arrays of names from the Marvel Cinematic Universe Wiki for referencing whether a character has been “blipped” or is safe. Insert this into your code as well so that we can use it when we fill the database with character data.
  const blipped = [
      "Andre Wilson",
      "Asgardian Actor",
      "Betty Brant",
      "Betty Ross",
      "Big Harv",
      "Billy Peskers",
      "Bucky Barnes",
      "Cammie Conroy",
      "Cooper Barton",
      "David Jerome",
      "Drax",
      "Elijah Cortez",
      "Erik Selvig",
      "Erika Denton",
      "Flash Thompson",
      "Galaga Guy",
      "Groot",
      "Hank Pym",
      "Hope van Dyne",
      "Hiro Kajimoto",
      "Isaiah Sorenson",
      "Jane Foster",
      "Janet van Dyne",
      "Jason Ionello",
      "Karen Oggerton",
      "Laura Barton",
      "Lila Barton",
      "Mantis",
      "Maria Hill",
      "Mary Livanos",
      "May Parker",
      "Michelle Jones",
      "Nathaniel Barton",
      "Ned Leeds",
      "Nick Fury",
      "Peter Parker",
      "Peter Quill",
      "Phillip Carroway",
      "Sam Wilson",
      "Sharon Carter",
      "Shuri",
      "Sif",
      "Stephen Strange",
      "Sue Lorman",
      "T'Challa",
      "Thaddeus Ross",
      "Wanda Maximoff",
      "Wong"
  ];

 const notBlipped = [
    "Tony Stark",
    "Thor",
    "Bruce Banner",
    "Steve Rogers",
    "Natasha Romanoff",
    "James Rhodes",
    "Nebula",
    "Okoye",
    "Rocket Raccoon",
    "Pepper Potts",
    "Thanos",
    "M'Baku",
    "Happy Hogan",
    "Clint Barton",
    "Scott Lang",
    "Carol Danvers",
    "Brunnhilde",
    "Korg",
    "Miek",
    "Akihiko",
    "Cassie Lang",
    "Howard the Duck",
    "Brooklyn Support Group Bobby",
    "Brooklyn Support Group Jimmy",
    "Brad Davis",
    "Roger Harrington",
    "Zach Cooper",
    "Zoha",
    "Yasmin Monette",
    "Tyler Corbyn",
    "Sebastian",
    "Phil Coulson",
    "Melinda May",
    "Daisy Johnson",
    "Leo Fitz",
    "Jemma Simmons",
    "Alphonso Mackenzie",
    "Yo-Yo Rodriguez",
    "Deke Shaw",
    "Enoch",
    "Agent Davis",
    "Agent Piper",
    "Agent Julian",
    "Agent Damon Keller",
    "Agent Diaz",
    "Jaco",
    "Marcus Benson",
    "Pax",
    "Snowflake",
    "Malachi",
    "Boyle",
    "Toad",
    "Trevor Khan",
    "Atarah",
    "Sarge",
    "Izel",
    "Isaiah",
    "Baal-Gad",
    "Alex Wilder",
    "Nico Minoru",
    "Karolina Dean",
    "Gert Yorkes",
    "Chase Stein",
    "Molly Hernandez",
    "Geoffrey Wilder",
    "Leslie Dean",
    "Janet Stein",
    "Victor Stein",
    "Stacey Yorkes",
    "Dale Yorkes",
    "Tina Minoru",
    "Robert Minoru",
    "Morgan le Fay",
    "Tamar",
    "Vaughn Kaye",
    "Bronwyn",
    "Cassandra",
    "Tandy Bowen",
    "Tyrone Johnson",
    "Old Lace"
];
Now, let’s add a new route to our server named /sync that retrieves all the Marvel character data through multiple pages from the API, compares it to the blip reference arrays to add the field to the data, and returns it as a JSON object. The Marvel API returns a lot of information about each character, but the fields we are interested in are just the ID, Name, Thumbnail URL, and computed Blip status. We update this code in the next step to fill our database instead of simply returning the data.
  app.get( "/sync", async ( req, res ) => {
      // -- Retrieve and Insert Characters Data --
      let result = await getCharacters( 0 ); // Retrieve once to get the total
      const total = result.data.total;

      let batch = \[];
      for( let offset = 0; offset < total; offset += 100 ) {
          // Get Character Data
          result = await getCharacters( offset );
          const characters = result.data.results;
          // Bulk Create
          for( let i = 0; i < characters.length; i++ ) {
              const isBlipped = blipped.some( c => characters\[ i ].name.includes( c )\
  );

              const isSafe = notBlipped.some( c => characters\[ i ].name.includes( c )\
  );
              batch.push({
                  marvelId: characters\[ i ].id,
                  name: characters\[ i ].name,
                  thumbnail: `${characters\[ i ].thumbnail\[ "path" ]}.${characters[ i\
  ].thumbnail\[ "extension" ]}`,
                  blip: isBlipped ? true : ( isSafe ? false : null )
              });
          }
      }
      res.json( batch );
  });
Connecting and Using CockroachDB Serverless
We’re now ready to put this data into our database.
Sequelize lets us connect to the CockroachDB Serverless by passing in options based on our connection string. Let’s save it in the .env file with the other sensitive information and initialize it like this, remembering to use the root.crt certificate we downloaded earlier for a secure connection.
Example Connection String
  postgres://username:password@hostname:26257\
  /defaultdb?sslmode=require&options=--cluster=clustername
Example .env File
MARVEL_PUBLIC_KEY=<public_key>
MARVEL_PRIVATE_KEY=<private key>
COCKROACHDB_USER=<username>
COCKROACHDB_PASS=<password>
COCKROACHDB_HOST=<host name>
COCKROACHDB_DATABASE=<database name>
Example Connection Code
  const { Sequelize, Model, DataTypes } = require( "sequelize" );\
  const sequelize = new Sequelize( {
      dialect: "postgres",
      username: process.env.COCKROACHDB_USER,
      password: process.env.COCKROACHDB_PASS,
      host: process.env.COCKROACHDB_HOST,
      port: 26257,
      database: process.env.COCKROACHDB_DATABASE,
      dialectOptions: {
        ssl: {
          ca: fs.readFileSync( "cc-ca.crt" ).toString()
        },
      },
      logging: false
  } );
And let’s define what our schema for the character data looks like within the database. The key fields we want to store are the Marvel ID of the character, Character Name, Thumbnail image, and a flag indicating the blip status of the character. If the blip flag is null, we can consider it as an unknown status.
class Character extends Model {}
Character.init({
    marvelId: DataTypes.INTEGER,
    name: DataTypes.STRING,
    thumbnail: DataTypes.STRING,
    blip: DataTypes.BOOLEAN
}, { sequelize, modelName: 'character' });
We must make sure our schema is set up in the database so that we can start using it, so call the sequelize.sync function after our server is booted up like this:
app.listen( port, () => {
    console.log( \`App listening at http://localhost:${port}\` );
    sequelize.sync(); // Synchronize our DB
});
Then, we must update the /sync route to insert this character data into our database. We want to clear the data before re-syncing the latest data, which we can do with the following code:
// Clear the table

await Character.destroy({
    truncate: true
});
And we can use the bulkCreate function to create in bulk the characters from our array batch of data and simply return a success flag at the end instead of the whole list of characters:
const c = await Character.bulkCreate( batch );
res.json( { success: true } );
The whole /sync route should now look like this:
app.get( "/sync", async ( req, res ) => {
    // -- Retrieve and Insert Characters Data --
    let result = await getCharacters( 0 ); // Retrieve once to get the total
    const total = result.data.total;
    // Clear the table
    await Character.destroy({
        truncate: true
    });
    let batch = \[];
    for( let offset = 0; offset < total; offset += 100 ) {
        // Get Character Data
        result = await getCharacters( offset );
        const characters = result.data.results;
        // Bulk Create
        for( let i = 0; i < characters.length; i++ ) {
            const isBlipped = blipped.some( c => characters\[ i ].name.includes( c ) );
            const isSafe = notBlipped.some( c => characters\[ i ].name.includes( c ) );
            batch.push({
                marvelId: characters\[ i ].id,
                name: characters\[ i ].name,
                thumbnail: \`${characters\[ i ].thumbnail\[ "path" ]}.${characters\[ i ].thumbnail\[ "extension" ]}\`,
                blip: isBlipped ? true : ( isSafe ? false : null )
            });
        }
    }
    const c = await Character.bulkCreate( batch );
    res.json( { success: true } );
});
We can now create additional routes to return all blipped, non-blipped, and unknown-state characters in preparation for the frontend Pug templates. These routes look like the following:
app.get( "/all", async ( req, res ) => {
    // -- Get All Characters --
    const characters = await Character.findAll();
    res.json( characters );
});

app.get( "/blipped", async ( req, res ) => {
    // -- Get Blipped Characters --
    const characters = await Character.findAll({
        where: {
            blip: true
        }
    });
    res.json( characters );
});

app.get( "/safe", async ( req, res ) => {
    // -- Get Non-Blipped Characters --
    const characters = await Character.findAll({
        where: {
            blip: false
        }
    });
    res.json( characters );
});

app.get( "/unknown", async ( req, res ) => {
    // -- Get Non-Blipped Characters --
    const characters = await Character.findAll({
        where: {
            blip: null
        }
    });
    res.json( characters );
});
Then we can complete our collection of routes with two endpoints /blip and /unblip with an ID parameter for the Marvel Character ID to be used for updating the database with a new blip status.
Here is the code for these last two routes:
app.get( "/blip/:id", async ( req, res ) => {
    // -- Blip Character by ID --
    const character = await Character.update( { blip: true }, {
        where: {
            marvelId: req.params\[ "id" ]
        }
    });
    res.json( character );
});

app.get( "/unblip/:id", async ( req, res ) => {
    // -- Unblip Character by ID --
    const character = await Character.update( { blip: false }, {
        where: {
            marvelId: req.params\[ "id" ]
        }
    });
    res.json( character );
});
Creating the Frontend User Interface
It’s time to wrap up our app by giving it a user interface. Make a new folder named views in the project directory and create a file inside it called index.pug, where we can write our Pug template code.
Next, replace the res.json function inside the default / route in app.js with the res.render function to render this template and pass it the list of all characters:
res.render( "index", { title: "The Blip (All Characters)", characters: characters } );
And while we are at it, let’s change the /all, /blipped, /safe, and /unknown routes to use this template instead of returning a JSON object.
app.get( "/all", async ( req, res ) => {
    // -- Get All Characters --
    const characters = await Character.findAll();
    res.render( "index", { title: "The Blip (All Characters)", characters: characters } );
});

app.get( "/blipped", async ( req, res ) => {
    // -- Get Blipped Characters --
    const characters = await Character.findAll({
        where: {
            blip: true
        }
    });
    res.render( "index", { title: "The Blip (Blipped)", characters: characters } );
});

app.get( "/safe", async ( req, res ) => {
    // -- Get Non-Blipped Characters --
    const characters = await Character.findAll({
        where: {
            blip: false
        }
    });
    res.render( "index", { title: "The Blip (Safe)", characters: characters } );
});

app.get( "/unknown", async ( req, res ) => {
    // -- Get Non-Blipped Characters --
    const characters = await Character.findAll({
        where: {
            blip: null
        }
    });
    res.render( "index", { title: "The Blip (Unknown)", characters: characters } );
});
Then, to set up our pug file, we can import Bootstrap for some layout help and place a simple div container inside and some header text at the top of the page for the project.
doctype html
html(lang="en")
  head
    meta(charset="utf-8")
    meta(name="viewport" content="width=device-width, initial-scale=1")
    link(href="https://cdn.jsdelivr.net/npm/bootstrap@5.0.2/dist/css/bootstrap.min.css" rel="stylesheet")
    script(src="https://cdn.jsdelivr.net/npm/bootstrap@5.0.2/dist/js/bootstrap.bundle.min.js")
    title= title
  body
    div.container
      h1 <a href="https://en.wikipedia.org/wiki/The_Blip">The Blip</a> Marvel Character List
      small
        a(href="https://marvel.com") Data provided by Marvel. © 2021 MARVEL
We add a button on the page that says “Sync Character Data from Marvel”. Pressing this button calls our /sync endpoint using the syncAll function. Wait for the server to pull all the Marvel characters’ data and refresh the page.
  body
    div.container
      h1 <a href="https://en.wikipedia.org/wiki/The_Blip">The Blip</a> Marvel Character List
      small
        a(href="https://marvel.com") Data provided by Marvel. © 2021 MARVEL
      br
      button.btn.btn-primary(id="sync-btn" onclick="syncAll()") Sync Character Data from Marvel
    script(type="text/javascript").
      async function syncAll() {
        document.getElementById( "sync-btn" ).innerText = "Syncing...";
        let result = await fetch( \`/sync\` ).then( r => r.json() );
        // Reload the page to grab the new data
        location.reload();
      }
Let’s add a callApi function within the script section below the syncAll function to dynamically update the “blip” status of any character by their Marvel ID:
    script(type="text/javascript").
      async function syncAll() {
        document.getElementById( "sync-btn" ).innerText = "Syncing...";
        let result = await fetch( \`/sync\` ).then( r => r.json() );
        // Reload the page to grab the new data
        location.reload();
      }
      async function callApi( api, id ) {
        let result = await fetch( \`/${api}/${id}\` ).then( r => r.json() );
        let elem = document.getElementById( \`btn-${id}\` );
        if( api === "blip" ) {
          elem.innerText = "Unblip";
          elem.classList.remove( "btn-success", "btn-secondary" );
          elem.classList.add( "btn-danger" );
          elem.onclick = () => callApi( "unblip", id );
        }
        else {
          elem.innerText = "Blip";
          elem.classList.remove( "btn-danger", "btn-secondary" );
          elem.classList.add( "btn-success" );
          elem.onclick = () => callApi( "blip", id );
        }
      }
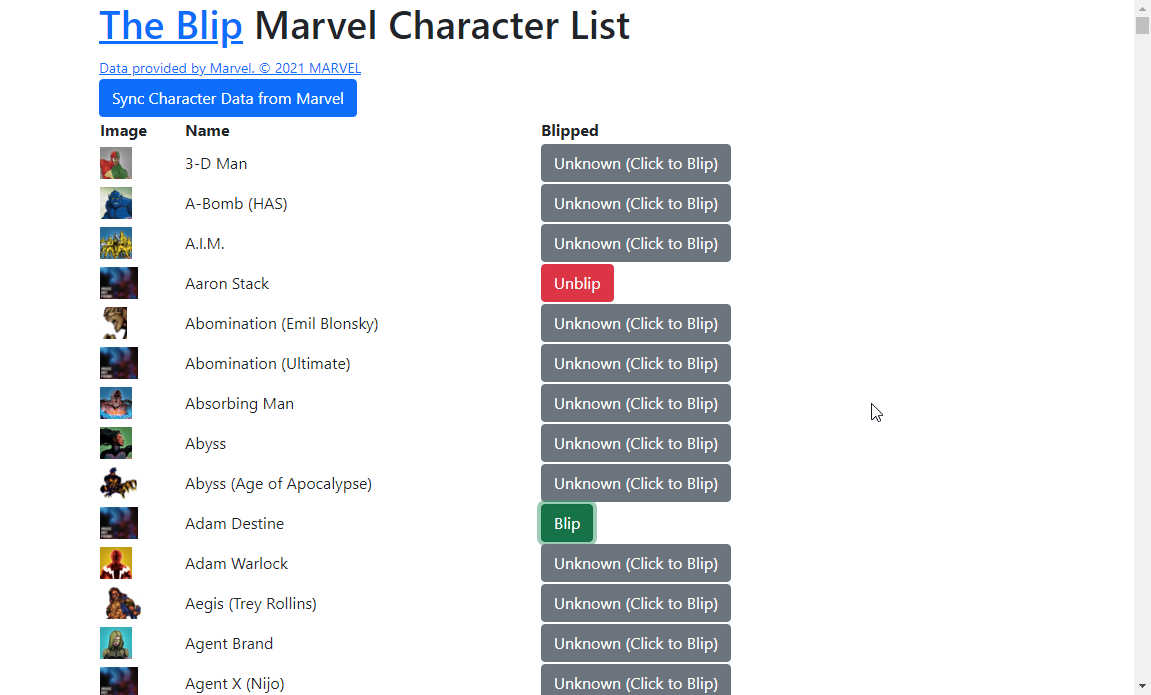
And finally, we display a table below the Sync button that lists all the characters from the data passed into the template and shows buttons that the user can click to use the callApi function we just wrote.
  body
    div.container
      h1 <a href="https://en.wikipedia.org/wiki/The_Blip">The Blip</a> Marvel Character List
      small
        a(href="https://marvel.com") Data provided by Marvel. © 2021 MARVEL
      br
      button.btn.btn-primary(id="sync-btn" onclick="syncAll()") Sync Character Data from Marvel
      table
        tr
          th Image
          th Name
          th Blipped
        each c in characters
          tr
            td
              img(src=c.thumbnail height="32px")
            td= c.name
            if c.blip === true
              td
                button.btn.btn-danger(id=\`btn-${c.marvelId}\` onclick=\`callApi("unblip", ${c.marvelId})\`) Blipped (Click to Unblip)
            else if c.blip === false
              td
                button.btn.btn-success(id=\`btn-${c.marvelId}\` onclick=\`callApi("blip", ${c.marvelId})\`) Safe (Click to Blip)
            else
              td
                button.btn.btn-secondary(id=\`btn-${c.marvelId}\` onclick=\`callApi("blip", ${c.marvelId})\`) Unknown (Click to Blip)\
...
And that’s it. Now open http://localhost:3000 again in your browser, and you’ll see that we’ve got a working Marvel Character Blip Tracking app.
Here’s what our final code looks like:
app.js
require( "dotenv" ).config();

const fetch = require( "node-fetch" );
const crypto = require( "crypto" );
const fs = require( "fs" );
const express = require( "express" );
const app = express();
const port = process.env.PORT || 3000;

const { Sequelize, Model, DataTypes } = require( "sequelize" );
const sequelize = new Sequelize( {
    dialect: "postgres",
    username: process.env.COCKROACHDB_USER,
    password: process.env.COCKROACHDB_PASS,
    host: process.env.COCKROACHDB_HOST,
    port: 26257,
    database: process.env.COCKROACHDB_DATABASE,
    dialectOptions: {
      ssl: {
        ca: fs.readFileSync( "cc-ca.crt" ).toString()
      },
    },
    logging: false
} );

class Character extends Model {}
Character.init({
    marvelId: DataTypes.INTEGER,
    name: DataTypes.STRING,
    thumbnail: DataTypes.STRING,
    blip: DataTypes.BOOLEAN
}, { sequelize, modelName: 'character' });

const blipped = [
    "Andre Wilson",
    "Asgardian Actor",
    "Betty Brant",
    "Betty Ross",
    "Big Harv",
    "Billy Peskers",
    "Bucky Barnes",
    "Cammie Conroy",
    "Cooper Barton",
    "David Jerome",
    "Drax",
    "Elijah Cortez",
    "Erik Selvig",
    "Erika Denton",
    "Flash Thompson",
    "Galaga Guy",
    "Groot",
    "Hank Pym",
    "Hope van Dyne",
    "Hiro Kajimoto",
    "Isaiah Sorenson",
    "Jane Foster",
    "Janet van Dyne",
    "Jason Ionello",
    "Karen Oggerton",
    "Laura Barton",
    "Lila Barton",
    "Mantis",
    "Maria Hill",
    "Mary Livanos",
    "May Parker",
    "Michelle Jones",
    "Nathaniel Barton",
    "Ned Leeds",
    "Nick Fury",
    "Peter Parker",
    "Peter Quill",
    "Phillip Carroway",
    "Sam Wilson",
    "Sharon Carter",
    "Shuri",
    "Sif",
    "Stephen Strange",
    "Sue Lorman",
    "T'Challa",
    "Thaddeus Ross",
    "Wanda Maximoff",
    "Wong"
];

const notBlipped = [
    "Tony Stark",
    "Thor",
    "Bruce Banner",
    "Steve Rogers",
    "Natasha Romanoff",
    "James Rhodes",
    "Nebula",
    "Okoye",
    "Rocket Raccoon",
    "Pepper Potts",
    "Thanos",
    "M'Baku",
    "Happy Hogan",
    "Clint Barton",
    "Scott Lang",
    "Carol Danvers",
    "Brunnhilde",
    "Korg",
    "Miek",
    "Akihiko",
    "Cassie Lang",
    "Howard the Duck",
    "Brooklyn Support Group Bobby",
    "Brooklyn Support Group Jimmy",
    "Brad Davis",
    "Roger Harrington",
    "Zach Cooper",
    "Zoha",
    "Yasmin Monette",
    "Tyler Corbyn",
    "Sebastian",
    "Phil Coulson",
    "Melinda May",
    "Daisy Johnson",
    "Leo Fitz",
    "Jemma Simmons",
    "Alphonso Mackenzie",
    "Yo-Yo Rodriguez",
    "Deke Shaw",
    "Enoch",
    "Agent Davis",
    "Agent Piper",
    "Agent Julian",
    "Agent Damon Keller",
    "Agent Diaz",
    "Jaco",
    "Marcus Benson",
    "Pax",
    "Snowflake",
    "Malachi",
    "Boyle",
    "Toad",
    "Trevor Khan",
    "Atarah",
    "Sarge",
    "Izel",
    "Isaiah",
    "Baal-Gad",
    "Alex Wilder",
    "Nico Minoru",
    "Karolina Dean",
    "Gert Yorkes",
    "Chase Stein",
    "Molly Hernandez",
    "Geoffrey Wilder",
    "Leslie Dean",
    "Janet Stein",
    "Victor Stein",
    "Stacey Yorkes",
    "Dale Yorkes",
    "Tina Minoru",
    "Robert Minoru",
    "Morgan le Fay",
    "Tamar",
    "Vaughn Kaye",
    "Bronwyn",
    "Cassandra",
    "Tandy Bowen",
    "Tyrone Johnson",
    "Old Lace"
];

// Get character data using the Marvel API
async function getCharacters( offset = 0 ) {
    const baseUrl = "https://gateway.marvel.com";
    const ts = new Date().getTime();
    // Generate MD5 hash
    const hash = crypto.createHash( "md5" ).update( \`${ts}${process.env.MARVEL_PRIVATE_KEY}${process.env.MARVEL_PUBLIC_KEY}\`).digest( "hex" );
    let result = await fetch( \`${baseUrl}/v1/public/characters?ts=${ts}&hash=${hash}&apikey=${process.env.MARVEL_PUBLIC_KEY}&limit=100&offset=${offset}\` ).then( r => r.json() );
    return result;
}

app.set( "view engine", "pug" );

app.get( "/", async ( req, res ) => {
    // -- Get All Characters --
    const characters = await Character.findAll();
    res.render( "index", { title: "The Blip (All Characters)", characters: characters } );
});

app.get( "/sync", async ( req, res ) => {
    // -- Retrieve and Insert Characters Data --
    let result = await getCharacters( 0 ); // Retrieve once to get the total
    const total = result.data.total;
    // Clear the table
    await Character.destroy({
        truncate: true
    });
    let batch = \[];
    for( let offset = 0; offset < total; offset += 100 ) {
        // Get Character Data
        result = await getCharacters( offset );
        const characters = result.data.results;
        // Bulk Create
        for( let i = 0; i < characters.length; i++ ) {
            const isBlipped = blipped.some( c => characters\[ i ].name.includes( c ) );
            const isSafe = notBlipped.some( c => characters\[ i ].name.includes( c ) );
            batch.push({
                marvelId: characters\[ i ].id,
                name: characters\[ i ].name,
                thumbnail: \`${characters\[ i ].thumbnail\[ "path" ]}.${characters\[ i ].thumbnail\[ "extension" ]}\`,
                blip: isBlipped ? true : ( isSafe ? false : null )
            });
        }
    }
    const c = await Character.bulkCreate( batch );
    res.json( { success: true } );
});

app.get( "/all", async ( req, res ) => {
    // -- Get All Characters --
    const characters = await Character.findAll();
    res.render( "index", { title: "The Blip (All Characters)", characters: characters } );
});

app.get( "/blipped", async ( req, res ) => {
    // -- Get Blipped Characters --
    const characters = await Character.findAll({
        where: {
            blip: true
        }
    });
    res.render( "index", { title: "The Blip (Blipped)", characters: characters } );
});

app.get( "/safe", async ( req, res ) => {
    // -- Get Non-Blipped Characters --
    const characters = await Character.findAll({
        where: {
            blip: false
        }
    });
    res.render( "index", { title: "The Blip (Safe)", characters: characters } );
});

app.get( "/unknown", async ( req, res ) => {
    // -- Get Non-Blipped Characters --
    const characters = await Character.findAll({
        where: {
            blip: null
        }
    });
    res.render( "index", { title: "The Blip (Unknown)", characters: characters } );
});

app.get( "/blip/:id", async ( req, res ) => {
    // -- Blip Character by ID --
    const character = await Character.update( { blip: true }, {
        where: {
            marvelId: req.params\[ "id" ]
        }
    });
    res.json( character );
});

app.get( "/unblip/:id", async ( req, res ) => {
    // -- Unblip Character by ID --
    const character = await Character.update( { blip: false }, {
        where: {
            marvelId: req.params\[ "id" ]
        }
    });
    res.json( character );
});

app.listen( port, () => {
    console.log( \`App listening at http://localhost:${port}\` );
    sequelize.sync(); // Synchronize our DB
});
index.pug
doctype html
html(lang="en")
  head
    meta(charset="utf-8")
    meta(name="viewport" content="width=device-width, initial-scale=1")
    link(href="https://cdn.jsdelivr.net/npm/bootstrap@5.0.2/dist/css/bootstrap.min.css" rel="stylesheet")
    script(src="https://cdn.jsdelivr.net/npm/bootstrap@5.0.2/dist/js/bootstrap.bundle.min.js")
    title= title
  bod
    div.container
      h1 <a href="https://en.wikipedia.org/wiki/The_Blip">The Blip</a> Marvel Character List
      small
        a(href="https://marvel.com") Data provided by Marvel. © 2021 MARVEL
      br
      button.btn.btn-primary(id="sync-btn" onclick="syncAll()") Sync Character Data from Marvel
      table
        tr
          th Image
          th Name
          th Blipped
        each c in characters
          tr
            td
              img(src=c.thumbnail height="32px")
            td= c.name
            if c.blip === true
              td
                button.btn.btn-danger(id=\`btn-${c.marvelId}\` onclick=\`callApi("unblip", ${c.marvelId})\`) Blipped (Click to Unblip)
            else if c.blip === false
              td
                button.btn.btn-success(id=\`btn-${c.marvelId}\` onclick=\`callApi("blip", ${c.marvelId})\`) Safe (Click to Blip)
            else
              td
                button.btn.btn-secondary(id=\`btn-${c.marvelId}\` onclick=\`callApi("blip", ${c.marvelId})\`) Unknown (Click to Blip)
    script(type="text/javascript").
      async function syncAll() {
        document.getElementById( "sync-btn" ).innerText = "Syncing...";
        let result = await fetch( \`/sync\` ).then( r => r.json() );
        // Reload the page to grab the new data
        location.reload();
      }
      async function callApi( api, id ) {
        let result = await fetch( \`/${api}/${id}\` ).then( r => r.json() );
        let elem = document.getElementById( \`btn-${id}\` );
        if( api === "blip" ) {
          elem.innerText = "Unblip";
          elem.classList.remove( "btn-success", "btn-secondary" );
          elem.classList.add( "btn-danger" );
          elem.onclick = () => callApi( "unblip", id );
        }
        else {
          elem.innerText = "Blip";
          elem.classList.remove( "btn-danger", "btn-secondary" );
          elem.classList.add( "btn-success" );
          elem.onclick = () => callApi( "blip", id );
        }
      }
Deploying Our Web App to the Cloud
We have a web app that runs locally, so let’s push it to the cloud on Heroku to run on a Free and Hobby instance to show our friends and family. If you don’t have a Heroku account, you can sign up here.
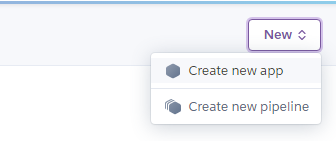
Once you log into the dashboard, create a new app and give it a unique name.

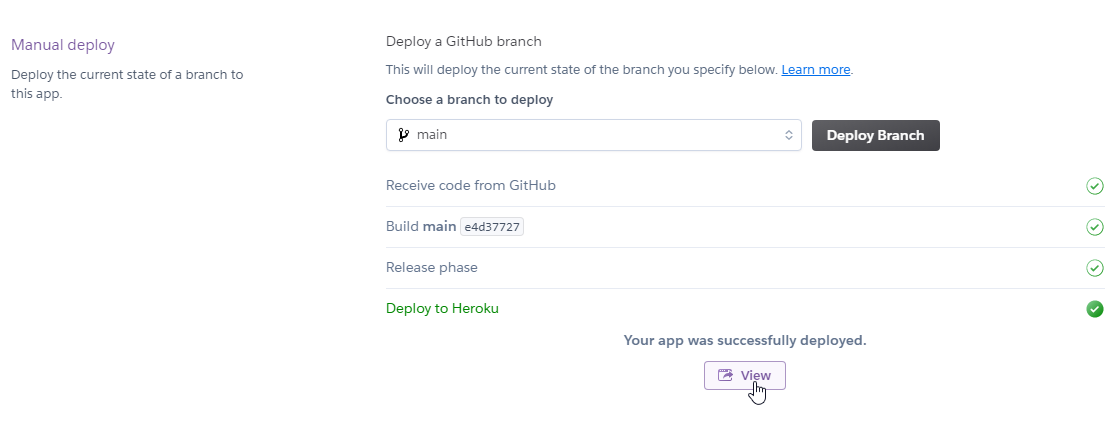
There are a few ways to deploy the server. I pushed my code to a GitHub repository since that’s my usual workflow. Then I connected the repository to Heroku, and then decided to deploy manually for now.


When done, you can click View to open the app, but since we didn’t provide any environment variables containing our passwords and keys from the .env file to Heroku, it will show an error. Let’s fix it.
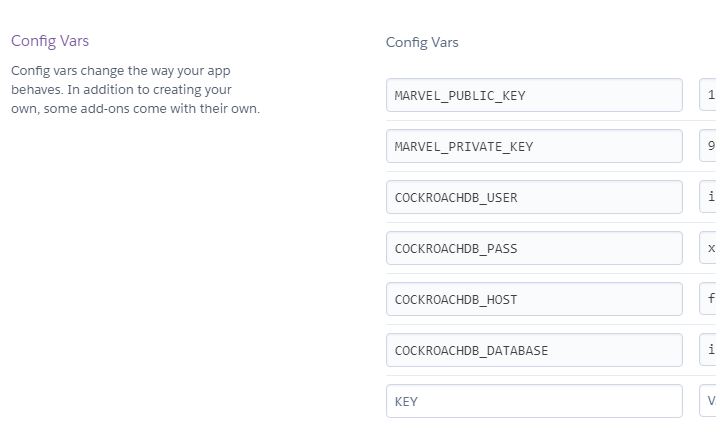
Click the Settings tab and scroll down to the Config Vars section. In this section, add the same keys and values as in our .env file. Then, deploy once more, and you should see the app running and now accessible from anywhere on the internet. How convenient is that?

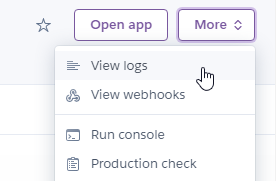
Note that if your app still shows an error, you may need to add a start script to the package.json file as Heroku runs npm start as its command to start the app. You can view the app runtime logs by clicking the More button and View Logs.

What’s Next?
You’ve seen first-hand how to start from nothing to create and deploy a fully working, database-enabled Node.js app. Now, here are some ideas to build on this project. You can add a user login system and the ability for users to specify favorites and sort their characters, or you could even make an entirely different project using CockroachDB Serverless.
To learn more about CockroachDB Serverless, check out the Cockroach Labs website and documentation section. And look at other articles on the blog to stay updated too.