This blog will examine how to add OpenTelemetry Observability into your Jest testing frameworks. You’ll learn how to perform better testing using the most valuable packages. We’ll also explain why you should choose the framework as your project’s testing framework. And why we decided to add Observability to our Jest tests.
One of the features of Jest that I enjoy most is its advanced mocking system, which means I can create a fake version of a function, a unit, or a module that can stand-in for the real one—enabling me to test only the unit that I need. Testing a single piece of code makes my tests more precise and accurate. It also reduces the time I spend on creating the testing environment. So, for example, if there are modules that I don’t want to test with Jest, I can quickly mock them.
Mocking unwanted behavior (mocking a function) –
/* Code we would like to test */
function LogAndExit(severity, msg, exitCode) {
    logger[severity](msg);
    // That will terminate the program immediately
    process.exit(exitCode);
}
So we’ll mock the process.exit using the Jest mocking system and check if the process.exit was called with the argument. Then, for example, you can re-implement the process.exit behavior to do nothing (to avoid the process’s exit).
describe('Test Log & Exit Function', () => {
    it('Should log with severity error and exit', () => {
        const severity = 'error';
        const msg = 'Please log my msg';
        const exitCode = 1;

        // Will change process.exit implementation
        jest.spyOn(process, 'exit').mockImplementation((exitCode) => {});
        // Spy on the logger and do not change logger.error implementation
        jest.spyOn(logger, 'error');

        // In case that process.exit is not mocked => That will terminate the jest worker process immediately
        LogAndExit(severity, msg, exitCode);

        // Test that process.exit & logger.error has been invoked
        expect(process.exit).toBeCalledTimes(1);
        expect(process.exit).toBeCalledWith(exitCode);
        expect(logger.error).toBeCalledTimes(1);
        expect(logger.error).toBeCalledWith(msg);

    });
});
Mocking a server’s response – eliminates the need to make the server available. For example, let’s assume we have a function that uses the HTTP module to check if the server returns a status code of 200.
const https = require('https');

module.exports = {
    isAlive: async function(url) {
        const statusCode = await new Promise(resolve => https.request(url, res => resolve(res.statusCode)).end());
        return statusCode === 200;
    }
}
Now let’s write a test that does not use the actual HTTPS module and test only the logic of the is Alive function.
describe('Test is alive function', () => {
    it('Should be alive', async () => {
        jest.mock('https', () => ({
            request: async (url, cb) => cb({statusCode: 200})
        }));
        const {isAlive} = require('./isAlive');

        await expect(isAlive('https://sprkl.dev')).resolves.toBeTruthy();
    });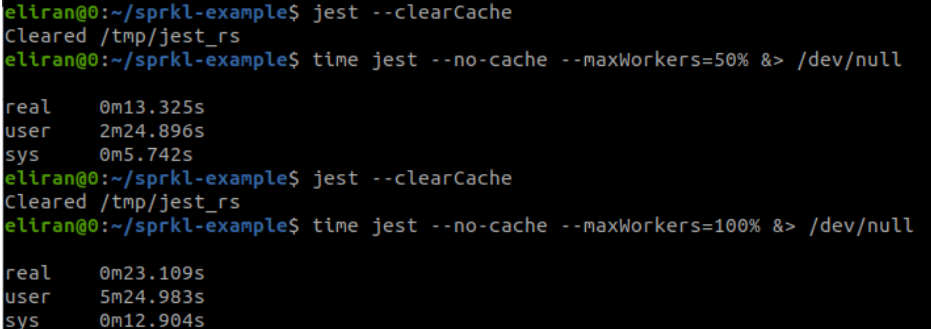
});As you probably know, Sandboxes allow you to create as many spies and stubs as you want without having to track them all and clear them manually. For example, if we use a module with a cache, we can use the module in every test without worrying about what is in the cache. The Jest sandbox system ensures the module is re-evaluated for all the tests from scratch (meaning the cache will be clean). Furthermore, it also allows Jest parallelizing tests over a few processes without worrying about sharing states between tests – which results (usually) in a significant performance boost.
And, IMO, the primary advantage you get with Jest is the isolation that prevents race conditions between tests – it’s possible but difficult to create a race condition between tests.
Jest’s philosophy is to provide an integrated “zero-configuration” experience. Therefore, if you have special needs for your testing environment, Jest allows you to modify almost every step from the setup phase to the test report phase. For the Sprkl project, we find this modification ability superessential as we could not support Jest without it.
For example, let’s assume we’d like to start a backend server every time a test is started and stop the server every time the test is completed. This way, we can use the globalSetup and globalTeardown options.
First, let’s config our jest.config.js file –
module.exports = {
    globalSetup: '<rootDir>/setup.js',
    globalTeardown: '<rootDir>/teardown.js'
};
Now, let’s create our setup & teardown files –
const myServer = require('./backendServer');

module.exports = async function(globalConfig, projectConfig) {
    console.log(`Start the backend server for ${globalConfig.rootDir}`);
    myServer.start();
const myServer = require('./backendServer');
module.exports = async function(globalConfig, projectConfig) {
console.log(`Stop the backend server for ${globalConfig.rootDir}`);
myServer.stop();
};Get more information about Jest’s architecture: https://jestjs.io/docs/architecture
Get more information about Jest’s configuration options: https://jestjs.io/docs/configuration
Jest has a lot of benefits and provides a great testing framework for Nodejs projects. We write some of our projects in TS, so we needed to choose between some testing frameworks. We found Jest the most suitable for our needs because it’s simple yet sophisticated – just how we like it.
Jest is a widespread open-source testing and mockup library in the Node.js ecosystem. Similarly, OpenTelemetry is one of the most robust open-source tools for instrumenting, monitoring, and observability of applications and is emerging as the new standard for observability and application monitoring. However, despite the value derived from fusing these two worlds, there is no simple way to connect these two excellent projects to bring the benefits of open observability into testing processes. But we decided to go for it and integrated these two to add observability to tests automatically, providing you with one trace per test, as we like to say.
Our goal is to quickly:
So this is what the Sprkl team and I did – we implemented a powerful instrumentation library for Jest so you can get a trace per test with automated logging for all your mockups, assertions, and code diffs directly in the IDE. We just feel that devs waste too much time on debugging flaky tests that their code didn’t even touch and that they don’t understand which specs were affected by their code changes – and this must stop.
Sprkl is now available on the VS Code marketplace.
