NPM Audit: 5 Ways to Use it to Protect Your Code
Updated March 14, 2024.
You might already know Node and the accompanying JS package manager - NPM. NPM is the most extensive package manager in the world, with over one million packages available. Since the packages and dependency trees are updated frequently, vulnerabilities from old package versions may find their way into your project.
If you have not touched your project in a while and find that you have far more vulnerabilities than expected, you’ll need a more comprehensive tool for dealing with your entire node module folder in one fell swoop. Node’s tool for the job is the NPM Audit. In this article, we’ll dive deeper into the various options in NPM Audit and how you can utilize them to protect your code.
NPM Advisory Database
The npm install and npm audit commands check for vulnerabilities against known security risks reported in the public npm registry. As of late 2021, this vulnerability database has been hosted on GitHub, called the GitHub Advisory Database. The same vulnerability database powers GitHub’s Dependabot tool alerting developers to known vulnerabilities in their code base hosted on GitHub.
The npm audit command now includes a URL with each proposed vulnerability fix linking to the GitHub Advisory Database’s specific vulnerability report. If you’re interested, GitHub also provides an API for browsing the Advisory Database for vulnerabilities based on severity or a particular package name. You can also offer suggestions for fixing vulnerabilities or editing a specific vulnerability description to clarify it.
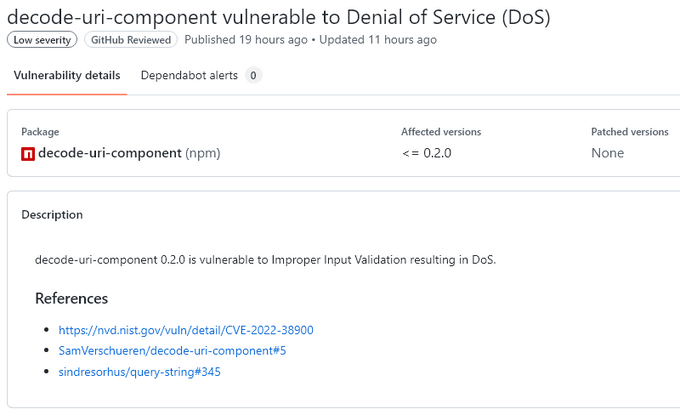
Here’s an example of a vulnerability description on GitHub:
How to run NPM Audit
The basic command you need to run to get Node’s suggestion on fixing your vulnerabilities is npm audit. Firstly, ensure you have installed the latest Node and NPM versions and open your project.
You should navigate to the project’s folder where your package.json file is saved. Once you have your project open, open a new terminal where you can type any of the mentioned CLI commands and where you’ll see the results.
The npm audit command will give you a list of the vulnerabilities found and more information about them.
At the end of the report, you’ll see the number of vulnerabilities that NPM Audit can fix automatically and the vulnerabilities that require a manual review.

If the report is particularly long, you can use npm audit --json to get the report in a JSON format. To pipe the report to a file, use the > (pipe) sign along with the path and filename you wish to generate: npm audit --json > report.json.
You can also use a package called npm-audit-html to generate the same report in an HTML format (npm audit --json | npm-audit-html --output report.html). JSON and HTML formats are more straightforward to view than a simple data dump to the terminal.
Jit orchestrates security for Node.js stacks. Your developers can quickly and seamlessly integrate npm-audit into their code security layer to help run dependency checks within a centralized CI workflow. From Code, pipeline, and infrastructure to runtime, Jit provides security-plan-as-code (SaC) and orchestrates all security tools at every stage of the software development lifecycle. Book a demo today.
5 Ways to Use NPM Audit to Protect Your Code
1. Generate security audit reports frequently
Since the NPM package ecosystem is updated often, you may already have vulnerabilities in your code due to old package versions you may not even be aware of. Most of us don’t run a full npm install frequently in the regular course of events.
You should run the , as this will help you ensure you don’t have hidden dependency vulnerabilities in your project. What you consider a 'regular basis' depends on your project's size and complexity.
About once a month may be enough for a large and complex project. If the project is stable and doesn't have a lot of updates, then even once a quarter may suffice. The frequency is up to you, but you can keep those reports as testimony that you are on top of the project’s vulnerability issue.
2. Review the report and security advisory
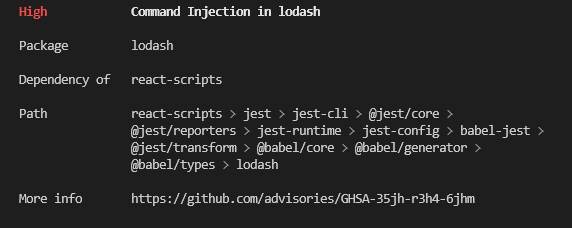
An NPM Audit report contains the following data in the following structure:
Severity -Description
Package (title) - relevant info
Patched In (title) - relevant info
Dependency Of (title) - relevant info
Path (title) - relevant info
More Info (title) - URL link to GitHub Advisory DB
For example:
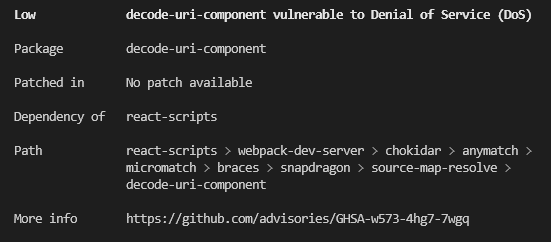
Here’s a brief description of what each piece of information means:
Severity - The severity of the vulnerability based on its potential impact. The severity is divided into
- Critical - Address immediately
- High - Address as quickly as possible
- Moderate - Address when time allows
- Low - Address at your discretion
Description - A short description of what might happen if you don’t address the vulnerability. For example - ‘Vulnerable to DoS attack.’
Package - The name of the package where the vulnerability was found.
Patched in - Assuming the vulnerability was addressed in a later version of the package, this part will say which version contains the patched version. For example >=2.0.1 (in all versions starting at 2.0.1 and higher)
Dependency of - Which other package (or packages) uses this particular package? You might see a lot of packages in the report you have no recollection of ever installing or using. That’s because each of the packages you use comes with its dependencies, and sometimes those dependencies have dependencies of their own in a very long chain called the software supply chain. Telling you which package is using this problematic package is vital since removing the original package eliminates the dependency problem without updating anything.
Path - The path to the package folder in the node modules containing the vulnerability.
More info - A link to the security report in the GitHub Advisory Database.
3. Verify the registry signatures of downloaded packages
Packages published to the public npm registry are signed to make it possible to detect if the package content has been tampered with. The signing happens automatically once the developer uploads the package to NPM.
Should a proxy server, a mirror, or a similar attack affect the users of a particular package, the signature found on the local package will not match the expected signature saved in the NPM registry for that package.
By adding the tag This tag only works starting at npm v8.15.0, so make sure you have the latest NPM version if you want to use this option. Note that the output might vary from version to version.
Here’s an example of the final report you might receive:

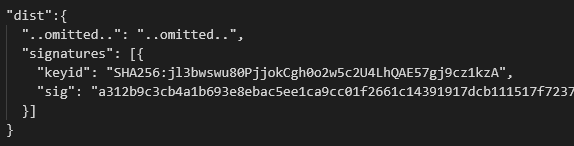
For each package, you’ll receive a list of its ‘keyid’ that has to match one of the public signing keys and the actual signature based on that key. For example:
To check if the ‘keyid’ matches one of the public keys, you can go to Make sure you compare based on the same key format. In this case, for example, you’ll need to check the SHA256 key.
Pay close attention to any packages with problematic signatures - it might indicate that your version has been tampered with.
Since there could be thousands of packages, you can pipe the results to a JSON file and only check packages where there is an indication that the signatures don't match. If you’re worried, an easy fix would be to re-install a problematic package and check again. You can contact NPM directly and report the problem if you still get the same issue.
4. Check for meta-vulnerabilities and remediations
A "meta-vulnerability" is a vulnerable dependency since the package depends on a vulnerable version of a different package. So, package ‘A’ might not have any vulnerability in itself. Still, it will be displayed as containing a vulnerability since it depends on package ‘B,’, which has a known vulnerability.
Once meta-vulnerabilities for a given package are calculated, they are cached in the ~/.npm folder and only re-evaluated if the advisory range changes or a new version of the package is published (in which case, the latest version is checked for meta-vulnerable status as well).
Suppose the chain of meta-vulnerabilities extends to the root project, and it’s impossible to update without changing its dependency ranges. In that case, the npm audit fix will require the --force option to apply the remediation.
Remediations may not require changes to the dependency ranges. In this case, all vulnerable packages will be updated to a version that does not have an advisory or meta-vulnerability posted against it without any need for developer interference.
5. Fixing vulnerabilities automatically
Assuming you have more than one or two vulnerabilities, this report can quickly get tedious. If you trust Node’s suggestions, you can run and verify the npm audit fix command. Since the npm audit fix is essentially running for it to be completed.
Once the fix command has concluded, you’ll get a summary of the completed changes:

This report will tell you if there are any potential breaking changes you should review. You can also rerun the command with npm audit fix force to make the update and deal with the broken code later.
6. Fixing vulnerabilities manually
Based on the audit report you have received, you have two options for dealing with changes that cannot be fixed automatically with an
- Forcing the audit fix to make the necessary changes, even if they might break your code.
- Go over each suggested fix and problem and decide how to deal with those yourself.
In the example we showed earlier, there are potentially 18 packages that require manual review and two packages that involve breaking changes.
Once you run the npm audit fix command, rerunning the report will give you only the problematic packages. Here, you need to look at the suggested remediation (assuming there is one) and see what else might be affected if you apply that fix.
In some of these cases, it might be easier to replace a package with a different one with similar usability rather than tracking a vulnerability down the dependency tree. That’s assuming the vulnerability is tagged as high or critical severity.
How and where to integrate npm audit in the SDLC
After installing packages, there are a few different SDLC integrations points to consider that highlight vulnerabilities as your developers code. While npm audit enables integration with the CLI, we will explore some other integrations using Jit, which can embed SCA scanning across your repos in minutes alongside other software security analysis like SAST and secrets detection:
- In the IDE using pre commit hooks: For those that want to catch security issues as they develop code, you can scan your dependencies directly in the IDE. using the Jit plugin for VScode. After installing Jit, open the command palette and search for "Jit: Install Pre Commit Hook". This will add the Jit pre-commit hook to your existing .pre-commit-config.yaml file. The hook will check for any security issues in your code before you commit it, helping you prevent insecure code from being committed to your repository.
- Within the PR: After installing the Jit GitHub app in the Github Marketplace, you can automatically scan every PR with npm audit to provide immediate feedback on every code change. This only examines the newly introduced code, which limits scan times and prevent vulnerability overload for developers.
- Scan the entire codebase: Just by activating SCA scanning with Jit, it will automatically scan all of your repos for third party vulnerabilities. You can also configure scans to analyze the entire codebase periodically.
These integrations don't only apply to SCA with npm audit - using Jit, you can unify SCA, SAST, secrets detection, IaC scanning , CSPM and more. Simply activate Jit on GitHub to roll out these security technologies across your codebase in a matter of minutes.
Starting Auditing Now
None of us want to face disgruntled users after our entire project fell apart due to a problem that wasn’t fixed on time. That’s why you need to audit your dependency vulnerabilities often.
Since most projects involve a team of developers, it’s much more efficient to audit your code after each PR. This is where CI/CD integrated tools for dependency audit come in handy. If doing all this automatically sounds easier than running the report yourself, how about giving Jit a try for free?

About the Author: Avichay Attlan is a full-stack engineer at JIT the Minimal Viable Security Platform for Developers. Avichay holds a B.Sc. in Software Engineering from Ben-Gurion University, and has been a full-stack developer in several fields and technologies, from semiconductors, to VoIP and business-communication and today cloud security. He has been employed at leading organizations such as Intel, Vonage (acquired by Ericsson) and now at Jit, where he focuses on building frictionless security into developer tools.