Grunt is a widespread and popular task runner for JavaScript. Its architecture is based on plugins that you can combine and configure to create a powerful build system for your web applications. The Grunt ecosystem is huge and offers hundreds of plugins to help you with tedious and repetitive tasks, such as linting, testing, minification, image processing, and so on.
I had a blast building and publishing my Grunt plugin and I’m keen to share with you the experience I’ve gained along the way. I’ll show you how to build your own little Grunt plugin and publish it via the npm package manager.
The plugin we will build in this article will serve as a remedy for so-called typographic orphans — single words on the last line of a paragraph or block element — by replacing the last space with a non-breakable space. This is a quite easy task, but while implementing it, we’ll touch all the relevant subjects, such as setup, best practices, configuration, testing, and publishing.
 If you want to get an in-depth knowledge of Grunt’s mechanics or wish to contribute to an existing plugin this article is for you. Before starting, I suggest you to take some time to have a look at the official Getting Started guide and at Etienne Margraff’s article titled How to Grunt and Gulp Your Way to Workflow Automation.
The plugin that we’ll build in this article is available on GitHub. For your benefit, I added tags (called
If you want to get an in-depth knowledge of Grunt’s mechanics or wish to contribute to an existing plugin this article is for you. Before starting, I suggest you to take some time to have a look at the official Getting Started guide and at Etienne Margraff’s article titled How to Grunt and Gulp Your Way to Workflow Automation.
The plugin that we’ll build in this article is available on GitHub. For your benefit, I added tags (called step01 – step04) to the repository. If you want to follow along with the code at hand just check out the respective tag. For example the command git checkout tags/step02 mirrors the state of the code after section 2.
Setting up Your Playground
Assuming you have Node.js installed on your machine, we can immediately get started to set up our plugin skeleton. Luckily, the Grunt team provides a nice tool calledgrunt-init to make plugin development easy. We’ll install this tool globally with npm and clone the Grunt plugin template from Git:
npm install -g grunt-init
git clone git://github.com/gruntjs/grunt-init-gruntplugin.git .grunt-init/gruntplugingrunt-init:
mkdir grunt-typographic-adoption
cd grunt-typographic-adoption
grunt-init gruntplugingrunt-init, you’re lucky. The scaffolding script will use the information provided by Git and GitHub to populate a lot of the points you have to tick off. Stick to the default values for Grunt’s and Node.js’ version unless some of your dependencies demand a specific one. With regard to versioning your own plugin, you should get familiar with Semantic Versioning. I suggest you to take a look at the official documentation for project scaffolding where you can read more about other available templates for grunt-init and ways to specify default prompt answers.
Now, let’s have a look at the directory and file structure we have in place now:
.gitignore
.jshintrc
Gruntfile.js
LICENSE
README.md
package.json
- tasks
  | - typographic_adoption.js
- test
  | - expected
  | - custom_options
    | - default_options
  | - fixtures
    | - 123
    | - testing
| - typographic_adoption_test.js.gitignore file comes in handy once you put your plugin under version control (operation that you should do and hopefully you already performed!). The Gruntfile.js specifies what needs to be done to build our plugin and luckily it comes with some pre-defined tasks, namely JavaScript linting (configured in .jshintrc) and a simple test suite (we’ll examine in detail the corresponding test folder in a minute). LICENSE and README.md are self-explanatory, pre-filled with standard content and important once you decide to publish your plugin.
Finally, package.json contains all the information about our plugin including all its dependencies. Let’s install and run it:
npm install
grunttypographic_adoption task in action and the output Done, without errors.. Give yourself a pat on the back since we have a fully functional Grunt plugin. It’s not doing anything particularly useful yet, but we’ll get there. The whole magic happens in tasks/typographic_adoption.js where we’ll implement our anti-widow code. But first of all, we’ll write some tests.
Test-Driven Development
It’s always a good idea to implement the tests first and thus specify what you want your task to accomplish. We’ll make the tests pass again, which gives us a good hint that we implemented everything correctly. Test-driven development is amazing and the users of your plugin will thank you! So what do we want to accomplish? I already told you that we want to tackle typographic orphans, that is single words on the last line of a paragraph or other block element. We’ll do this by scanning files for HTML block elements, extracting the inner text, and replacing the last space with a non-breakable space. In other words, we feed our plugin with this:<p>
Lorem ipsum dolor sit amet, consetetur sadipscing elitr,
sed diam nonumy eirmod tempor invidunt ut labore et dolore
magna aliquyam erat, sed diam voluptua.
</p><p>
Lorem ipsum dolor sit amet, consetetur sadipscing elitr,
sed diam nonumy eirmod tempor invidunt ut labore et dolore
magna aliquyam erat, sed diam voluptua.
</p>nodeunit testing task, we can implement this kind of tests easily.
The mechanism is simple:
- Grunt executes our typographic adoption task on all files specified in
Gruntfile.js(best practice is to put them intotest/fixtures). - The transformed files are then stored in
tmp(the.gitignorefile makes sure that this folder is never going into your code repository). - The
nodeunittask looks for test files intestand findstypographic_adoption_test.js. This file specifies any number of tests, that is checking whether a file intmpequals its counterpart intest/expected. nodeunitinforms us on the command line if and which tests failed or if the whole test suite passed.
h1, p, blockquote, th, and many others), while we let the user customize this with an option to set arbitrary CSS selectors. That helps to widen or narrow down the scope of our task.
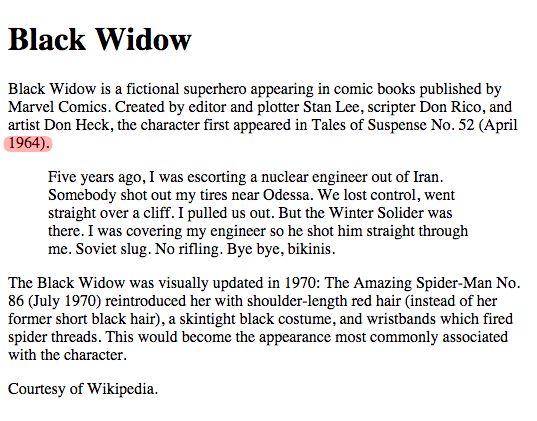
Now it’s time to get our hands dirty. Firstly, navigate to test/fixtures, remove the 123 file, and edit testing into a simple HTML file with some block elements that you want to test your plugin against. I decided to use a short article about Marvel’s Black Widow since typographic orphans are also sometimes called widows.
Now, copy the content of test/fixtures/testing and override the two files in test/expected with it. Edit them according to what you expect as an outcome after your plugin processed the testing file. For the case with custom options I chose the scenario where the user only wants <p> elements to get de-orphanized.
Lastly, edit Gruntfile.js to target only your testing file (that means remove the 123 bit from the files arrays) and give your tests a meaningful description in test/typographic_adoption_test.js.
The moment of truth has arrived. Run grunt in your project’s root:
grunt
...
Warning: 2/2 assertions failedImplementing the Task
Before we start with implementation, we should think to the helpers we might need. Since we want to search HTML files for certain elements and alter their text portion, we need a DOM traversing engine with jQuery-like capabilities. I found cheerio very helpful and lightweight, but feel free to use whatever you are comfortable with. Let’s plug in cheerio as a dependency:npm install cheerio --savenode_modules directory and also, thanks to --save, saves it under dependencies in your package.json. The only thing left to do is open up tasks/typographic_adoption.js and load the cheerio module:
module.exports = function(grunt) {
  var cheerio = require('cheerio');
...options object inside the grunt.registerMultiTask function and change it accordingly:
var options = this.options({
  selectors: 'h1.h2.h3.h4.h5.h6.p.blockquote.th.td.dt.dd.li'.split('.')
});options object gives us all the customized settings the plugin users put into their Gruntfile.js but also the possibility to set default options. Go ahead and change the custom_options target in your own Gruntfile.js to reflect whatever your tests from chapter 2 are testing. Since I just want paragraphs to get processed, it looks like this:
custom_options: {
  options: {
    selectors: ['p']
  },
  files: {
    'tmp/custom_options': ['test/fixtures/testing']
  }
}tasks/typographic_adoption.js and right under the line where you are building the options object replace the scaffolding code with this:
this.files.forEach(function(f) {
  var filepath = f.src, content, $;

  content = grunt.file.read(filepath);
  $ = cheerio.load(content, { decodeEntities: false });

  $(options.selectors.join(',')).each(function() {
    var text = $(this).html();
    text = text.replace(/ ([^ ]*)$/, ' $1');
    $(this).html(text);
  });

  grunt.file.write(f.dest, $.html());
  grunt.log.writeln('File "' + f.dest + '" created.');
});Gruntfile.js. The function we call for each file loads the file’s content with the grunt.file API, feeds it into cheerio, and searches for all the HTML elements we have selected in the options. Once found, we replace the last space inside the text of each element with a non-breakable space and write that back to a temporary file. Our test suite can now compare those temporary files with our expected ones and hopefully it shows you something like this:
grunt
...
Running "nodeunit:tests" (nodeunit) task
Testing typographic_adoption_test.js..OK
>> 2 assertions passed (59ms)

Done, without errors.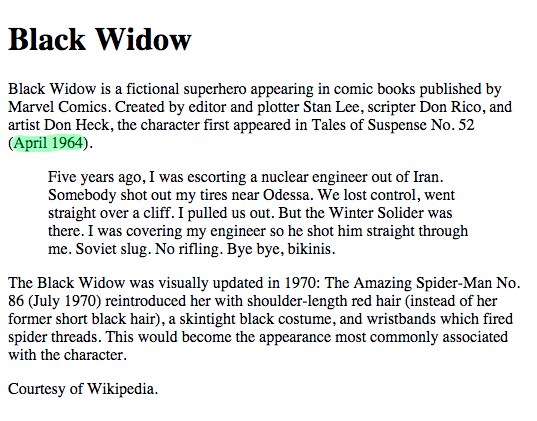 If you want you can further improve, extend, and polish it until you are happy with the result and feel like sharing it with other developers.
Publish Your Plugin
Publishing our plugin is easy and it takes only a few minutes. Before we push our code, we have to make sure that everything is set up correctly. Let’s take a look at thepackage.json file where all the information that npm uses in their registry reside. Our initial template already took care of adding gruntplugin to the keywords list, which is essential for our plugin to be found as a Grunt plugin. This is the moment to take some time and add more keywords so people can find our plugin easily.
We also take care of our README.md file and provide our future users with documentation on our task’s general usage, use cases, and options. Thanks to grunt-init we already got a nice first draft to work with and can polish it from there.
Once these preparations are done, we are good to publish our plugin. If you don’t have a npm account yet, you can create one on their website, or fire up npm on the command line and set up everything there. The following command will ask you for a username and password and either create a new user on npm and save your credentials at .npmrc or log you in:
npm addusernpm publishpackage.json file. Take a look at the Grunt plugin we just created here.
Conclusions
Thanks to this tutorial, you have learned how to create a Grunt plugin from scratch. Moreover, if you’ve published it, you’re now the proud owner of a Grunt plugin that is available on the Web, ready to be used by other web developers. Keep it up, keep maintaining your plugin, and stick to test-driven development. If you are in the process of building a Grunt plugin or already built one and want to share something around the process, please comment in the section below. Once again, I want to highlight that the plugin we’ve build in this article is available on GitHub.Frequently Asked Questions (FAQs) about Building and Publishing Your Own Grunt Plugin
What is a Grunt plugin and why should I create one?
A Grunt plugin is a piece of code that extends the functionality of Grunt, a JavaScript task runner. It allows you to automate repetitive tasks such as minification, compilation, unit testing, and linting. Creating your own Grunt plugin allows you to customize these tasks to suit your specific needs, improving your workflow and productivity.
How do I start building my own Grunt plugin?
To start building your own Grunt plugin, you need to have Node.js and npm installed on your computer. Then, you can use the grunt-init command to create a new Grunt plugin project. This will generate a basic structure for your plugin, including a package.json file and a Gruntfile.js file.
How do I publish my Grunt plugin to npm?
Once you’ve built your Grunt plugin, you can publish it to npm by running the npm publish command in your project directory. Before you can do this, you need to create an npm account and log in to it using the npm login command. After publishing, your plugin will be available for others to install and use.
What is the purpose of the package.json file in a Grunt plugin?
The package.json file in a Grunt plugin contains metadata about the plugin, such as its name, version, and dependencies. This information is used by npm when installing the plugin and by Grunt when loading the plugin.
How do I add tasks to my Grunt plugin?
You can add tasks to your Grunt plugin by defining them in the Gruntfile.js file. Each task is a function that takes two arguments: the Grunt object and a task-specific options object. The Grunt object provides methods for configuring and running tasks, while the options object allows you to customize the behavior of the task.
How do I test my Grunt plugin?
You can test your Grunt plugin by writing unit tests using a testing framework such as Mocha or Jasmine. These tests should verify that your tasks are functioning correctly. You can run your tests using the grunt test command.
Can I use third-party libraries in my Grunt plugin?
Yes, you can use third-party libraries in your Grunt plugin. You can install them using npm and require them in your Gruntfile.js file. Be sure to list these libraries as dependencies in your package.json file so that they are installed along with your plugin.
How do I update my Grunt plugin?
You can update your Grunt plugin by making changes to its code and then publishing a new version to npm. Be sure to update the version number in your package.json file before publishing.
Can I share my Grunt plugin with others?
Yes, you can share your Grunt plugin with others by publishing it to npm. Others can then install your plugin using the npm install command.
What are some best practices for writing a Grunt plugin?
Some best practices for writing a Grunt plugin include writing clear and concise code, documenting your code thoroughly, writing unit tests for your tasks, and following the Grunt plugin conventions.
 Stephan Max
Stephan is a Dublin-based developer originally from Germany. Holding a degree in computer science and being a code wrangler at heart, he works as a technical cloud adviser inside the IBM Bluemix team by day and moonlights as a front-end developer and JavaScript engineer. He loves traveling, writing, music, and building stuff that helps people.