In this tutorial we’re going to build an SMS reminder app with Node.js. We’re going to use the user’s Google Calendar to get appointments and then send the text message with Twilio.
As ever, you can find the code used in this tutorial from the github repo.
Setting Things Up
First you’re going to need to have a Google account and a Twilio account. If you don’t have those yet, you can go ahead and sign up. Here are the links:
You don’t need to worry about Twilio, it’s free to try.
Google Console Project
Once you have a Google account, go to the Google Console and create a new app. By default the Google Console page shows you the dashboard of the most recent app that you’ve worked on. But if you haven’t work on any projects yet it will show the following:
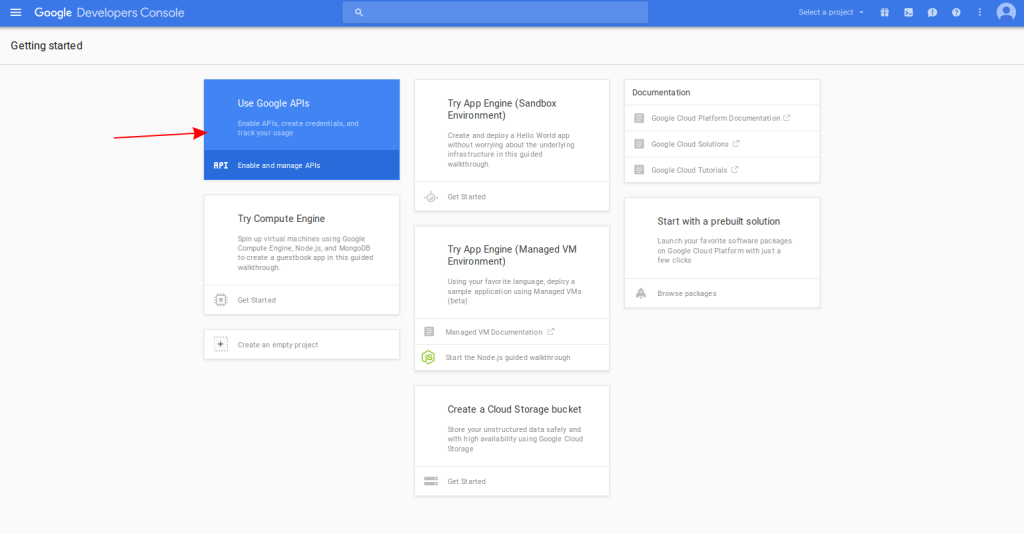
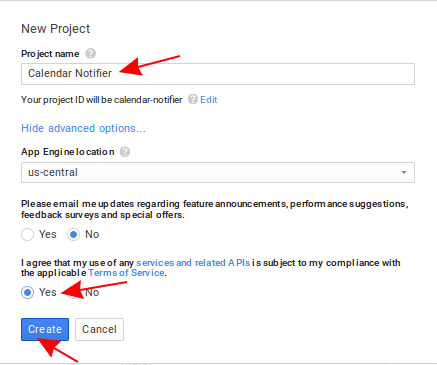
From there you can click on the select project menu at the upper right corner and select create a project. This opens a modal window which allows you to enter the title of the project.
Once the project is created, the dashboard is displayed. From there you can click on the use Google APIs, search for the Google Calendar API and enable it.
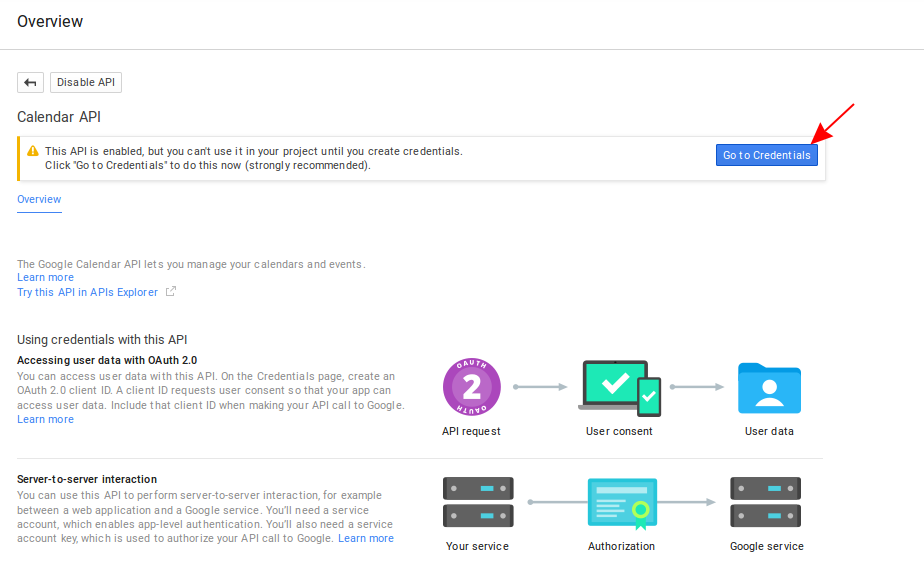
Once the API is enabled, it will ask you to create credentials. Click Go to Credentials to begin setting it up. This will show you the following:

Click on the Add credentials button then select OAuth 2.0 client ID.
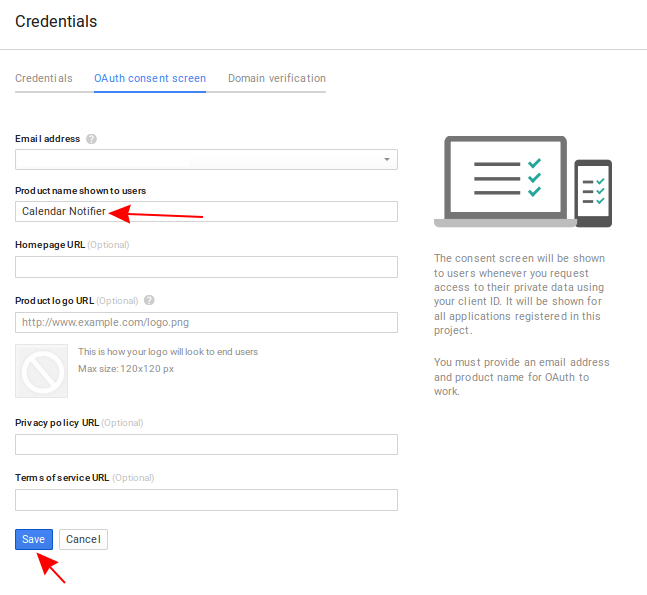
This will ask you to configure consent screen first. Click on configure consent screen.
Enter a value for the Product name shown to users text field and click on save.
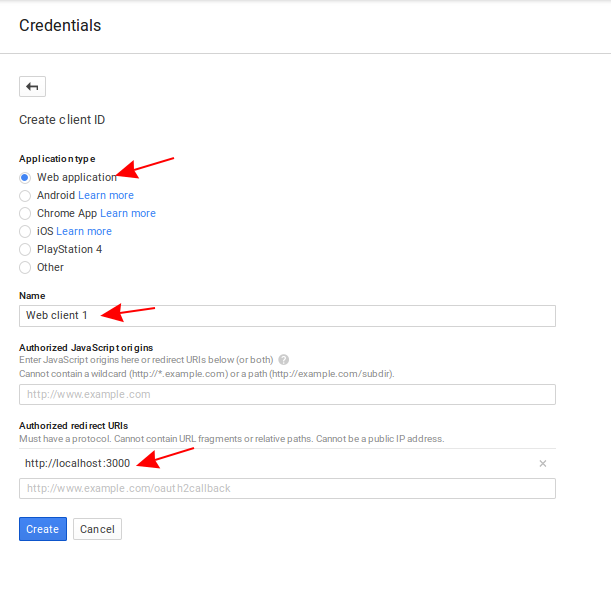
Once that’s configured you can now create the client ID. Select Web application for the application type, leave the default name (if you want), enter http://localhost:3000/login for the Authorized redirect URIs then click create.
This opens a modal which displays the client ID and client secret. Take note of those for now as we will be using them later.
Twilio
Once you’ve created a Twilio account, go to the settings page and take note of the values for the AccountSID and AuthToken under the Live API Credentials.
Next go to the programmable voice dashboard. This is where you can see the sandbox number. You can use this number for testing twilio. But Later on you will need to buy a phone number so that the text messages sent by twilio won’t have “sent from twilio sandbox” added to it. Another limit of the Twilio sandbox number is that it can only be used with verified numbers. Which means you have to register a phone number with twilio in order to send a message to it. You can do this from the manage caller IDs page.
Building the App
Now we’re ready to build the app. Before we proceed I’d like to provide a brief overview on how we’re going to implement the app. There’s going to be three major files: one for the server, one for caching events from Google Calendar and one for reminding the user. The server is used for allowing the user to login and obtaining an access token. The events will be saved in the MySQL database and the global app configuration will be added in a .json file. Node’s implementation of cron will be used for executing the task for caching events and reminding the user.
Installing the Dependencies
On your working directory, create a package.json file and add the following:
{
  "name": "google-calendar-twilio",
  "version": "0.0.1",
  "dependencies": {
    "config": "^1.17.1",
    "cron": "^1.1.0",
    "express": "^4.13.3",
    "googleapis": "^2.1.6",
    "moment": "^2.10.6",
    "moment-timezone": "^0.4.1",
    "mysql": "felixge/node-mysql",
    "twilio": "^2.6.0"
  }
}
In this file we’re specifying the name and version of the libraries which our app depends on. Here’s a break down of usage for each library:
config– used for storing and retrieving global app configuration.cron– used for executing a specific task at a specific time of the day. In this app we’re using it for running the task for caching events from the users Google calendar and sending text reminders.express– the defacto web framework for Node.js. We’re using it to serve the login page.googleapis– the official Node.js client for Google’s APIs.moment– a date and time library. We’re using it to easily format the dates that we get from the Google Calendar API.moment-timezone– the timezone plugin for moment. This sets the default timezone for the app.mysql– a MySQL client for Node.js.twilio– the official Twilio client for Node.js. This allows us to send text reminders.
Execute npm install from your terminal to install all the dependencies.
Database
As mentioned earlier, we’re going to use the MySQL database for this app. Go ahead and create a new database using the database management tool of your choice. Then use the following SQL dump file to create the tables: appointment-notifier.sql.
There are two tables in the database: users and appointments. The users table is used for storing the user’s data. In the case of this app, we’re only going to store one user, and only the access token is stored.
The appointments table is used for storing the events which we got from the Google Calendar API. Note that it has no user_id field in it because we only have one user. And we’re going to fetch all the rows which have zero as the value for the notified field.
App Configuration
On your working directory, create a config folder then inside it create a default.json file. This is where we will put the global app configuration. This includes the timezone, the phone number to which we’re going to send the reminders, the database, google app and Twilio settings.
Here’s the template, be sure to fill in all the fields.
{
    "app": {
        "timezone": "Asia/Manila"
    },

    "me": {
        "phone_number": ""
    },

    "db": {
        "host": "localhost",
        "user": "root",
        "password": "secret",
        "database": "calendar_notifier"
    },

    "google":{
        "client_id": "THE CLIENT ID OF YOUR GOOGLE APP",
        "client_secret": "THE CLIENT SECRET OF YOUR GOOGLE APP",
        "redirect_uri": "http://localhost:3000/login",
        "access_type": "offline",
        "scopes": [
            "https://www.googleapis.com/auth/plus.me",
            "https://www.googleapis.com/auth/calendar"
        ]
    },

    "twilio": {
        "sid": "YOUR TWILIO SID",
        "secret": "YOUR TWILIO SECRET",
        "phone_number": "+YOUR TWILIO PHONE NUMBER / SANDBOX NUMBER"
    }

}
Common Files
As good developers we need to avoid code repetition as much as we can. That’s why we need to put code that’s needed by those three major files (server, cache, notify) that I mentioned earlier into separate files. Create a common folder on your working directory. This is where we’re going to add the common files.
Database
Create a db.js file inside the common directory then add the following:
var config = require('config');

var db_config = config.get('db');
var mysql = require('mysql');
var connection = mysql.createConnection({
    host: db_config.host,
    user: db_config.user,
    password: db_config.password,
    database: db_config.database
});

exports.db = connection;
This uses the config library to get the configuration values that we’ve added earlier on the config/default.json file. Specifically we’re getting the database configuration so that we can connect to the database. Then we’re exporting this module so that we can use it later on from another file.
Time
The time.js file is used for setting the default timezone with the moment-timezone library. We also export the value for the timezone since we’re going to use it later when running the two cron tasks (caching events and notifying users).
var config = require('config');
var app_timezone = config.get('app.timezone');
var moment = require('moment-timezone');
moment.tz.setDefault(app_timezone);

exports.config = {
    timezone: app_timezone
};

exports.moment = moment;
The google.js file is used for initializing the Google client and the OAuth2 client. In order to initialize the OAuth2 client we need to pass in the client ID, client secret and the redirect URL which we have added in the configuration file earlier. Then we initialize the Google Calendar service. Lastly, we export the OAuth2 client, calendar and the Google configuration.
var config = require('config');
var google_config = config.get('google');

var google = require('googleapis');
var OAuth2 = google.auth.OAuth2;
var oauth2Client = new OAuth2(google_config.client_id, google_config.client_secret, google_config.redirect_uri);

var calendar = google.calendar('v3');

exports.oauth2Client = oauth2Client;
exports.calendar = calendar;
exports.config = google_config;
Creating the Server
Now we’re ready to work on the server. The server is responsible for getting the access token. Which can be used for talking to the Google Calendar API without the user being currently logged in. Begin by creating a server.js file and adding the following:
var google = require('./common/google');
var connection = require('./common/db');

var express = require('express');
var app = express();

var server = app.listen(3000, function () {
  var host = server.address().address;
  var port = server.address().port;

  console.log('Example app listening at http://%s:%s', host, port);
});


function updateAccessToken(tokens, response){

    connection.db.query(
        "UPDATE users SET access_token = ? WHERE id = 1",
        [JSON.stringify(tokens)],
        function(err, rows, fields){
            if(!err){
                console.log('updated!');
                response.send('connected!');
            }else{
                console.log('error updating table');
                console.log(err);
                response.send('error occured, please try again');
            }
        }
    );

}

app.get('/', function(req, res){
    var url = google.oauth2Client.generateAuthUrl({
      access_type: google.config.access_type,
      scope: google.config.scopes
    });

    res.send('<a href="' + url + '">login to google</a>');
});


app.get('/login', function(req, res){
    var code = req.query.code;
    console.log('login');

    google.oauth2Client.getToken(code, function(err, tokens){

      if(!err){
        console.log('tokens');
        console.log(tokens);

        updateAccessToken(tokens, res);

      }else{
        res.send('error getting token');
        console.log('error getting token');
      }
    });

});
Breaking it down:
First we import the google and db module that we’ve created earlier.
var google = require('./common/google');
var connection = require('./common/db');
Create an Express server that runs on port 3000 of localhost. This is why we’ve added http://localhost:3000/login earlier on the app configuration and in the redirect URI for Google:
var express = require('express');
var app = express();

var server = app.listen(3000, function () {
  var host = server.address().address;
  var port = server.address().port;

  console.log('Example app listening at http://%s:%s', host, port);
});
Define an updateAccessToken function. This accepts two arguments: tokens and response. The token is the access token which we get from Google after the user has given the necessary permissions. And the response is the response object that comes from Express. We’re passing it to this function so that we could send a response to the user. Inside the function, we update the access_token of the first row. As mentioned earlier, this app only works for a single user. Once the access_token is updated, we send the response.
function updateAccessToken(tokens, response){

    connection.db.query(
        "UPDATE users SET access_token = ? WHERE id = 1",
        [JSON.stringify(tokens)],
        function(err, rows, fields){
            if(!err){
                console.log('updated!');
                response.send('connected!');
            }else{
                console.log('error updating table');
                console.log(err);
                response.send('error occured, please try again');
            }
        }
    );

}
Add the route for the home page. This gets executed when http://localhost:3000 is accessed. From here we generate the authentication URL. This uses the generateAuthUrl method from the oauth2Client. It accepts an object containing the access_type and the scope. We’re getting those values from the app configuration file that we’ve created earlier. Lastly, we send the actual link that the user can click on. Note that you should always do this inside a view, but in order to simplify things we’re just going to directly return the link.
app.get('/', function(req, res){
    var url = google.oauth2Client.generateAuthUrl({
      access_type: google.config.access_type,
      scope: google.config.scopes
    });

    res.send('<a href="' + url + '">login to google</a>');
});
Add the route for the login. This is the route where the user gets redirected after giving the necessary permissions to the app. Google passes in a query parameter called code. And we’re getting it through the query object in the request. We then call the getToken method and pass in the code as the argument. This would give us the access token. So we call the updateAccessToken function to save it into the database.
app.get('/login', function(req, res){
    var code = req.query.code;
    console.log('login');

    google.oauth2Client.getToken(code, function(err, tokens){

      if(!err){
        console.log('tokens');
        console.log(tokens);

        updateAccessToken(tokens, res);

      }else{
        res.send('error getting token');
        console.log('error getting token');
      }
    });

});
Creating the Cacher
The cacher is responsible for saving the users appointments into the database. This prevents us from having to query the Google Calendar API directory every time we send reminders. Create a cache.js file and add the following:
var google = require('./common/google');
var connection = require('./common/db');
var time = require('./common/time');

var CronJob = require('cron').CronJob;


function addAppointment(event_id, summary, start, end){

    connection.db.query(
        "INSERT INTO appointments SET id = ?, summary = ?, datetime_start = ?, datetime_end = ?, notified = 0",
        [event_id, summary, start, end],
        function(err, rows, fields){
            if(!err){
                console.log('added!');
            }else{
                console.log('error adding to table');
            }
        }
    );

}

function getEvents(err, response){

    console.log('response');
    console.log(response);
    if(err){
      console.log('The API returned an error: ' + err);
    }

    var events = response.items;

    if(events.length == 0){
        console.log('No upcoming events found.');
    }else{
      console.log('Upcoming 10 events:');
      for(var i = 0; i < events.length; i++){
        var event = events[i];
        var event_id = event.id;
        var summary = event.summary;
        var start = event.start.dateTime || event.start.date;
        var end = event.end.dateTime || event.end.date;

        addAppointment(event_id, summary, start, end);

      }

    }

}

function cache(){

    var current_datetime = time.moment().toISOString();

    google.calendar.events.list({
        auth: google.oauth2Client,
        calendarId: 'primary',
        timeMin: current_datetime,
        maxResults: 10,
        singleEvents: true,
        orderBy: 'startTime'
    }, getEvents);

}

connection.db.query('SELECT access_token FROM users WHERE id = 1', function(error, results, fields){
    if(!error){
        var tokens = JSON.parse(results[0].access_token);

        google.oauth2Client.setCredentials({
          'access_token': tokens.access_token,
          'refresh_token': tokens.refresh_token
        });

        new CronJob('0 0 * * *', cache, null, true, time.config.timezone);
        //cache(); //for testing
    }
});
Breaking it down:
First we import all the modules that we need.
var google = require('./common/google');
var connection = require('./common/db');
var time = require('./common/time');

var CronJob = require('cron').CronJob;
The addAppointment function is responsible for saving the appointments into the appointments table. This accepts the event_id, summary, start and end datetime of the appointment. The event_id is basically the ID of the specific appointment in Google Calendar. We’re using it as the value for the primary key, which means that duplicates won’t get inserted into the appointments table. What’s lacking here is the means to compare the appointments that are already in the database and the ones returned by the API. If for some reason the schedule of the appointment changes, the database won’t be updated since all we’re doing here is inserting into the table. I’ll be leaving that for your todo list.
function addAppointment(event_id, summary, start, end){

    connection.db.query(
        "INSERT INTO appointments SET id = ?, summary = ?, datetime_start = ?, datetime_end = ?, notified = 0",
        [event_id, summary, start, end],
        function(err, rows, fields){
            if(!err){
                console.log('added!');
            }else{
                console.log('error adding to table');
            }
        }
    );

}
The getEvents function is responsible for looping through all the appointments returned by the API. This uses the addAppointment method to save the appointment for each iteration of the loop.
function getEvents(err, response){

    console.log('response');
    console.log(response);
    if(err){
      console.log('The API returned an error: ' + err);
    }

    var events = response.items;

    if(events.length == 0){
        console.log('No upcoming events found.');
    }else{

      for(var i = 0; i < events.length; i++){
        var event = events[i];
        var event_id = event.id;
        var summary = event.summary;
        var start = event.start.dateTime || event.start.date;
        var end = event.end.dateTime || event.end.date;

        addAppointment(event_id, summary, start, end);

      }

    }

}
The cache method is the one that’s making the actual call to the Google Calendar API. This is through the use of the Google Client. Here we’re calling the list method on the calendar.events object. This accepts two arguments: first is the object containing the options for the query and the second is the function to be executed once a result is returned.
function cache(){

    var current_datetime = time.moment().toISOString();

    google.calendar.events.list({
        auth: google.oauth2Client,
        calendarId: 'primary',
        timeMin: current_datetime,
        maxResults: 10,
        singleEvents: true,
        orderBy: 'startTime'
    }, getEvents);

}
In the object containing the options, we have the following:
auth– this is theoauth2Client. This is used for authenticating the request.calendarId– the ID of the calendar in which we’ll be getting the appointments. In this case we’re using the primary calendar. Google Calendar actually allows you to create many calendars. Others can also share their calendars to you. And each of those calendars have their own ID. That is what we’re specifying here. If you’re interested in accessing other calendars be sure to check out the API documentation on Calendars.timeMin– the base datetime to be used in the query. In this case we’re using the current datetime. Because who wants to get notified of an event that happened in the past? Note though that this uses the ISO 8601 standard for representing the time. Thankfully there’s a method calledtoISOStringin moment which we can use to get that.maxResults– the total number of results you want to return.singleEvents– allows you to specify whether to return only single one-off events. Here we’ve usedtruewhich means that recurring events wouldn’t get returned.orderBy– allows you to specify the order in which the results will be returned. In this case we’ve usedstartTimewhich orders the result in ascending order based on their start times. This is only available ifsingleEventsoption is set totrue.
All of these options and many others can be found in the Events: list documentation
Get the access_token from the database and use it for setting the credentials for the oauth2Client client. Once that’s done, create a new cron job which will run the cache method every day at 12 midnight.
connection.db.query('SELECT access_token FROM users WHERE id = 1', function(error, results, fields){
    if(!error){
        var tokens = JSON.parse(results[0].access_token);

        google.oauth2Client.setCredentials({
          'access_token': tokens.access_token,
          'refresh_token': tokens.refresh_token
        });

        new CronJob('0 0 * * *', cache, null, true, time.config.timezone);
        //cache(); //for testing
    }
});
Creating the Notifier
Last but not least we have the notifier (notify.js). This is responsible for getting the appointments from the database and determining if they’re ripe for notification. If they are, then we send them.
var config = require('config');

var twilio_config = config.get('twilio');
var twilio = require('twilio')(twilio_config.sid, twilio_config.secret);

var connection = require('./common/db');
var time = require('./common/time');

var CronJob = require('cron').CronJob;

function updateAppointment(id){

    //update appointment to notified=1
    connection.db.query(
        "UPDATE appointments SET notified = 1 WHERE id = ?",
        [id],
        function(error, results, fields){
            if(!error){
                console.log('updated appointment with ID of ' + id);
            }
        }
    );
}

function sendNotifications(error, results, fields){

    var phone_number = config.get('me.phone_number');
    console.log(phone_number);

    console.log('results');
    console.log(results);

    if(!error){
        for(var x in results){

            var id = results[x].id;
            var datetime_start = results[x].datetime_start;
            var datetime_end = results[x].datetime_end;

            var appointment_start = time.moment(datetime_start);
            var summary = results[x].summary + " is fast approaching on " + appointment_start.format('MMM DD, YYYY hh:mm a');

            var hour_diff = appointment_start.diff(time.moment(), 'hours');

            console.log('hour diff:');
            console.log(hour_diff);

            if(hour_diff <= 24){

                twilio.sendMessage({
                    to: phone_number,
                    from: twilio_config.phone_number,
                    body: summary
                }, function(err, responseData){

                    if(!err){
                        console.log('message sent!');
                        console.log(responseData.from);
                        console.log(responseData.body);
                    }else{
                        console.log('error:');
                        console.log(err);
                    }
                });

                updateAppointment(id);
            }


        }
    }

}


function startTask(){

    connection.db.query('SELECT * FROM appointments WHERE notified = 0', sendNotifications);

}

new CronJob('0 12 * * *', startTask, null, true, time.config.timezone);
Breaking it down:
Import all the required modules.
var config = require('config');

var twilio_config = config.get('twilio');
var twilio = require('twilio')(twilio_config.sid, twilio_config.secret);

var connection = require('./common/db');
var time = require('./common/time');

var CronJob = require('cron').CronJob;
Create an updateAppointment function. This accepts the ID of the appointment as its argument. All it does is set the value for the notified field to 1 which means that the notification for the specific appointment has already been sent.
function updateAppointment(id){

    //update appointment to notified=1
    connection.db.query(
        "UPDATE appointments SET notified = 1 WHERE id = ?",
        [id],
        function(error, results, fields){
            if(!error){
                console.log('updated appointment with ID of ' + id);
            }
        }
    );
}
Next we have the sendNotifications function. This is responsible for actually sending the text reminders with Twilio. This function gets called after fetching the appointments from the database. That’s why it has the error, results, and fields arguments passed into it. The error contains any error from the database. The results contain the rows returned from the database. And the fields contain information about the returned results fields.
function sendNotifications(error, results, fields){

    var phone_number = config.get('me.phone_number');
    console.log(phone_number);

    console.log('results');
    console.log(results);

    if(!error){
        for(var x in results){

            var id = results[x].id;
            var datetime_start = results[x].datetime_start;
            var datetime_end = results[x].datetime_end;

            var appointment_start = time.moment(datetime_start);
            var summary = results[x].summary + " is fast approaching on " + appointment_start.format('MMM DD, YYYY hh:mm a');

            var hour_diff = appointment_start.diff(time.moment(), 'hours');

            console.log('hour diff:');
            console.log(hour_diff);

            if(hour_diff <= 24){

                twilio.sendMessage({
                    to: phone_number,
                    from: twilio_config.phone_number,
                    body: summary
                }, function(err, responseData){

                    if(!err){
                        console.log('message sent!');
                        console.log(responseData.from);
                        console.log(responseData.body);
                        updateAppointment(id);
                    }else{
                        console.log('error:');
                        console.log(err);
                    }
                });

            }


        }
    }

}
Inside the function we get the users phone number from the app configuration.
var phone_number = config.get('me.phone_number');
console.log(phone_number);
Check if there are any errors and if there are none proceed with looping through all the results that were returned.
if(!error){
    for(var x in results){
        ...
    }
}
Inside the loop we extract all the values that we need and construct the actual message to be sent. We also get the hour difference between the current time and the start time of the appointment. We check if the hour difference is less than or equal to 24 hours.
var id = results[x].id;
var datetime_start = results[x].datetime_start;
var datetime_end = results[x].datetime_end;

var appointment_start = time.moment(datetime_start);
var summary = results[x].summary + " is fast approaching on " + appointment_start.format('MMM DD, YYYY hh:mm a');

var hour_diff = appointment_start.diff(time.moment(), 'hours');

console.log('hour diff:');
console.log(hour_diff);

if(hour_diff <= 24){
    ...
}
If it’s less than or equal to 24 hours, we send the notification. This is through the use of the Twilio client. We call sendMessage and pass in an object containing the to (the users phone number), from (Twilio’s sandobox number or a phone number that you bought from Twilio), and the body which contains the text message. If there aren’t any errors returned, we assume that the notification has been sent. So we call the updateAppointment function to set the notified field to 1, so it won’t get selected the next time the task runs.
twilio.sendMessage({
    to: phone_number,
    from: twilio_config.phone_number,
    body: summary
}, function(err, responseData){

    if(!err){
        console.log('message sent!');
        console.log(responseData.from);
        console.log(responseData.body);

        updateAppointment(id);
    }else{
        console.log('error:');
        console.log(err);
    }
});
Finally we have the startTask method. All it does is to select all the appointments from the appointments table whose notification hasn’t been sent yet. This function gets executed every 12 noon and 6pm.
function startTask(){

    connection.db.query('SELECT * FROM appointments WHERE notified = 0', sendNotifications);

}

new CronJob('0 12,18 * * *', startTask, null, true, time.config.timezone);
Conclusion
That’s it! In this tutorial you’ve learned how to create an SMS reminder app with Twilio. Specifically we’ve taken a look at how to get the user’s appointments through the Google Calendar API. We have saved those in the database and notified the user via Twilio. You can find the code used in this tutorial from the github repo.
Frequently Asked Questions (FAQs) about Building an SMS Appointment Reminder App with Twilio
How can I test the functionality of my SMS appointment reminder app?
Testing the functionality of your SMS appointment reminder app is crucial to ensure it works as expected. You can use Twilio’s built-in testing tools to simulate sending and receiving messages. You can also use unit testing frameworks like Jest or Mocha for your JavaScript code. Remember to test all the functionalities including appointment creation, reminder scheduling, and SMS sending.
Can I customize the reminder messages in the app?
Yes, you can customize the reminder messages in your app. The message content is typically defined in your server-side code. You can modify this to include any information you want, such as the appointment time, location, or any other details relevant to the appointment.
How can I schedule reminders for different time zones?
Scheduling reminders for different time zones can be a bit tricky. You need to store the time zone information for each appointment and use this when scheduling the reminders. JavaScript’s Date object can handle time zone conversions, or you can use libraries like Moment.js for more complex scenarios.
What happens if the SMS fails to send?
If an SMS fails to send, Twilio will attempt to resend it. You can also set up error handling in your code to log these failures and take appropriate action, such as resending the message or notifying the user.
Can I use this app for multiple users?
Yes, you can use this app for multiple users. You would need to modify the code to associate appointments with specific users and ensure that reminders are sent to the correct phone number. This might involve adding user authentication and managing user data in your database.
How secure is the data in this app?
The security of your data depends on how you implement your app. Twilio provides secure communication channels, but you also need to ensure that your server and database are secure. This might involve using secure protocols, encrypting sensitive data, and following best practices for web security.
Can I integrate this app with my existing scheduling system?
Yes, you can integrate this app with your existing scheduling system. This would involve modifying the code to interact with your system’s API or database. The exact details would depend on the specifics of your scheduling system.
How much does it cost to send SMS reminders with Twilio?
The cost of sending SMS reminders with Twilio depends on the number of messages you send and the countries you send them to. Twilio provides a detailed pricing structure on their website.
Can I send reminders to international numbers?
Yes, you can send reminders to international numbers with Twilio. However, you need to ensure that you’re compliant with the SMS regulations in each country, and the cost may be higher than for domestic messages.
How can I monitor the performance of my app?
You can monitor the performance of your app using various tools. Twilio provides analytics for your SMS usage, and you can use server monitoring tools to track the performance of your server-side code. You should also implement logging to help diagnose any issues that arise.
 Wern Ancheta
Wern is a web developer from the Philippines. He loves building things for the web and sharing the things he has learned by writing in his blog. When he's not coding or learning something new, he enjoys watching anime and playing video games.