It is quite common during the course of a project to find yourself needing to write custom scripts for performing a variety of actions. Such one-off scripts, which are typically executed via the command-line (CLI), can be used for virtually any type of task. Having written many such scripts over the years, I have grown to appreciate the value of taking a small amount of time upfront to put in place a custom CLI microframework to facilitate this process. Fortunately, Node.js and its extensive package ecosystem, npm, make it easy to do just that. Whether parsing a text file or running an ETL, having a convention in place makes it easy to add new functionality in an efficient and structured way.
While not necessarily associated with the command-line, web crawling is often employed in certain problem domains like automated functional testing and defacement detection. This tutorial demonstrates how to implement a lightweight CLI framework whose supported actions revolve around web crawling. Hopefully, this will get your creative juices flowing, whether your interest be specific to crawling or to the command-line. Technologies covered include Node.js, PhantomJS, and an assortment of npm packages related to both crawling and the CLI.
The source code for this tutorial can be found on GitHub. In order to run the examples, you will need to have both Node.js and PhantomJS installed. Instructions for downloading and installing them can be found here: Node.js, PhantomJS.
Setting up a Basic Command-Line Framework
At the heart of any CLI framework is the concept of converting a command, which typically includes one or more optional or required arguments, into a concrete action. Two npm packages that are quite helpful in this regard are commander and prompt.
Commander allows you to define which arguments are supported, while prompt allows you to (appropriately enough) prompt the user for input at runtime. The end result is a syntactically sweet interface for performing a variety of actions with dynamic behaviors based on some user-supplied data.
Say, for example, we want our command to look like this:
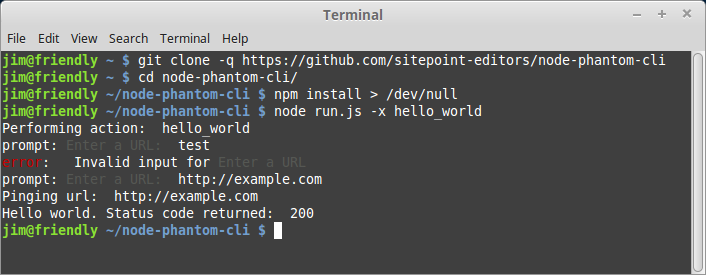
$ node run.js -x hello_world
Our entry point (run.js) defines the possible arguments like this:
program
  .version('1.0.0')
  .option('-x --action-to-perform [string]', 'The type of action to perform.')
  .option('-u --url [string]', 'Optional URL used by certain actions')
  .parse(process.argv);
and defines the various user input cases like this:
var performAction = require('./actions/' + program.actionToPerform)

switch (program.actionToPerform) {
  case 'hello_world':
    prompt.get([{

      // What the property name should be in the result object
      name: 'url',

      // The prompt message shown to the user
      description: 'Enter a URL',

      // Whether or not the user is required to enter a value
      required: true,

      // Validates the user input
      conform: function (value) {

        // In this case, the user must enter a valid URL
        return validUrl.isWebUri(value);
      }
    }], function (err, result) {

      // Perform some action following successful input
      performAction(phantomInstance, result.url);
    });
    break;
}
At this point, we’ve defined a basic path through which we can specify an action to perform, and have added a prompt to accept a URL. We just need to add a module to handle the logic that is specific to this action. We can do this by adding a file named hello_world.js to the actions directory:
'use strict';

/**
 * @param Horseman phantomInstance
 * @param string url
 */
module.exports = function (phantomInstance, url) {

  if (!url || typeof url !== 'string') {
    throw 'You must specify a url to ping';
  } else {
    console.log('Pinging url: ', url);
  }

  phantomInstance
    .open(url)
    .status()
    .then(function (statusCode) {
      if (Number(statusCode) >= 400) {
        throw 'Page failed with status: ' + statusCode;
      } else {
        console.log('Hello world. Status code returned: ', statusCode);
      }
    })
    .catch(function (err) {
      console.log('Error: ', err);
    })

    // Always close the Horseman instance
    // Otherwise you might end up with orphaned phantom processes
    .close();
};
As you can see, the module expects to be supplied with an instance of a PhantomJS object (phantomInstance) and a URL (url). We will get into the specifics of defining a PhantomJS instance momentarily, but for now it’s enough to see that we’ve laid the groundwork for triggering a particular action. Now that we’ve put a convention in place, we can easily add new actions in a defined and sane manner.
Crawling with PhantomJS Using Horseman
Horseman is a Node.js package that provides a powerful interface for creating and interacting with PhantomJS processes. A comprehensive explanation of Horseman and its features would warrant its own article, but suffice to say that it allows you to easily simulate just about any behavior that a human user might exhibit in their browser. Horseman provides a wide range of configuration options, including things like automatically injecting jQuery and ignoring SSL certificate warnings. It also provides features for cookie handling and taking screenshots.
Each time we trigger an action through our CLI framework, our entry script (run.js) instantiates an instance of Horseman and passes it along to the specified action module. In pseudo-code it looks something like this:
var phantomInstance = new Horseman({
  phantomPath: '/usr/local/bin/phantomjs',
  loadImages: true,
  injectJquery: true,
  webSecurity: true,
  ignoreSSLErrors: true
});

performAction(phantomInstance, ...);
Now when we run our command, the Horseman instance and input URL get passed to the hello_world module, causing PhantomJS to request the URL, capture its status code, and print the status to the console. We’ve just run our first bona fide crawl using Horseman. Giddyup!
Chaining Horseman Methods for Complex Interactions
So far we’ve looked at a very simple usage of Horseman, but the package can do much more when we chain its methods together to perform a sequence of actions in the browser. In order to demonstrate a few of these features, let’s define an action that simulates a user navigating through GitHub to create a new repository.
Please note: This example is purely for demonstration purposes and should not be considered a viable method for creating Github repositories. It is merely an example of how one could use Horseman to interact with a web application. You should use the official Github API if you are interested in creating repositories in an automated fashion.
Let us suppose that the new crawl will be triggered like so:
$ node run.js -x create_repo
Following the convention of the CLI framework we’ve already put in place, we need to add a new module to the actions directory named create_repo.js. As with our previous “hello world” example, the create_repo module exports a single function containing all of the logic for that action.
module.exports = function (phantomInstance, username, password, repository) {

  if (!username || !password || !repository) {
    throw 'You must specify login credentials and a repository name';
  }

  ...
}
Notice that with this action we are passing more parameters to the exported function than we did previously. The parameters include username, password, and repository. We will pass these values from run.js once the user has successfully completed the prompt challenge.
Before any of that can happen though, we have to add logic to run.js to trigger the prompt and capture the data. We do this by adding a case to our main switch statement:
switch (program.actionToPerform) {

  case 'create_repo':
    prompt.get([{
       name: 'repository',
       description: 'Enter repository name',
       required: true
    }, {
       name: 'username',
       description: 'Enter GitHub username',
       required: true
     }, {
       name: 'password',
       description: 'Enter GitHub password',
       hidden: true,
       required: true
    }], function (err, result) {
      performAction(
        phantomInstance,
        result.username,
        result.password,
        result.repository
      );
    });
    break;

    ...
Now that we’ve added this hook to run.js, when the user enters the relevant data it will be passed to the action, allowing us to proceed with the crawl.
As for the create_repo crawl logic itself, we use Horseman’s array of methods to navigate to the Github login page, enter the supplied username and password, and submit the form:
phantomInstance
  .open('https://github.com/login')
  .type('input[name="login"]', username)
  .type('input[name="password"]', password)
  .click('input[name="commit"]')
We continue the chain by waiting for the form submission page to load:
.waitForNextPage()
after which we use jQuery to determine if the login was successful:
.evaluate(function () {
  $ = window.$ || window.jQuery;
  var fullHtml = $('body').html();
  return !fullHtml.match(/Incorrect username or password/);
})
.then(function (isLoggedIn) {
  if (!isLoggedIn) {
    throw 'Login failed';
  }
})
An error is thrown if the login fails. Otherwise, we continue chaining methods to navigate to our profile page:
.click('a:contains("Your profile")')
.waitForNextPage()
Once we’re on our profile page, we navigate to our repositories tab:
.click('nav[role="navigation"] a:nth-child(2)')
.waitForSelector('a.new-repo')
While on our repositories tab, we check to see if a repository with the specified name already exists. If it does, then we throw an error. If not, then we continue with our sequence:
// Gather the names of the user's existing repositories
.evaluate(function () {
  $ = window.$ || window.jQuery;

  var possibleRepositories = [];
  $('.repo-list-item h3 a').each(function (i, el) {
    possibleRepositories.push($(el).text().replace(/^\s+/, ''));
  });

  return possibleRepositories;
})

// Determine if the specified repository already exists
.then(function (possibleRepositories) {
  if (possibleRepositories.indexOf(repository) > -1) {
    throw 'Repository already exists: ' + repository;
  }
})
Assuming no errors have been thrown, we proceed by programmatically clicking the “new repository” button and waiting for the next page:
.click('a:contains("New")')
.waitForNextPage()
after which we enter the supplied repository name and submit the form:
.type('input#repository_name', repository)
.click('button:contains("Create repository")')
Once we reach the resulting page we know that the repository has been created:
.waitForNextPage()
.then(function () {
  console.log('Success! You should now have a new repository at: ', 'https://github.com/' + username + '/' + repository);
})
As with any Horseman crawl, it is crucial that we close the Horseman instance at the end:
.close();
Failing to close the Horseman instance can result in orphaned PhantomJS processes persisting on the machine.
Crawling to Gather Data
At this point we have assembled a static sequence of actions to programmatically create a new repository on GitHub. To accomplish this, we chained a series of Horseman methods.
This approach can be useful for specific structural and behavioral patterns that are known beforehand, however, you may find that you need to implement more flexible scripting at some point. This might be the case if your action sequence has the potential to vary widely based on context or produce multiple different outcomes. It would also be the case if you need to extract data from the DOM.
In such cases you can use Horseman’s evaluate() method, which allows you to execute free-form interactions in the browser by injecting either inline or externally-linked JavaScript.
This section demonstrates an example of extracting basic data from a page (anchor links, in this case). One scenario where this might be necessary would be building a defacement detection crawler to hit every URL on a domain.
As with our last example, we have to first add a new module to the actions directory:
module.exports = function (phantomInstance, url) {

  if (!url || typeof url !== 'string') {
    throw 'You must specify a url to gather links';
  }

  phantomInstance
    .open(url)

    // Interact with the page. This code is run in the browser.
    .evaluate(function () {
      $ = window.$ || window.jQuery;

      // Return a single result object with properties for
      // whatever intelligence you want to derive from the page
      var result = {
        links: []
      };

      if ($) {
        $('a').each(function (i, el) {
          var href = $(el).attr('href');
          if (href) {
            if (!href.match(/^(#|javascript|mailto)/) && result.links.indexOf(href) === -1) {
              result.links.push(href);
            }
          }
        });
      }
      // jQuery should be present, but if it's not, then collect the links using pure javascript
      else {
        var links = document.getElementsByTagName('a');
        for (var i = 0; i < links.length; i++) {
          var href = links[i].href;
          if (href) {
            if (!href.match(/^(#|javascript|mailto)/) && result.links.indexOf(href) === -1) {
              result.links.push(href);
            }
          }
        }
      }

      return result;
    })
    .then(function (result) {
      console.log('Success! Here are the derived links: \n', result.links);
    })

    .catch(function (err) {
      console.log('Error getting links: ', err);
    })

    // Always close the Horseman instance
    // Otherwise you might end up with orphaned phantom processes
    .close();
And then add a hook for the new action in run.js:
switch (program.actionToPerform) {

  ...

  case 'get_links':
    prompt.get([{
        name: 'url',
        description: 'Enter URL to gather links from',
        required: true,
        conform: function (value) {
          return validUrl.isWebUri(value);
        }
    }], function (err, result) {
      performAction(phantomInstance, result.url);
    });
    break;
Now that this code is in place, we can run a crawl to extract links from any given page by running the following command:
$ node run.js -x get_links
This action demonstrates extracting data from a page, and does not utilize any browser actions that are built-in by Horseman. It directly executes whatever JavaScript you put in the evaluate() method, and does so as if it’s natively running in a browser environment.
One last thing should be noted in this section, which was alluded to earlier: not only can you execute custom JavaScript in the browser using the evaluate() method, but you can also inject external scripts into the runtime environment prior to running your evaluation logic. This can be done like so:
phantomInstance
  .open(url)
  .injectJs('scripts/CustomLogic.js')
  .evaluate(function() {
    var x = CustomLogic.getX(); // Assumes variable 'CustomLogic' was loaded by scripts/custom_logic.js
    console.log('Retrieved x using CustomLogic: ', x);
  })
By extending the logic above, you could perform virtually any action on any website.
Using Horseman to Take Screenshots
The final use case I want to demonstrate is how you would use Horseman to take screenshots. We can do this with Horseman’s screenshotBase64() method, which returns a base64 encoded string representing the screenshot.
As with our previous example, we have to first add a new module to the actions directory:
module.exports = function (phantomInstance, url) {

  if (!url || typeof url !== 'string') {
    throw 'You must specify a url to take a screenshot';
  }

  console.log('Taking screenshot of: ', url);

  phantomInstance
    .open(url)

    // Optionally, determine the status of the response
    .status()
    .then(function (statusCode) {
      console.log('HTTP status code: ', statusCode);
      if (Number(statusCode) >= 400) {
        throw 'Page failed with status: ' + statusCode;
      }
    })

    // Take the screenshot
    .screenshotBase64('PNG')

    // Save the screenshot to a file
    .then(function (screenshotBase64) {

      // Name the file based on a sha1 hash of the url
      var urlSha1 = crypto.createHash('sha1').update(url).digest('hex')
        , filePath = 'screenshots/' + urlSha1 + '.base64.png.txt';

      fs.writeFile(filePath, screenshotBase64, function (err) {
        if (err) {
          throw err;
        }
        console.log('Success! You should now have a new screenshot at: ', filePath);
      });
    })

    .catch(function (err) {
      console.log('Error taking screenshot: ', err);
    })

    // Always close the Horseman instance
    // Otherwise you might end up with orphaned phantom processes
    .close();
};
And then add a hook for the new action in run.js:
case 'take_screenshot':
  prompt.get([{
      name: 'url',
      description: 'Enter URL to take screenshot of',
      required: true,
      conform: function (value) {
        return validUrl.isWebUri(value);
      }
  }], function (err, result) {
    performAction(phantomInstance, result.url);
  });
  break;
Now you can take screenshots with the following command:
$ node run.js -x take_screenshot
The reason for using base64 encoded strings (and not, for example, saving actual images) is that they are a convenient way to represent raw image data. This StackOverflow answer goes into more detail.
If you wanted to save actual images, you’d use the screenshot() method.
Conclusion
This tutorial has attempted to demonstrate both a custom CLI microframework and some basic logic for crawling in Node.js, using the Horseman package to leverage PhantomJS. While using a CLI framework would likely benefit many projects, the use of crawling is typically limited to very specific problem domains. One common area is in quality assurance (QA), where crawling can be used for functional and user interface testing. Another area is security where, for example, you might want to crawl your website periodically to detect if it has been defaced or otherwise compromised.
Whatever the case may be for your project, make sure to clearly define your goals and be as unobtrusive as possible. Get permission when you can, be polite to the maximum extent that you can, and take care never to DDoS a site. If you suspect that you’re generating a lot of automated traffic then you probably are, and should likely re-evaluate your goals, implementation, or level of permission.
Frequently Asked Questions (FAQs) about Web Crawling with Node and PhantomJS Horseman
What is the difference between web crawling and web scraping?
Web crawling and web scraping are two distinct processes, although they are often used interchangeably. Web crawling is the process of systematically browsing the web, typically carried out by bots or spiders. It involves indexing the content of a website and following links to other web pages. On the other hand, web scraping is the process of extracting specific data from a website. It involves parsing the HTML of a web page to pull out the data you need. While web crawling is about navigating and indexing, web scraping is about data extraction.
Why use Node.js for web crawling?
Node.js is a popular choice for web crawling due to its asynchronous nature. It allows for concurrent processing, which means you can crawl multiple pages at the same time. This makes it significantly faster than other languages that execute synchronously. Additionally, Node.js has a rich ecosystem with numerous libraries and tools that can aid in web crawling, such as PhantomJS Horseman.
What is PhantomJS Horseman and how does it aid in web crawling?
PhantomJS Horseman is a Node.js package that provides a high-level API for automating web browsers using PhantomJS. It allows you to perform actions on web pages, such as clicking on links, filling out forms, and taking screenshots, all from your Node.js code. This makes it a powerful tool for web crawling, as it allows you to interact with web pages just like a human user would.
How does JavaScript rendering affect web crawling?
JavaScript rendering can significantly affect web crawling. Traditional web crawlers only parse the HTML of a web page, ignoring any content generated by JavaScript. However, modern search engines are capable of rendering JavaScript, allowing them to index JavaScript-generated content. This means that if your website relies heavily on JavaScript for content generation, it may not be fully indexed by traditional web crawlers.
Can I use web crawling to monitor changes on a website?
Yes, web crawling can be used to monitor changes on a website. By regularly crawling a website and comparing the current state with a previous state, you can detect any changes. This can be useful for a variety of purposes, such as tracking price changes on e-commerce websites or monitoring updates on news websites.
Is web crawling legal?
The legality of web crawling depends on several factors, including the jurisdiction you’re in and the specific website you’re crawling. Some websites explicitly allow web crawling in their robots.txt file, while others prohibit it. It’s important to respect the website’s robots.txt file and not to overload the website’s server with too many requests in a short period of time.
How can I optimize my web crawling process?
There are several ways to optimize your web crawling process. One way is to use a breadth-first search (BFS) algorithm, which ensures that you crawl all pages at a certain depth before moving on to the next depth level. Another way is to prioritize your crawling based on the relevance of the pages. For example, you might want to crawl product pages before blog posts if you’re crawling an e-commerce website.
Can I crawl websites that require login with Node.js and PhantomJS Horseman?
Yes, with PhantomJS Horseman, you can automate the process of logging into a website. This allows you to crawl pages that are only accessible after login. However, you should be aware that this might violate the website’s terms of service.
How can I handle dynamic content in web crawling?
Handling dynamic content can be challenging in web crawling, as traditional web crawlers only parse the static HTML of a web page. However, with tools like PhantomJS Horseman, you can render JavaScript and interact with dynamic content just like a human user would. This allows you to crawl and extract data from websites that rely heavily on JavaScript for content generation.
How can I prevent my web crawler from being blocked?
There are several strategies to prevent your web crawler from being blocked. One way is to respect the website’s robots.txt file, which provides guidelines on what parts of the website you’re allowed to crawl. Another way is to limit the rate at which you send requests to the website, to avoid overloading the server. You can also rotate your IP address and user agent to avoid being detected as a bot.
 Andrew Forth
Andrew has been developing web applications in a variety of industries since 2004. He loves elegant code and is passionate about security. Learning new things is his favorite part of the job. When he’s not coding, he’s probably writing music or reading historical texts.