
If you’ve ever wanted to write a web app or API without messing around with the server, Amazon’s Lambda might be what you’re looking for.
Amazon Web Services (AWS) is a collection of developer tools that Amazon develops and publicly offers.This article will get you up and running with Lambda, a tool in the AWS suite. We’ll be using Lambda to create an HTTP GET endpoint that will make requests using the GitHub API to pull repository info from GitHub and return a JSON response.
The Lambda tagline is “Run Code without Thinking about Servers”. At first glance, this may sound confusing. Where or how does the code run then? Let’s find out.
To follow along with this article, you’ll need an AWS account of your own. You can create a free AWS account at aws.amazon.com.

Serverless and Functions as a Service
“Serverless” is a software infrastructure term you may have heard about. It describes a solution for on-demand code execution. The term “serverless” can be misleading because there are still servers in the equation. A better descriptor is FaaS, or “functions as a service.”
Both definitions describe a new development and deployment experience. This experience is considered “serverless” because you, as a developer, no longer have to manage, monitor, or scale any servers that are running your code. You upload your code to a FaaS provider (Lambda, in this case), and the FaaS provider executes it and manages any infrastructure for you behind the scenes.
The Pros and Cons of Serverless Architecture
Given this expanded definition of the “Serverless” architecture, let’s look at some of the pros and cons when working with Lambda.
Pros
-
On-demand usage pricing.
Traditional server hosting uses a recurring billing cycle. Your server is always up and running, using resources and waiting for input. You pay a monthly or yearly fee to keep it running for the duration of your billing cycle. With Lambda, you’re only billed for computational resources that you use, not idle time. Lambda has two usage pricing models: duration and concurrency. -
Duration pricing
Lambda duration pricing calculates prices based on the time the function begins executing until it terminates. This price calculation is beneficial for projects using short-lived computational resources. You can save a significant amount of money over traditional “idle” hosting solutions.Lambda duration pricing is as follows:
- $0.20 per 1 million requests
- $0.00001667 for every GB-second duration of computing time, with every execution rounded up to the nearest 100ms
The duration pricing is dependent on pre-configured memory usage of your deployed function. This duration and memory variability creates a pricing matrix that’s further detailed on the Lambda pricing page.
-
Concurrency pricing
“Provisioned Concurrency” mode pricing calculates the price from the time it’s enabled until disabled. Concurrency mode keeps lambda functions ready and removes any startup time from duration mode.Lambda concurrency pricing is as follows:
- Provisioned Concurrency is $0.0000041667 for every GB-second
- Requests are $0.20 per 1M requests
- Duration is $0.0000097222 for every GB-second
The AWS pricing page includes further details and examples of the pricing matrix. Learn more on the Lambda pricing page.
-
Built-in auto scaling
In a traditional hosted infrastructure, there comes a time where you may need to worry about performance and scaling. As the traffic and usage of your application increase, you may need to add more hosted servers to your infrastructure to keep up with demand. Self-managed scaling can cause failures and bottlenecks for your users. Lambda takes care of scaling automatically when needed, removing additional cognitive overhead.
Cons
-
Inconsistent local development workflow.
You can write Lambda function code locally and test it in isolation. Still, you won’t be able to simulate a production environment locally without creating your hacked-together version of Lambda.
Lambda Key Concepts: Code and Triggers
Lambda has two main concepts: code and triggers. Code is self-explanatory. In our case, it’s the JavaScript code that you write and upload to Lambda to produce your desired behaviors.
Once uploaded, the code won’t execute on its own. This is where triggers come in. Triggers are events fired by other AWS services that pass data to the Lambda function for execution.
Some example triggers are seen when:
- an HTTP request to AWS API Gateway fires Lambda code
- an event is fired on an interval, like a cron job from CloudWatch Events
- a DynamoDB table is updated and triggers Lambda code
Lambda code function signature
You define a Lambda function by exporting a regular function from JavaScript that matches the expected Lambda signature:
exports.myLambdaFunction = (event, context, callback) => {
   // Use callback() and return
}
The function receives three arguments:
-
event: a key-value pair dictionary of “trigger data” that Lambda passes to the function. -
context: AWS internal information such as AWS request ID, Lambda expiration timeout, and Log info. For more info, see the Lambda docs. -
callback: a standard async JavaScript callback handler. For more info see the Lambda docs
Building a Lambda Function
To get started creating a new Lambda function, visit the Lambda dashboard.
It should look similar to this:
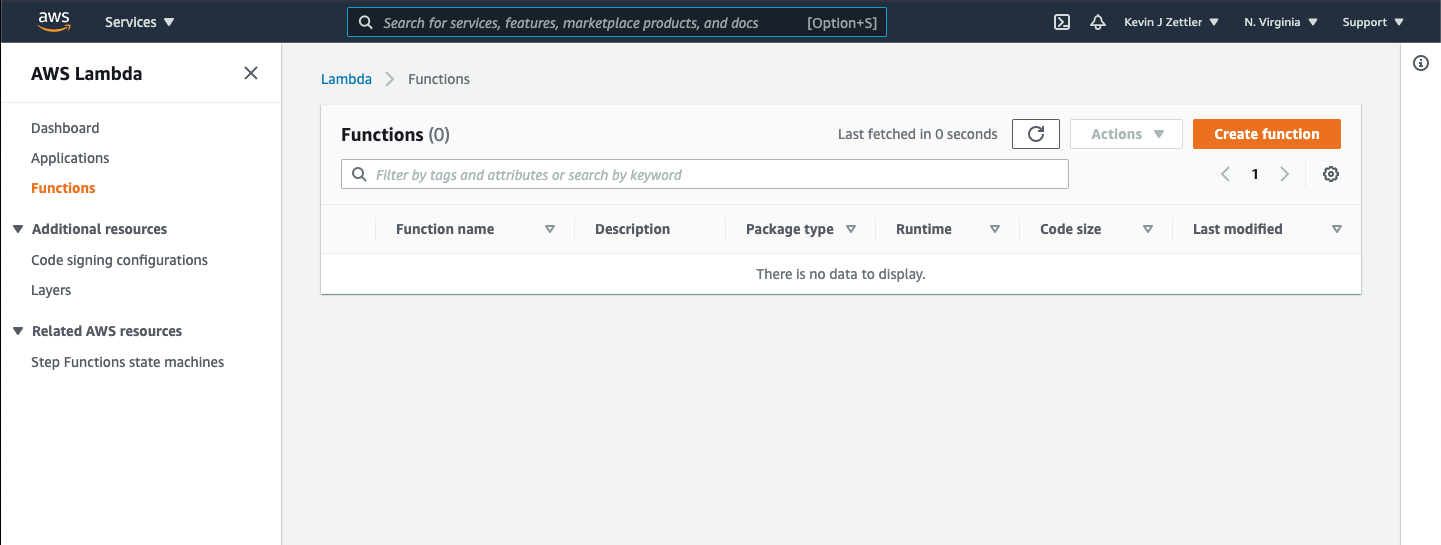
Click the Create function button to get started.
Create function
The next screen will prompt you with a few options for creating the Lambda function.
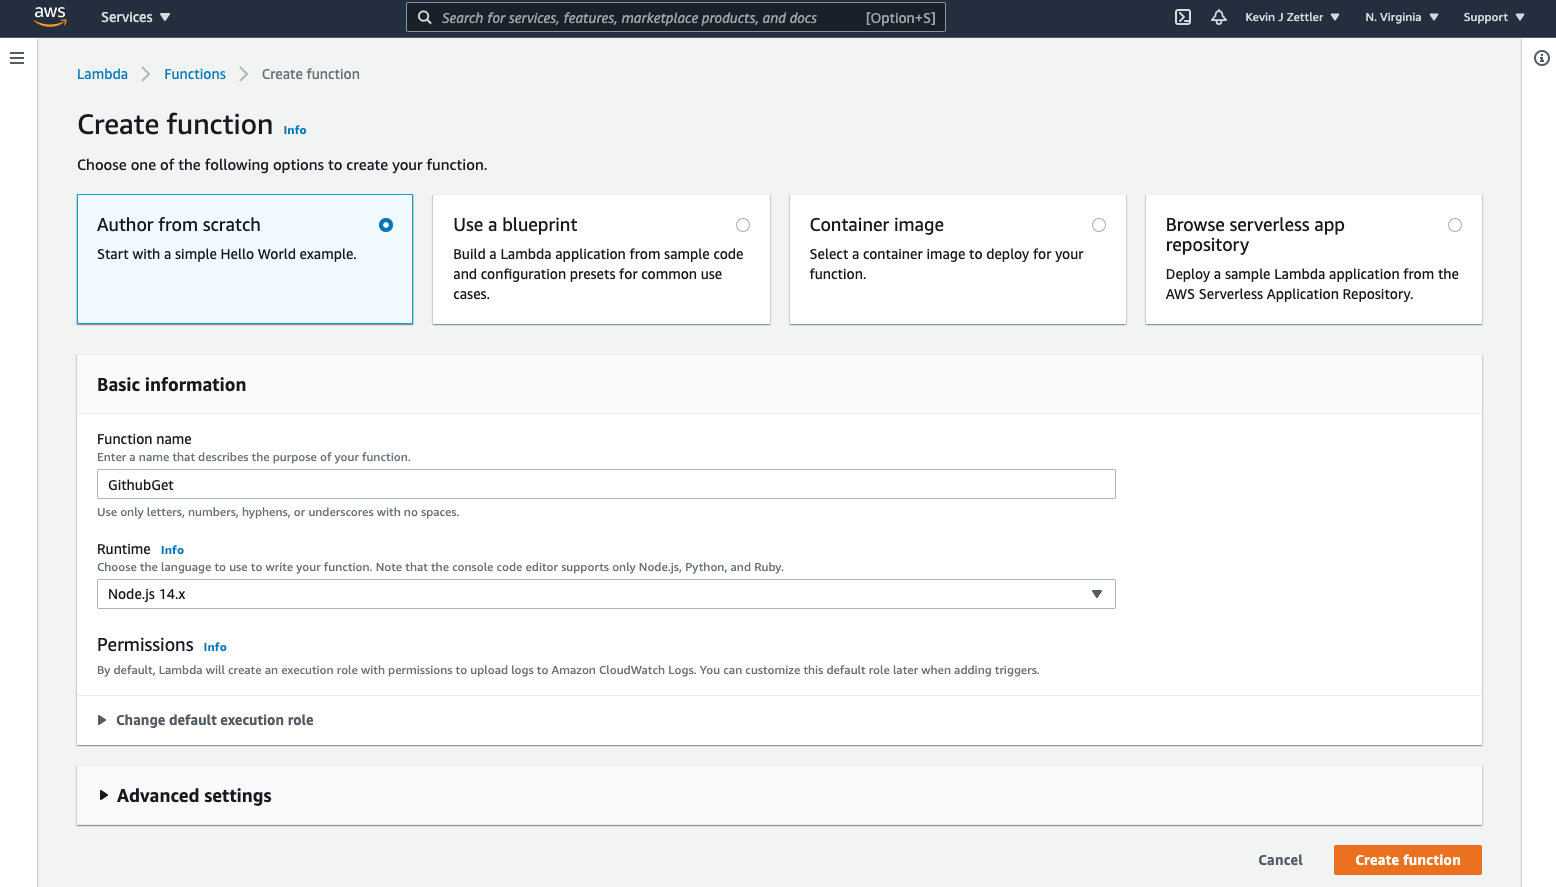
The options are:
- Author from scratch
- Use a blueprint
- Container image
- Browse serverless app repository
For our purposes, select Author from scratch and fill out the “Basic information” section. Add a function name. (I’ve used “GithubGet” below.) Click the Create function button to continue.
Function overview
We’re now at the function overview screen.
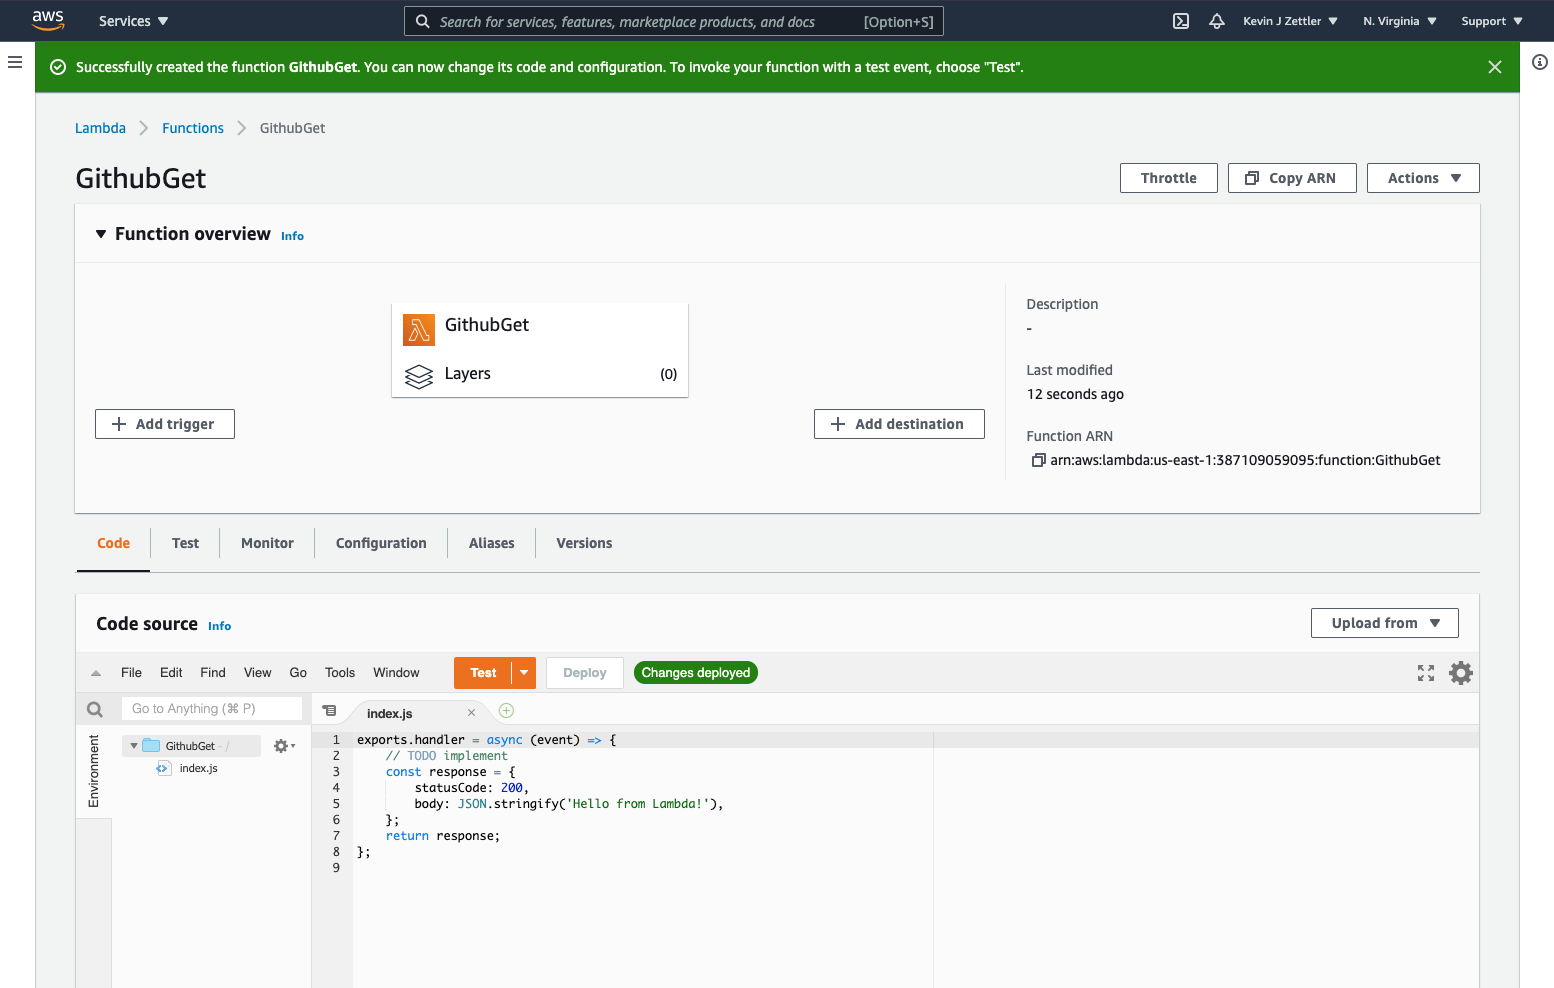
The upper function overview pane contains the functions trigger, function, and destination. The lower pane contains the code source and tabs for other configurations. Next, we will add a trigger to the function. Click the Add trigger button.
Add trigger
On the Add trigger screen, do the following:
- select “API Gateway” from the dropdown
- select “Create an API” from the API dropdown
- select the HTTP API option
- select “Open” from the Security dropdown
The final trigger configuration should look like this:
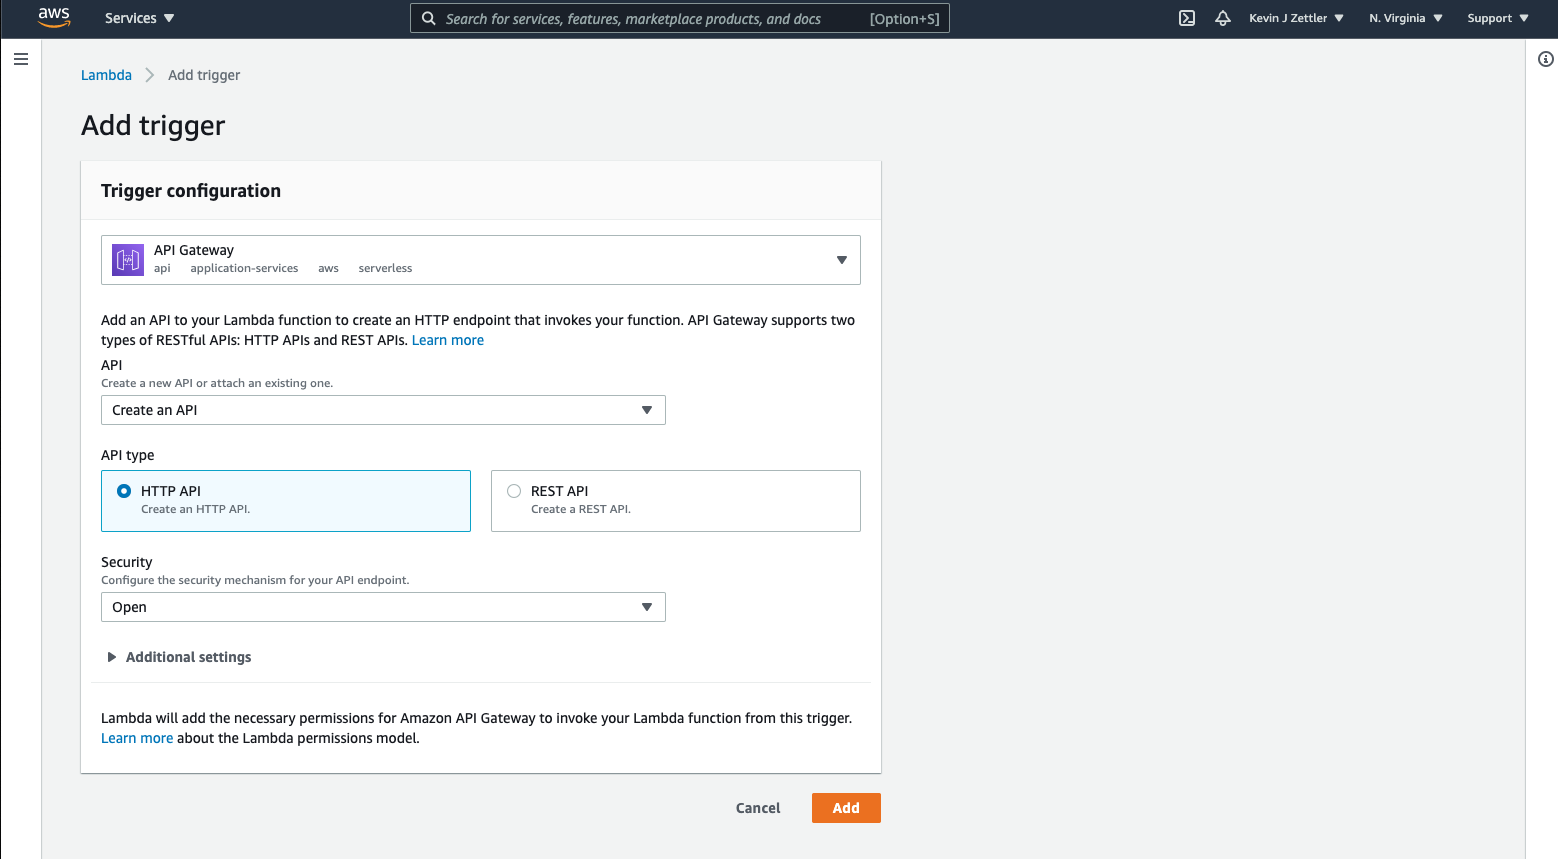
Click the Add button to continue.
Specifying Lambda function code
We now have an API Gateway trigger registered back on the function overview page before our GithubGet function.
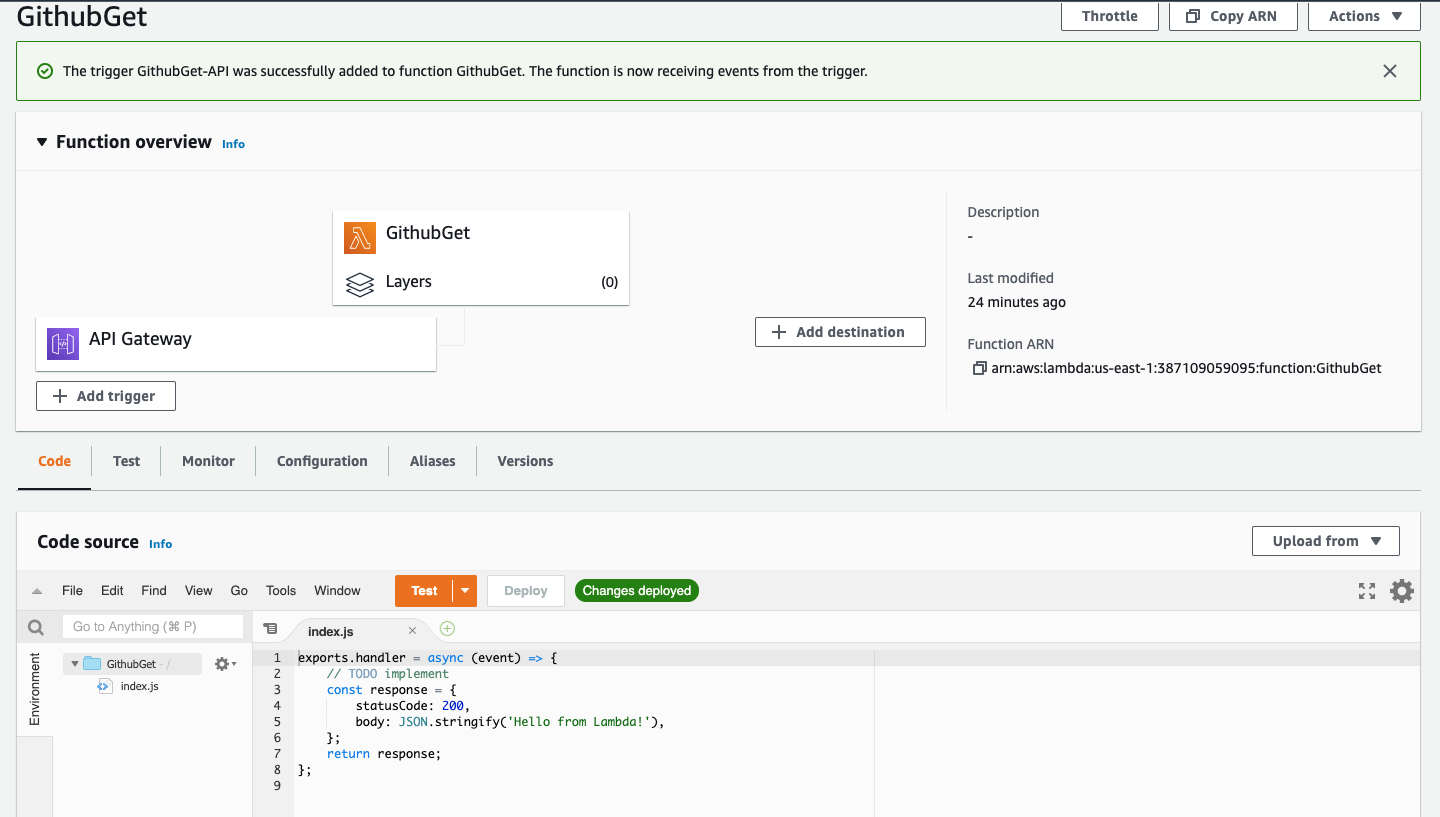
In the lower pane, click the “Code” tab to view the code editor. There is a pre-configured “Hello, World!” code example that looks like this:
exports.handler = async (event) => {
    // TODO implement
    const response = {
        statusCode: 200,
        body: JSON.stringify('Hello from Lambda!'),
    };
    return response;
};
Now that we have the API Gateway trigger in place, we can publicly access this function. Click on the “Configuration” tab and the “Triggers” tab and expand the “API Gateway” trigger.
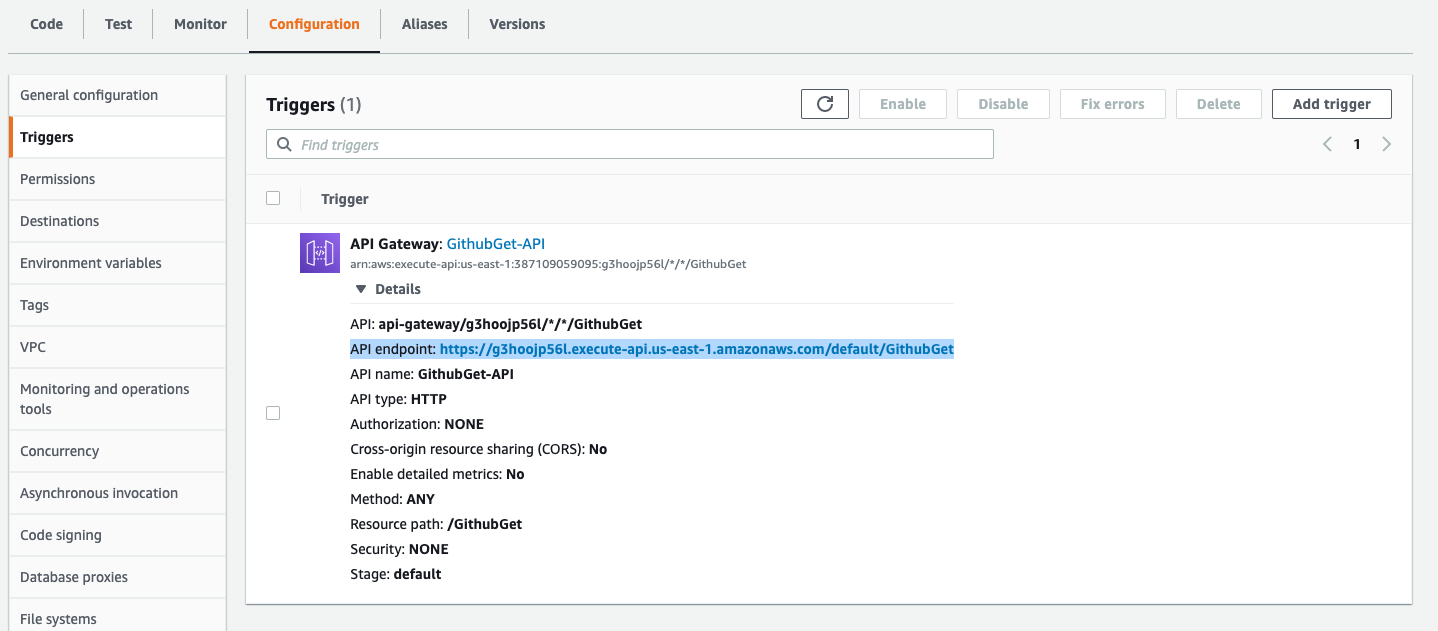
You should see an API endpoint: entry with a URL. Click that URL, and you should hit a page that renders a “Hello From Lambda!” message. Congratulations! You’ve set up a simple Lambda instance. The inline editor requires little overhead to get Lambda code up and running, but we’re going to do something more advanced for this tutorial.
Creating complex functions with dependencies
In most real-world scenarios, you’re going to want to create more complex functions using third-party libraries or packages installed via npm.
Let’s create a custom function that uses an npm dependency and upload it to Lambda. You can follow the steps below, or feel free to grab the code from the example repository.
Creating a new function
Let’s set up a folder for our new function and, from within the directory, initialize npm with a default package.json file:
npm init -f
Next, we’ll install the official GitHub client:
npm install @octokit/rest
Create the file index.js with the following code:
const { Octokit } = require("@octokit/rest");
const octokit = new Octokit();

exports.handler = async (event) => {
  try{
    const ghres = await octokit.rest.search.repos({
      q: "sitepoint",
      sort: "stars"
    });

    const result = ghres.data.items.map(function(repo){
      return { url: repo.html_url, "stars": repo.stargazers_count };
    });

    return {
      statusCode: 200,
      body: JSON.stringify(result)
    }

  }catch(error){
    return {
      statusCode: 500,
      body: {error: error}
    }
  }
};
Here’s a breakdown of what this code is doing:
- It includes and initializes the GitHub “Octokit” rest API.
- It defines a function
handlerthat matches the Lambda signature. - When
handleris called, it makes a search request to GitHub for all repos that matchsitepointas a query. - With the response from Github, a map is created that includes URL and star count for each repo.
- Finally, it returns an HTTP response like an object that matches the API Gateway’s expected integration.
Upload to AWS Lambda
Create a zip file of the function’s files using whatever zip utility you’re familiar with. I used the command line zip utility on macOS, like this:
zip -r lambdaupload.zip ./index.js ./node_modules/
To upload code to Lambda, return to the Code editor on the function overview and click the Upload from selector and select “.zip”.
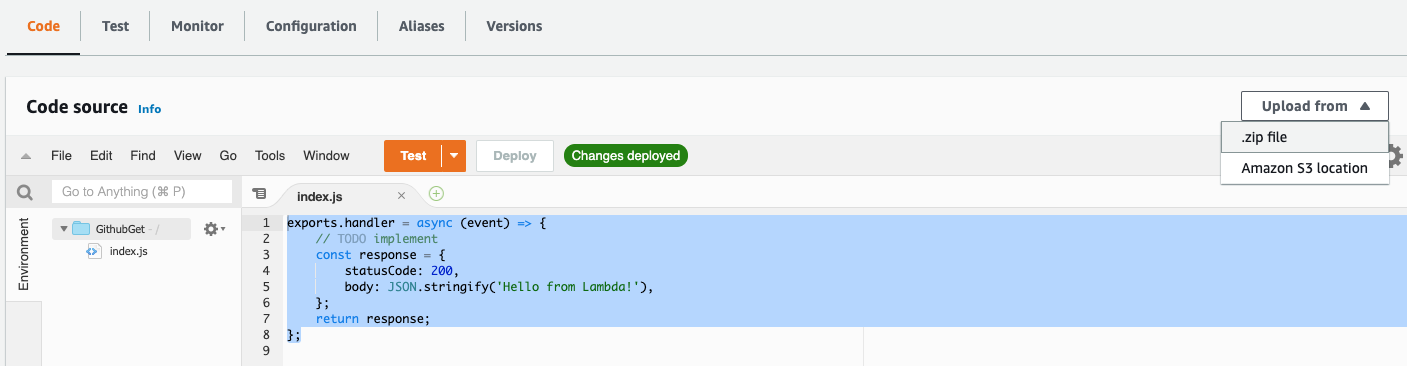
Then select the lambdaupload.zip file from your computer and upload it to AWS. You should see the code editor refresh and have the handler we wrote above uploaded. If you visit the API endpoint URL that we found from the trigger configuration, you should see a new response instead of the “Hello from Lambda!” message. Congratulations! You’ve successfully deployed and triggered code on Lambda.
Next steps and the Future of Lambda
I hope this project has given you a good foundation for working with AWS Lambda. Although we used a third-party client (GitHub) integration within our function code, this layer can be replaced by any other client API or a database client connection.
Serverless frameworks
This article demonstrates a very manual and somewhat ephemeral process of Lambda configuration. There are other ways to configure and initialize Lambda driven by the AWS API.
Some tools, modules and frameworks are being built on top of the AWS API that help streamline this process:
-
serverless.com: this is the most mature FaaS framework. It delivers a very comprehensive Lambda experience and applies to other non-AWS FaaS providers. It provides a local development environment setup for rapid iteration, automated Lambda code deployment, multiple deployment staging environments, and much more.
-
terraform.io: this is a widely adopted infrastructure-as-code and configuration management tool. Terraform lets developers declaratively define cloud infrastructure configurations and then automatically deploy and sync those configurations. In the previous Lambda exercise, we did a lot of manual configuration through the AWS browser UI. This work was fairly tedious, and if we need to change anything, we’d have to do further work in the AWS UI. Instead, we could define the resources we used on AWS with Terraform and have Terraform automatically deploy the Lambda function.
FAQs About Node.js Microservices
Node.js microservices are small, independent, and modular applications built using the Node.js runtime that work together to form a larger, distributed system. They communicate via lightweight protocols (e.g., HTTP or message queues) and can be developed, deployed, and scaled independently.
Node.js is a popular choice for microservices due to its non-blocking, event-driven architecture, which makes it highly suitable for handling multiple concurrent requests. It’s also well-suited for building RESTful APIs and lightweight services.
Node microservices can communicate via various protocols, including HTTP/HTTPS, WebSocket, message queues, or gRPC. The choice of communication method depends on the specific requirements of the application.
Benefits of using Node for microservices include better scalability, improved fault tolerance, ease of development, more support, and the ability to choose the most suitable database and technology stack for each service.
An API gateway in Node.js microservices architecture acts as a central entry point for external requests. It can handle tasks like load balancing, authentication, rate limiting, and routing requests to the appropriate microservice.
Node.js microservices can be deployed using various methods, including containers (Docker), serverless platforms, traditional virtual machines, or cloud-based platforms (e.g., AWS, Azure, Google Cloud). The choice depends on your infrastructure and application requirements.
Data consistency can be challenging in a microservices environment. Techniques like event sourcing, distributed transactions, and eventual consistency are used to manage data integrity across services. Databases like Apache Cassandra and Amazon DynamoDB are popular choices for such scenarios.
Message queues, such as RabbitMQ or Kafka, are used for asynchronous communication between microservices. They help decouple services and ensure reliable message delivery.
 Kev Zettler
Freelance technologist and founder of RedTrenchMediaCorp, a Y Combinator alumni. Serial entrepreneur. Indie game developer. Punk rocker. Website at: kevzettler.com