
- Bundling — a Basic Example
- Transpiling TypeScript and ES6
- Module Loading
- Working with Plugins
- Hot Module Reloading (HMR)
- Meet Sparky, the Built-in Task Runner
- Unit Testing
- Development vs Production Environments
- A Lightweight Webpack Alternative
- Frequently Asked Questions about FuseBox: A Faster Webpack Alternative
webpack has arguably become the de facto JavaScript module bundler, but it has a reputation for being confusing and difficult to learn. In this article, I want to present a faster, simpler webpack alternative — FuseBox.
In today’s rapidly evolving front-end landscape, it’s vital to have a solid grasp of the JavaScript module system. Modules can help organize your code, make it more maintainable and increase its reusability. Unfortunately, browser support for ES modules isn’t quite there yet, so you’ll invariably need a module bundler to stitch them together into a single file which can be delivered to the browser.
FuseBox is a next generation ecosystem of tools that provides for all of the requirements of the development lifecycle. It enables developers to bundle any file format, it’s a module loader, a transpiler, a task runner and much more.
In this article, we’re going to use FuseBox to walk you through the common tasks involved in developing a JavaScript application. These are as follows:
- bundling: define an entry point and a bundle name
- transpiling: write in TypeScript and target ES5
- module loading: combine your modules into one single file
- handling other assets: use a FuseBox plugin to compile Sass
- hot module reloading (HMR): see your project automatically update to reflect your changes
- task running: an introduction to Sparky, FuseBox’s built-in task runner
- unit testing: an introduction to FuseBox’s built-in test runner
- targeting production: produce a minified, uglified bundle for deployment.
Once you’ve finished reading, you’ll be able to drop FuseBox into your next project and benefit from its speed, simplicity and flexibility.
Bundling — a Basic Example
Disclaimer: I’m one of the core contributors to the project.
Projects are becoming larger — that’s a fact. If we were to include all the files required by the page one by one, this would make things considerably slower, as the browser would have to make a bunch of blocking HTTP requests. Bundling solves this issue and reduces the number of files requested and FuseBox makes this process as easy as possible.
To start bundling, we need to teach FuseBox about what we want. FuseBox doesn’t require much in the way of configuration to bundle heavy projects. In fact, ten lines of configuration are usually enough for most use cases. However, before we start getting into some real-world examples, let’s create something simple.
First, create a new folder. Then, from your command line, navigate to it and enter the following: npm init -y. This will initialize your project. Then type npm install fuse-box -D, which will install FuseBox as a development dependency.
Next create a folder called src which is where all your code will go. Also, create an index.js file in your src folder and add the following content into it:
console.log('Hello world');
Next, create a fuse.js file in the root of your project. This file will contain all your FuseBox configuration.
At this point, our folder structure should look something like this:
MyProject
├── node_modules
├── src
│    └── index.js
├── fuse.js
└── package.json
Add the code below to fuse.js:
const { FuseBox } = require("fuse-box");

const fuse = FuseBox.init({
  homeDir: "src",
  output: "dist/$name.js"
});

fuse.bundle("app")
  .instructions("> index.js");

fuse.run();
Let’s break this code down section by section.
First, we require FuseBox. Then we initialize a new instance of FuseBox with the init method. This is also called the Producer in FuseBox terms. It’s where we define global configuration for all bundles.
The homeDir option points FuseBox to the home directory of our files. This is because FuseBox creates a virtual file structure that mimics the physical one. The output option tells FuseBox where our output bundle should reside. Notice the $name.js: this is a placeholder that will be replaced with the name you provide to your bundle.
The command fuse.bundle("app") is where we tell FuseBox about our bundle. We’re telling FuseBox to create a bundle with the name app.js that will reside in the dist folder in your project. The end file will be project/dist/app.js.
The instructions('>index.js') part is where we tell FuseBox what we want to bundle. The symbol > is what we call an arithmetic instruction: it’s the language FuseBox uses to learn what files need to be bundled.
The command fuse.run() tells FuseBox to start the bundling process.
Now from your command line enter node fuse.js — and that’s it, you’re done! FuseBox will now start its bundling magic and create the bundle at dist/app.js.
The full example is available here.
Transpiling TypeScript and ES6
What we’ve done so far is nice, but this is not how many modern JavaScript projects are developed. Applications today are developed using ES6, which is the sixth major release of the ECMAScript language specification. ES6 is great: it enables new language features like classes, arrow functions and much more. The problem, though, is that it’s not fully supported by all browser or Node.js versions yet. So we need to transpile our code into a more common supported version of JavaScript, ES5.
There are two major tools to achieve this: Typescript and Babel. FuseBox supports both. In fact, FuseBox is built with Typescript, thus supporting it natively.
To get started with FuseBox and Typescript, do the following:
- create a new project
- using the command line, navigate to the root of this project and do
npm init -y - create a
srcfolder - inside
srcfolder, addindex.ts - create
fuse.jsin the root of the project - install FuseBox and TypeScript as dependencies:
npm install fuse-box typescript -D.
In index.ts, add the following:
const name: string = "FuseBox";
console.log(name);
You may be wondering what :string means. It’s an example of Typescript’s type system, telling the compiler that the variable name is of type string. To learn more about Typescript, check the official site.
Add the following to fuse.js:
const { FuseBox } = require("fuse-box");

const fuse = FuseBox.init({
  homeDir: "src",
  output: "dist/$name.js"
});

fuse.bundle("app")
  .instructions("> index.ts");

fuse.run();
Notice that things are still the same as before, the only difference being that we use the .ts file format instead of .js in instructions('>index.ts'). Now that the prerequisites are in place, from your command line enter node fuse.js and FuseBox will start bundling.
The full example is available here.
Note: When using ES6 syntax, FuseBox will automatically detect the module type and transpile the code seamlessly. No need for Babel. FuseBox rocks!
Module Loading
So far, we’ve been doing just simple console.log examples. Let’s take it a step further and start learning about module loading. Modules are discreet units of independent, reusable code. In JavaScript there are many ways to create modules.
FuseBox Bundles your code into the CommonJS module format. Unfortunately, this is not supported in browsers. But no need to worry: FuseBox has your back and provides a comprehensive API to make working with modules in the browser a breeze.
Building on our Typescript example, let’s create some modules and start using them. As we’re using TypeScript, we’ll be using the ES6 module system.
In your src folder, next to index.ts, create hello.ts and add the following to it:
export function hello(name: string) {
  return `Hello ${name}`;
}
In index.ts, add the following:
import { hello } from "./hello";

const name: string = `Mr. Mike`;
console.log(hello(name));
Now, from your command line enter node fuse.js, then node dist/app.js. You should see the following written out to your console:
Hello Mr. Mike
Congratulations! You just created and loaded your first module with FuseBox, ES6 and Typescript. :)
We’ve learned how to load local modules, but FuseBox works with external Node packages too. So let’s expand this example and show how we can include Moment.js as a module.
From the command line enter npm install moment -S. This command installs the Moment.js package as a dependency of your project. Now add the following to your index.ts:
import {hello} from "./hello";
import * as moment from "moment"

const time = moment().format('MMMM Do YYYY, h:mm:ss a');
const name: string = `Mr. Mike`;
console.log(hello(name));
console.log(time);
If you now enter node fuse.js, then node dist/index.js, you should see the following written out to your console (although the date will obviously be different):
Hello Mr. Mike
March 7th 2018, 11:50:48 am
The full example is available here.
Working with Plugins
No ecosystem of tools can fulfill all requirements for all users, and FuseBox is no exception. Despite FuseBox offering a wide range of functionality out of the box, there’s an active community of developers that enrich this ecosystem with awesome new plugins.
So far, we’ve been working exclusively with JavaScript and TypeScript files. Now it’s time to dig deeper and start using FuseBox plugins. We’ll start off with using two important plugins: CSSPlugin and SassPlugin.
Let’s do the usual:
- create a new project
- using the command line, navigate to the root of this project and do
npm init -y - create a
srcfolder - inside
srcfolder addindex.ts - inside
srcfolder addmain.css - inside
srcfolder addextra.scss - create
fuse.jsin the root of the project - install FuseBox, TypeScript and a Sass compiler as dependencies by entering the following from your command line:
npm install fuse-box typescript node-sass -D.
Notice the file extra.scss file: this is where we’ll write our Sass. Of course, browsers don’t natively support Sass, which is why we’ll use the FuseBox SassPlugin. Your fuse.js should look like this:
const { FuseBox, CSSPlugin, SassPlugin } = require("fuse-box");

const fuse = FuseBox.init({
  homeDir: "src",
  output: "dist/$name.js",
  plugins: [
    [SassPlugin(), CSSPlugin()],
    CSSPlugin()
  ]
});
fuse.bundle("app")
  .instructions(`> index.ts`);

fuse.run();
Notice that we have CSSPlugin repeated twice in the above. This is because of an important concept in FuseBox called plugin chaining. This concept is really powerful, as it enables FuseBox to feed the result of one plugin into the next one.
Next, let’s add some content to the style sheet files.
In main.css, add this:
body {
  margin: 0;
  font-family: Verdana, Geneva, Tahoma, sans-serif;
  background: #ececec;
}
In extra.scss add this:
$font-stack:    Helvetica, sans-serif;
$primary-color: #333;

body {
  font: 100% $font-stack;
  color: $primary-color;
}
Now let’s import those stylesheet files to process and bundle. In your index.ts, add this:
import "./main.css";
import "./extra.scss";

document.body.innerHTML = `
<div class="content">
  <h1>Welcome to FuseBox!</h1>
</div>`;
Unlike the other solutions out there, FuseBox allows you to import files other than JavaScript without any extra workarounds. Now FuseBox will run the SassPlugin to compile the Sass into CSS and bundle both main.css and extra.scss for you. However, how do we preview the result? Now is a good time to introduce another cool built-in plugin called WebIndexPlugin.
Here we have another example of how FuseBox makes a developer’s life easier. This plugin auto generates an HTML file, and you can pass it any other HTML file to use as a template. However, the most important point about this plugin is that it automatically includes the bundles for you. This means there’s no need for you to think about what you should add manually. We’ll see more of the benefits of this behavior once we talk about hashing later on.
Your fuse.js should look like this:
const { FuseBox, CSSPlugin, SassPlugin, WebIndexPlugin } = require("fuse-box");

const fuse = FuseBox.init({
  homeDir: "src",
  output: "dist/$name.js",
  plugins: [
    [SassPlugin(), CSSPlugin()],
    CSSPlugin(),
    WebIndexPlugin({path: "."})
  ]
});

fuse.bundle("app")
  .instructions(">index.ts");

fuse.run();
From your command line, run node fuse.js, and now FuseBox will generate index.html in the dist folder. Open this file and you’ll see your CSS applied to the page.
Now, in your main.css, try changing the line background: #ececec; to background: blue;. From the command line, enter node fuse.js, refresh the page in your browser, and you’ll see your page now has a blue background.
Notice that we have to enter node fuse.js every time we make a change to our code and want to see the result. This is not a sensible way to work, right? To solve this, FuseBox has a watch method. The watch method instructs FuseBox to automatically re-bundle on any file change.
Let’s add watch to our bundle. Now fuse.js should look like this:
const { FuseBox, CSSPlugin, SassPlugin, WebIndexPlugin } = require("fuse-box");

const fuse = FuseBox.init({
  homeDir: "src",
  output: "dist/$name.js",
  plugins: [
    [SassPlugin(), CSSPlugin()],
    CSSPlugin(),
    WebIndexPlugin({path: "."})
  ]
});

fuse.bundle("app")
  .watch()
  .instructions(">index.ts");

fuse.run();
From the command line enter node fuse.js, then modify any of your files. You’ll see FuseBox automatically re-bundling for you without having to enter node fuse.js manually.
The full example is available here.
Hot Module Reloading (HMR)
Hot module reloading (HMR) allows FuseBox to detect when files have been changed and update these modules in memory, meaning that the view in the browser is also updated. This is a really quite powerful feature! Gone are the days where you must switch between your editor and the browser, hitting F5 to see changes. Unlike some other solutions, FuseBox HMR works with all your files and is not limited to JavaScript files. In simple terms: change your code, save, and FuseBox will update your project automatically for you, showing the updated application in the browser.
While we’re talking about FuseBox HMR, it’s a good time to introduce FuseBox’s built-in development server. This is a full Express application, which means that you can create routes, add middlewares, etc. Check the full documentation to get more information.
Building on the last example, update your fuse.js file to look like this:
const { FuseBox, CSSPlugin, SassPlugin, WebIndexPlugin } = require("fuse-box");

const fuse = FuseBox.init({
  homeDir: "src",
  output: "dist/$name.js",
  plugins: [
    [SassPlugin(), CSSPlugin()],
    CSSPlugin(),
    WebIndexPlugin({path: "."})
  ]
});

fuse.dev();

fuse.bundle("app")
  .instructions("> index.ts")
  .watch()
  .hmr();

fuse.run();
Notice we added two extra commands: fuse.dev() and .hmr(). That is all you need to enable HMR with FuseBox. From your command line enter node fuse.js, and you’ll see the following message in the console: server running http://localhost:4444.
This is the URL FuseBox will give you to access your project. Head over to http://localhost:4444/ and start changing some of your CSS or JavaScript files. You’ll see the changes reflected immediately in the browser without a single refresh!
The full example is available here.
Meet Sparky, the Built-in Task Runner
So far, we’ve been dealing with bundling files, but most projects will typically need to perform some extra tasks such as cleaning folders, copying files, incrementing the application version and so on.
Remember when we said that FuseBox is the only tool you need for your development requirements? Well, here we start to see this statement coming true. FuseBox has a built-in task runner called Sparky (you can read more about it here). By default, it covers the common tasks mentioned earlier, but it can be easily extended using plugins to cover some more custom ones.
Building on the last example, let’s create the following:
- a task that cleans the
distfolder every time you start the bundling process - a task that copies image files from your
srcfolder, whenever you add, edit or delete any of those images.
Building on the last example, your fuse.js should look like this:
const { FuseBox, CSSPlugin, SassPlugin, WebIndexPlugin, Sparky } = require("fuse-box");

const fuse = FuseBox.init({
  homeDir: "src",
  output: "dist/$name.js",
  plugins: [
    [SassPlugin(), CSSPlugin()],
    CSSPlugin(),
    WebIndexPlugin({path: "."})
  ]
});

fuse.dev();

fuse.bundle("app")
  .instructions("> index.ts")
  .watch()
  .hmr();

Sparky.task("clean", () => {
  return Sparky.src("dist").clean("dist");
});

Sparky.task("watch:images", () => {
  return Sparky.watch("**/*.+(svg|png|jpg|gif)", {base: "./src"})
    .dest("./dist");
});

Sparky.task("default", ["clean", "watch:images"], () => {
  fuse.run();
});
Let’s look at what’s new here. First, we require Sparky, then we created three tasks. Task default is a convention Sparky uses, and it will be automatically executed when you run node fuse.js. Notice we have ["clean", "watch:images"] in the default task definition. This is an example of Sparky’s execution flow. Sparky has two modes: waterfall and parallel modes. In waterfall mode, tasks will be executed sequentially, meaning that the above watch:images task would not be executed until the clean task is completed.
Also notice that we moved fuse.run to the default task. This is important, as we want to make sure that bundling will start after the other tasks are completed.
The second clean task is really simple: we use the clean method to remove the dist folder.
The third watch:images task is responsible for copying images. Sparky.watch is a built-in file watcher method that will kick in every time there’s a change in your folder. The "**/*.+(svg|png|jpg|gif)" is a file glob that tells Sparky to watch all of these image file formats in our src folder. The .dest method tells Sparky to copy any of the changed files to dist folder.
Add some images to your src folder and run node fuse.js. Sparky will now clear all files in the dist folder and copy all images in the src folder to the dist folder. Now try to edit any image in src folder and you’ll see that the Sparky file watcher will kick in and copy that file to dist folder.
The full example is available here.
Unit Testing
Testing is the most powerful tool we know of to improve software quality. Tests reduce bugs, provide accurate documentation, and improve design.
FuseBox comes with a built-in test runner. It’s built on top of the same engine Fusebox uses for bundling, which means that it benefits from everything FuseBox has — speed, caching, plugins, etc. Secondly, it uses Typescript by default, which means you don’t have to wire anything; it just works.
Let’s do the usual:
- create a new project
- navigate in your command line to the root of this project and do
npm init - create a
srcfolder - inside
srcfolder, addindex.ts - inside
srcfolder, addindex.test.ts - create
fuse.jsin the root of the project - install FuseBox, babel-runtime and TypeScript as dependencies by doing the following from your command line:
npm install fuse-box fuse-test-runner babel-runtime typescript -D.
Your fuse.js should look like this:
const { FuseBox } = require("fuse-box");

const fuse = FuseBox.init({
  homeDir: "src",
  output: "dist/$name.js"
});

fuse.dev();

fuse.bundle("app")
  .instructions("> index.ts")
  .watch()
  .hmr();

fuse.run();
fuse.bundle("app").test("[**/**.test.ts]");
The config is still the same. We just added one extra line: fuse.bundle("app").test("[**/**.test.ts]");. This line instructs FuseBox to run any test files that ends with .test.ts.
In index.ts, add this:
export const count = 1;

export function calculate(num) {
  return num + 1;
}
In index.test.ts, add this:
import { should } from "fuse-test-runner";
import { count, calculate } from "./index";

export class BarTest {
  "Should be okay"() {
    should(count).beOkay();
  }

  "Should equal 2"() {
    should(calculate(count))
      .equal(2);
  }

  "Should not equal 2"() {
    should(calculate(5))
      .equal(2);
  }
}
Let’s look at what we’re doing here:
- we require the built-in assertion library
- we require the necessary functions from
index.ts - we create a class to wrap our test methods
- we create the test methods that will test our code.
Let’s take the first test Should be okay. Here we simply want to validate that the count variable is not empty or undefined. To do that, we use should(count).beOkay();. We start any assertion with the method should, which accepts variables, functions, objects and expressions. We then use one of the built-in assertions. In the example above, we use beOkay, which asserts that the count variable is not empty or undefined.
In the second test, Should equal 2, we pass count to the calculate function and assert that the correct result is returned.
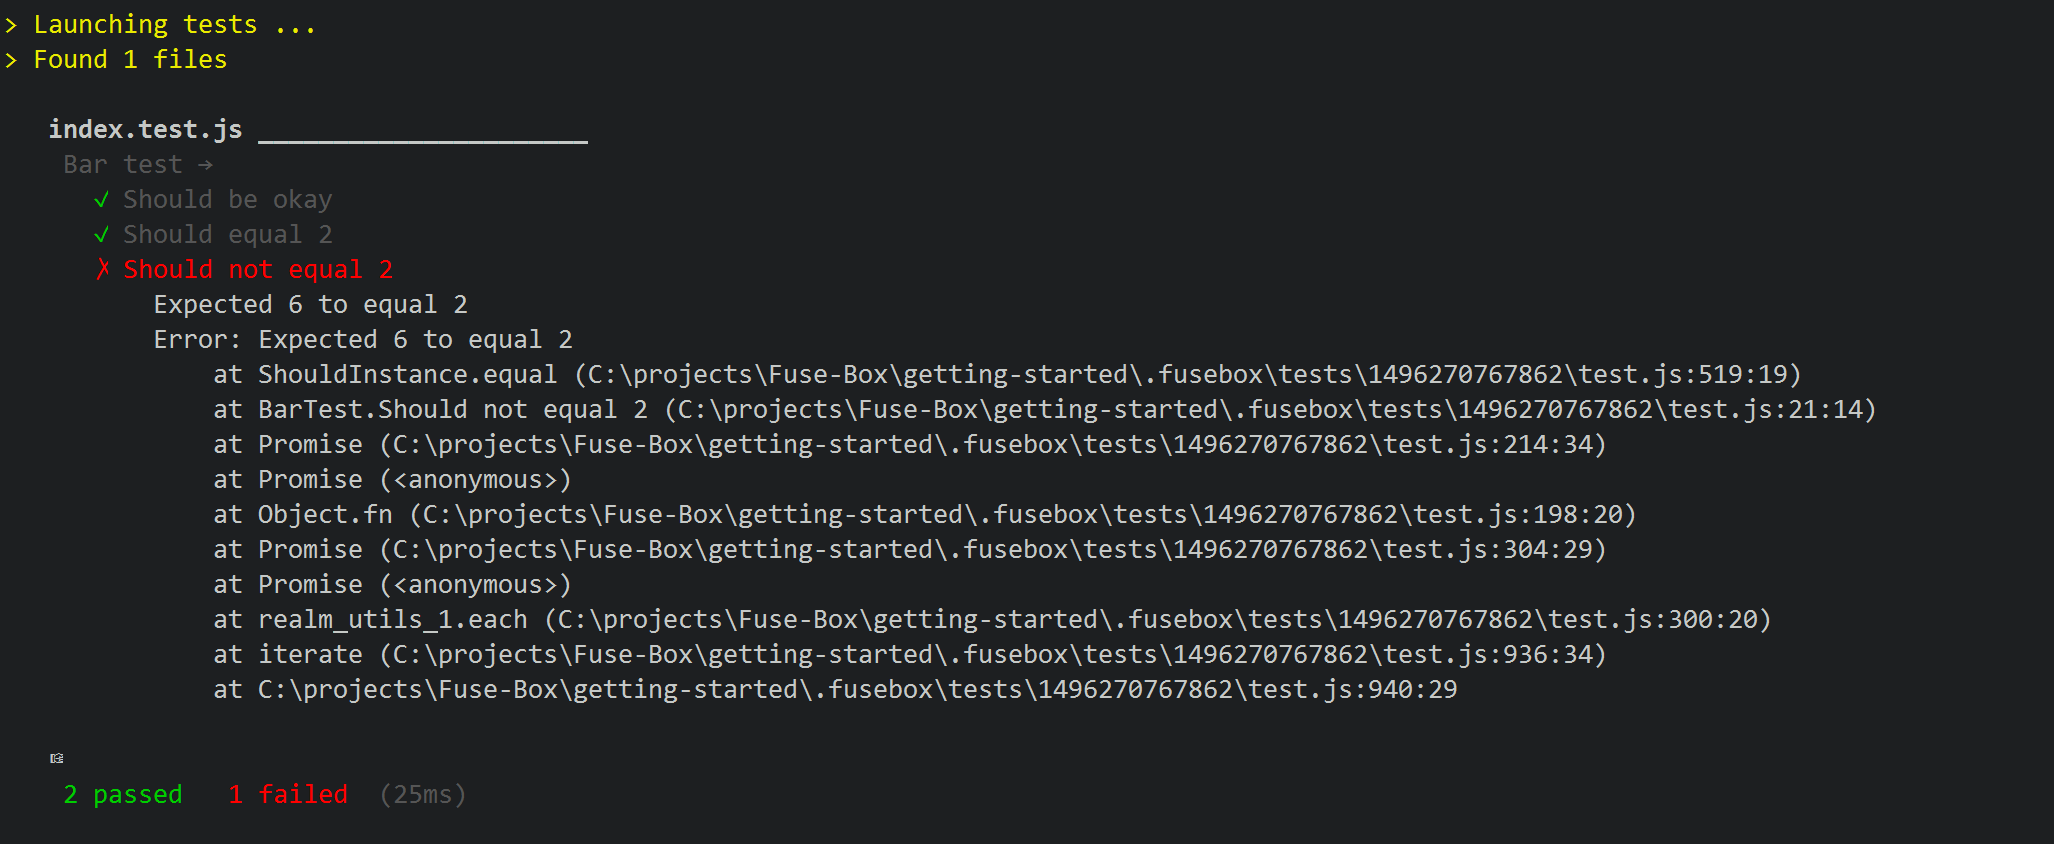
In the third test, Should not equal 2, we intentionally try to force the test to fail by passing number 5, resulting in value 6, which doesn’t equal the expected value 2.
Now run node fuse.js and you’ll see in your console that first two tests passed and the third one failed.
The full example is available here.
Development vs Production Environments
We’ve dealt with major FuseBox concepts, but usually you have different requirements for both your development and production environments. For example, you wouldn’t ship your bundled code with HMR enabled. To help you with that, we’ll walk through a recommended setup that will fulfill both development and production requirements.
Let’s do the usual:
- create a new project
- navigate in your command line to the root of this project and do
npm init -y - create a
srcfolder - inside
srcfolder, addindex.ts - inside
srcfolder, addcalc.ts - inside
srcfolder, addcalc.test.ts - inside
srcfolder, addmain.css - inside
srcfolder, addextra.scss - create
fuse.jsin the root of the project - install FuseBox, Sass, UglifyJS, babel-runtime and TypeScript as dependencies by running the following from your command line:
npm install fuse-box fuse-test-runner babel-runtime typescript node-sass uglify-js -D.
Add the following to fuse.js:
const { FuseBox, CSSPlugin, SassPlugin, WebIndexPlugin, UglifyJSPlugin, Sparky } = require("fuse-box");

let fuse, app, vendor, isProduction = false;

Sparky.task("config", () => {
  fuse = FuseBox.init({
    homeDir: "src",
    output: "dist/$name.js",
    hash: isProduction,
    sourceMaps: !isProduction,
    plugins: [
      [SassPlugin(), CSSPlugin()],
      CSSPlugin(),
      WebIndexPlugin({path: "."}),
      isProduction && UglifyJSPlugin()
    ]
  });

  // vendor should come first
  vendor = fuse.bundle("vendor")
    .instructions("~ index.ts");

  // out main bundle
  app = fuse.bundle("app")
    .instructions(`!> [index.ts]`);

  if (!isProduction) {
    fuse.dev();
  }
});

// development task "node fuse""
Sparky.task("default", ["config"], () => {
  vendor.hmr().watch();
  app.watch();
  return fuse.run();
});

// Dist task "node fuse dist"
Sparky.task("dist", ["set-production", "config"], () => {
  return fuse.run();
});

Sparky.task("set-production", () => {
  isProduction = true;
  return Sparky.src("dist/").clean("dist/");
});

Sparky.task("test", ["config"], () => {
  return app.test();
});
The above might seem like a lot to digest, but don’t worry: once we break it down, you’ll realize how powerful and simple it is.
The concept remains the same, but what we’ve added is a new variable isProduction. This will set a condition defining whether Fusebox should create a development or production bundle for you.
Then there’s a hash property on the object we pass to FuseBox.init(), which is set to the value of isProduction. This is FuseBox’s hashing feature which is important for managing releases. It allows us to invalidate the browser cache when serving a new version of our application, which in return guarantees that our users will get the latest version of our app. With hashing enabled, FuseBox will generate a file hash name for each bundle every time we start the bundling process. For example:
d72d7ad8-app.js
b841f28-vendor.js
When we go into production we need our code to be as small and performant as possible. We achieve that by minifying the bundle with the UglifyJSPlugin we’re adding.
In the plugins property, notice the following line: isProduction && UglifyJSPlugin(). This is a JavaScript expression which means that if isProduction variable evaluates to true, apply the UglifyJSPlugin.
Next, we create a vendor bundle. The idea behind a vendor bundle is to separate your local code from external packages and dependencies. This allows for a modular approach and less repeated code within bundles. Notice in .instructions("~ index.ts"), the ~ symbol is a FuseBox arithmetic symbol that instructs FuseBox to extract all external dependencies, ignoring the actual project files. Simply put, this will bundle all your external dependencies (npm packages) minus your local code.
Moving on, we create the main bundle. Notice the !> symbols in .instructions("!> [index.ts]"). Again these are arithmetic symbols. The ! instructs FuseBox to removes the loader API from a bundle (because we already included it in the vendor bundle). The > symbol instructs FuseBox to automatically execute a file on load.
The Tasks
The final thing to explain is our tasks. Notice that we even encapsulated our config in a config task of its own. This allows us to use it in other tasks without repeating ourselves or polluting our code.
Let’s start with the default task. Notice that we enabled HMR inside it with vendor.hmr().watch(). We did that because the default task is going to target our development environment, so isProduction is false here.
The set-production task is where we set the isProduction variable to true.
The dist task, on the other hand, is going to target our production environment. Therefore, it’s dependent on the set-production and config tasks. This means that dist task won’t run until the set-production task has completed, which in turn won’t run until the config task has completed.
Finally is the test task, which simply executes the tests we’ve defined in our projects.
Now let’s see all of this in action. From your command line, run node fuse.js. You’ll notice that FuseBox does the following:
- starts the bundling process
- starts the dev server
- starts HMR
- every time we change our code the HMR and bundling process will kick in again.
But What About Production?
Never fear! If we run node fuse.js dist (notice the dist parameter), FuseBox does the following:
- start the bundling process.
There’s no HMR or dev server running. This is because we’re in production mode. Open your dist folder and you’ll see that FuseBox generated your bundles with random names. Open any of those bundles and you’ll see that your code looks funny. That’s because FuseBox minified your code using the UglifyJSPlugin. If you compare the size of your bundles between development and production mode, you’ll see the difference!
Finally, if you want to run your tests, from the command line run node fuse.js test.
The full example is available here.
A Lightweight Webpack Alternative
As we’ve seen, we were able to fully cover all the requirements of a modern development workflow — from development to production — by using just FuseBox. There are a lot more advanced options and concepts you’ll discover as you explore the library, but hopefully this article will help you to set your foot on the right path and enjoy using FuseBox.
Our community on Gitter is growing, we’re very friendly and supportive! If you like the project, don’t forget to star our GitHub repository and follow us on Twitter. Otherwise, if you have any questions or comments, please don’t hesitate to leave them in the comments below.
This article was peer reviewed by Dominic Myers. Thanks to all of SitePoint’s peer reviewers for making SitePoint content the best it can be!
Frequently Asked Questions about FuseBox: A Faster Webpack Alternative
What makes FuseBox a faster alternative to Webpack?
FuseBox is a bundler module that is designed to be faster and simpler than Webpack. It achieves this through its core feature, which is the ability to bundle files in a fraction of the time it takes Webpack. This is due to its unique caching mechanism that only regenerates the files that have been changed, rather than the entire bundle. This results in significantly faster build times, making it a more efficient alternative to Webpack.
How does FuseBox improve the development process?
FuseBox simplifies the development process by eliminating the need for complex configuration files. It has a straightforward setup process and a user-friendly API, which makes it easier for developers to get started. Additionally, it supports TypeScript out of the box, which eliminates the need for additional plugins or loaders.
Can FuseBox handle large projects?
Yes, FuseBox is designed to handle large projects efficiently. It has a powerful multi-threading feature that allows it to handle multiple tasks simultaneously. This makes it capable of handling large projects without slowing down the development process.
What are the main features of FuseBox?
FuseBox comes with several features that make it a powerful tool for developers. These include a built-in dev server, HMR (Hot Module Replacement), CSS and HTML plugins, and support for TypeScript, Babel, and Vue.js. It also has a Quantum plugin that provides tree shaking and scope hoisting capabilities.
How does FuseBox compare to other Webpack alternatives?
Compared to other Webpack alternatives, FuseBox stands out due to its speed and simplicity. It offers a faster bundling process and a simpler setup, making it a more efficient and user-friendly option. It also provides a range of features that are not commonly found in other bundlers, such as multi-threading and built-in TypeScript support.
Is FuseBox suitable for beginners?
Yes, FuseBox is suitable for beginners. Its straightforward setup process and user-friendly API make it easy for beginners to get started. Additionally, it has a comprehensive documentation that provides detailed instructions and examples, making it easier for beginners to understand how to use it.
How does FuseBox’s Quantum plugin improve performance?
The Quantum plugin is a core feature of FuseBox that significantly improves performance. It provides tree shaking and scope hoisting capabilities, which help to reduce the size of the bundle and improve the loading speed. This results in a faster and more efficient application.
Does FuseBox support code splitting?
Yes, FuseBox supports code splitting. This allows developers to split their code into multiple bundles, which can be loaded on demand. This helps to improve the loading speed and performance of the application.
Can I use FuseBox with my existing Webpack project?
Yes, you can use FuseBox with your existing Webpack project. FuseBox is designed to be a drop-in replacement for Webpack, so you can easily switch to it without having to rewrite your entire project.
Is FuseBox actively maintained and supported?
Yes, FuseBox is actively maintained and supported. It has a strong community of developers who regularly contribute to its development and provide support to users. It also has a comprehensive documentation that provides detailed instructions and examples, making it easier for users to get help when they need it.
 Feras Khoursheed
Passionate Developer, Entrepreneur, Musician