
HTTPS Everywhere
The HTTP/2 specification was published as RFC 7540 in May 2015, which means at this point it’s a part of the standard. This was a major milestone. Now we can all upgrade our servers to use HTTP/2. One of the most important aspects is the backwards compatibility with HTTP 1.1 and the negotiation mechanism to choose a different protocol. Although the standard doesn’t specify mandatory encryption, currently no browser supports HTTP/2 unencrypted. This gives HTTPS another boost. Finally we’ll get HTTPS everywhere! What does our stack actually look like? From the perspective of a website running in the browser (at the application level) we have to traverse the following layers to reach the IP level:- Client browser
- HTTP
- SSL/TLS
- TCP
- IP
The most recent version is TLS 1.3. TLS is the successor of SSL, which is available in its latest release SSL 3.0. The changes from SSL to TLS preclude interoperability, but the basic procedure is, however, unchanged. We have three different encrypted channels. The first is a public key infrastructure for certificate chains. The second provides public key cryptography for key exchanges. Finally, the third one is symmetric. Here we have cryptography for data transfers. TLS 1.3 uses hashing for some important operations. Theoretically, it’s possible to use any hashing algorithm, but it’s highly recommended to use SHA2 or a stronger algorithm. SHA1 has been a standard for a long time but has recently become obsolete. HTTPS is also gaining more attention for clients. Privacy and security concerns have always been around, but with the growing amount of online accessible data and services, people are getting more and more concerned. For those sites that don’t implement it, there is a useful browser extension — HTTPS Everywhere from the EFF — which encrypts our communications with most websites.TLS has exactly one performance problem: it is not used widely enough. Everything else can be optimized: https://t.co/1kH8qh89Eg
— Ilya Grigorik (@igrigorik) February 20, 2014
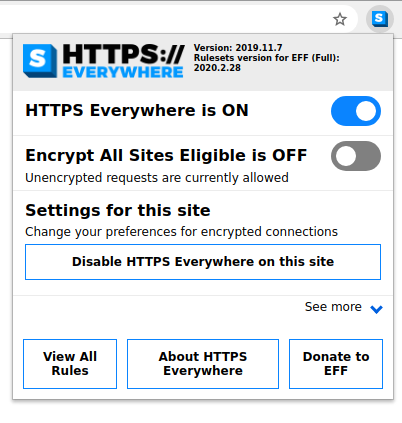 The creators realized that many websites offer HTTPS only partially. The plugin allows us to rewrite requests for those sites that offer only partial HTTPS support. Alternatively, we can also block HTTP altogether (see the screenshot above).
Basic Communication
The certificate’s validation process involves validating the certificate signature and expiration. We also need to verify that it chains to a trusted root. Finally, we need to check to see if it’s been revoked. There are dedicated, trusted authorities in the world that grant certificates. In case one of these were to become compromised, all other certificates from the said authority would get revoked. The sequence diagram for an HTTPS handshake looks as follows. We start with the initialization from the client, which is followed by a message with the certificate and key exchange. After the server sends its completed package, the client can start the key exchange and cipher specification transmission. At this point, the client is finished. Finally the server confirms the cipher specification selection and closes the handshake.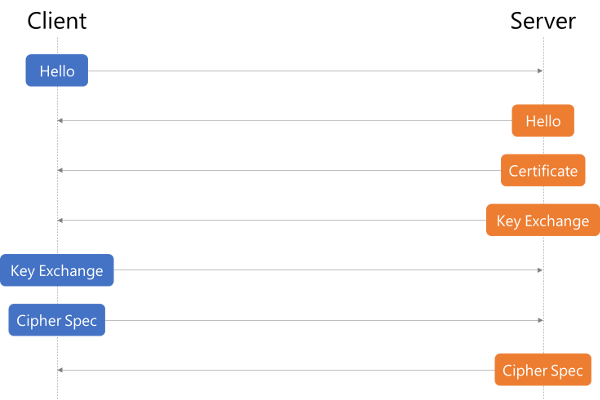 The whole sequence is triggered independently of HTTP. If we decide to use HTTPS, only the socket handling is changed. The client is still issuing HTTP requests, but the socket will perform the previously described handshake and encrypt the content (header and body).
So what do we need to make SSL/TLS work with an Express.js server?
The whole sequence is triggered independently of HTTP. If we decide to use HTTPS, only the socket handling is changed. The client is still issuing HTTP requests, but the socket will perform the previously described handshake and encrypt the content (header and body).
So what do we need to make SSL/TLS work with an Express.js server?
HTTPS
By default, Node.js serves content over HTTP. But there’s also an HTTPS module that we have to use in order to communicate over a secure channel with the client. This is a built-in module, and the usage is very similar to how we use the HTTP module:const https = require("https"),
fs = require("fs");
const options = {
key: fs.readFileSync("/srv/www/keys/my-site-key.pem"),
cert: fs.readFileSync("/srv/www/keys/chain.pem")
};
const app = express();
app.use((req, res) => {
res.writeHead(200);
res.end("hello world\n");
});
app.listen(8000);
https.createServer(options, app).listen(8080);
/srv/www/keys/my-site-key.pem and and /srv/www/keys/chain.pem files for the moment. Those are the SSL certificates we need to generate, which we’ll do a bit later. This is the part that changed with Let’s Encrypt. Previously, we had to generate a private/public key pair, send it to a trusted authority, pay them and probably wait for a bit in order to get an SSL certificate. Nowadays, Let’s Encrypt instantly generates and validates your certificates for free!
Generating Certificates
Certbot
The TLS specification demands a certificate, which is signed by a trusted certificate authority (CA). The CA ensures that the certificate holder is really who they claim to be. So basically when you see the green lock icon (or any other greenish sign to the left side of the URL in your browser) it means that the server you’re communicating with is really who it claims to be. If you’re on facebook.com and you see a green lock, it’s almost certain you really are communicating with Facebook and no one else can see your communication — or rather, no one else can read it. It’s worth noting that this certificate doesn’t necessarily have to be verified by an authority such as Let’s Encrypt. There are other paid services as well. You can technically sign it yourself, but then (as you’re not a trusted CA) the users visiting your site will likely see a large scary warning offering to get them back to safety. In the following example, we’ll use the Certbot, which is used to generate and manage certificates with Let’s Encrypt. On the Certbot site you can find instructions on how to install Certbot for almost any OS/server combination. You should choose the options that are applicable to you. A common combination for deploying Node apps is NGINX on the latest LTS Ubuntu and that’s what I’ll use here.sudo apt-get update
sudo apt-get install software-properties-common
sudo add-apt-repository universe
sudo add-apt-repository ppa:certbot/certbot
sudo apt-get update
Webroot
Webroot is a Certbot plugin that, in addition to the Certbot default functionality (which automatically generates your public/private key pair and generates an SSL certificate for those), also copies the certificates to your webroot folder and verifies your server by placing some verification code into a hidden temporary directory named.well-known. In order to skip doing some of these steps manually, we’ll use this plugin. The plugin is installed by default with Certbot. In order to generate and verify our certificates, we’ll run the following:
certbot certonly --webroot -w /var/www/example/ -d www.example.com -d example.com
/var/log/letsencrypt.
You’ll also be asked for your email address. It’s a good idea to put in a real address you use often, as you’ll get a notification if your certificate is about to expire. The trade-off for Let’s Encrypt issuing a free certificate is that it expires every three months. Luckily, renewal is as easy as running one simple command, which we can assign to a cron job and then not have to worry about expiration. Additionally, it’s a good security practice to renew SSL certificates, as it gives attackers less time to break the encryption. Sometimes developers even set up this cron to run daily, which is completely fine and even recommended.
Keep in mind that you have to run this command on a server to which the domain specified under the -d (for domain) flag resolves — that is, your production server. Even if you have the DNS resolution in your local hosts file, this won’t work, as the domain will be verified from outside. So if you’re doing this locally, it will most likely fail, unless you opened up a port from your local machine to the outside world and have it running behind a domain name which resolves to your machine. This is a highly unlikely scenario.
Last but not least, after running this command, the output will contain paths to your private key and certificate files. Copy these values into the previous code snippet — into the cert property for certificate, and the key property for the key:
// ...

const options = {
  key: fs.readFileSync("/var/www/example/sslcert/privkey.pem"),
  cert: fs.readFileSync("/var/www/example/sslcert/fullchain.pem") // these paths might differ for you, make sure to copy from the certbot output
};

// ...
Tighetning It Up
HTTP Strict Transport Security
Have you ever had a website where you switched from HTTP to HTTPS and there were some residual redirects still redirecting to HTTP? HTTP Strict Transport Security (HSTS) is a web security policy mechanism to mitigate protocol downgrade attacks and cookie hijacking. HSTS effectively forces the client (browser accessing your server) to direct all traffic through HTTPS — a “secure or not at all” ideology! Express JS doesn’t allow us to add this header by default, so we’ll use Helmet, a Node module that allows us to do this. Install Helmet by running the following:npm install helmet
const https = require("https"),
  fs = require("fs"),
  helmet = require("helmet");

const options = {
  key: fs.readFileSync("/srv/www/keys/my-site-key.pem"),
  cert: fs.readFileSync("/srv/www/keys/chain.pem")
};

const app = express();

app.use(helmet()); // Add Helmet as a middleware

app.use((req, res) => {
  res.writeHead(200);
  res.end("hello world\n");
});

app.listen(8000);

https.createServer(options, app).listen(8080);
Diffie–Hellman Strong(er) Parameters
In order to skip some complicated math, let’s cut to the chase. In very simple terms, there are two different keys used for encryption: the certificate we get from the certificate authority, and one that’s generated by the server for key exchange. The default key for key exchange (also called Diffie–Hellman key exchange, or DH) uses a “smaller” key than the one for the certificate. In order to remedy this, we’ll generate a strong DH key and feed it to our secure server for use. In order to generate a longer (2048 bit) key, you’ll needopenssl, which you probably have installed by default. In case you’re unsure, run openssl -v. If the command isn’t found, install openssl by running sudo apt install openssl (or visit their download page here):
openssl dhparam -out /var/www/example/sslcert/dh-strong.pem 2048
// ...

const options = {
  key: fs.readFileSync("/var/www/example/sslcert/privkey.pem"),
  cert: fs.readFileSync("/var/www/example/sslcert/fullchain.pem"), // these paths might differ for you, make sure to copy from the certbot output
  dhparam: fs.readFileSync("/var/www/example/sslcert/dh-strong.pem")
};

// ...
Conclusion
In 2020 and beyond, there’s no excuse to dismiss HTTPS. The future direction is clearly visible: HTTPS everywhere! In Node.js, we have lots of options for utilizing SSL/TLS. We can publish our websites in HTTPS, we can create requests to encrypted websites, and we can authorize otherwise untrusted certificates.FAQs on Implementing and Optimizing SSL/TLS in Node.js for Secure Connections
What is the Importance of SSL/TLS in Node.js?
SSL/TLS is crucial in Node.js for a variety of reasons. Firstly, it provides a secure connection between the client and the server, ensuring that all data transmitted between the two is encrypted and safe from interception by third parties. This is particularly important for applications that handle sensitive user data, such as login credentials or payment information. Secondly, SSL/TLS can help to build trust with users. When a user sees that a site is secured with SSL/TLS, they can be confident that their data is being handled securely. Lastly, using SSL/TLS can also have SEO benefits, as search engines often give preference to sites that use secure connections.
How Can I Generate a Self-Signed Certificate for Node.js?
Generating a self-signed certificate for Node.js can be done using OpenSSL. First, you need to install OpenSSL on your system. Once installed, you can generate a self-signed certificate using the following command: openssl req -x509 -newkey rsa:4096 -keyout key.pem -out cert.pem -days 365. This will create a new RSA key pair, and a certificate that is valid for 365 days. The -keyout option specifies the filename to write the newly created private key to, and the -out option specifies the output filename of the certificate.
How Can I Use the Created SSL/TLS Certificate with My Node.js Server?
Once you have generated your SSL/TLS certificate, you can use it with your Node.js server by including it in your server configuration. This can be done using the https module’s createServer method, which takes an options object and a request listener. The options object should include your certificate and private key, like so:const https = require('https');const fs = require('fs');const options = {
key: fs.readFileSync('key.pem'),
cert: fs.readFileSync('cert.pem')};https.createServer(options, (req, res) => {
res.writeHead(200);
res.end('hello world\n');}).listen(8000);
This will create a new HTTPS server that uses your SSL/TLS certificate.
What is the Difference Between SSL and TLS?
SSL (Secure Sockets Layer) and TLS (Transport Layer Security) are both cryptographic protocols designed to provide secure communication over a network. While they are often used interchangeably, there are some key differences. SSL is the older of the two protocols, and has been largely deprecated due to known security vulnerabilities. TLS is the successor to SSL, and offers improved security and performance. In general, when people refer to SSL/TLS, they are usually referring to TLS.
How Can I Redirect HTTP Traffic to HTTPS in Node.js?
Redirecting HTTP traffic to HTTPS can be done by creating an HTTP server that listens for incoming connections and redirects them to the HTTPS server. This can be done using the http module’s createServer method, like so:const http = require('http');http.createServer((req, res) => {
res.writeHead(301, { 'Location': 'https://' + req.headers['host'] + req.url });
res.end();}).listen(80);
This will create a new HTTP server that listens on port 80 and redirects all incoming connections to the equivalent HTTPS URL.
How Can I Verify the SSL/TLS Configuration of My Node.js Server?
Verifying the SSL/TLS configuration of your Node.js server can be done using online tools such as SSL Labs’ SSL Server Test. This tool will perform a deep analysis of the configuration of any SSL web server, providing a detailed report that includes information about the server’s certificate, protocol support, cipher strength, and more.
What Should I Do If I Encounter an SSL/TLS Error in Node.js?
If you encounter an SSL/TLS error in Node.js, the first step is to try and understand the error message. The error message will often provide clues as to what the issue might be. Common issues include problems with the certificate (such as it being expired or not trusted), or issues with the server configuration. If you’re unable to resolve the issue yourself, consider seeking help from the Node.js community or a professional.
How Can I Update the SSL/TLS Certificate on My Node.js Server?
Updating the SSL/TLS certificate on your Node.js server involves generating a new certificate (or obtaining one from a certificate authority), and then updating your server configuration to use the new certificate. Once the new certificate is in place, you will need to restart your server for the changes to take effect.
Can I Use Let’s Encrypt to Obtain a Free SSL/TLS Certificate for My Node.js Server?
Yes, Let’s Encrypt is a free, automated, and open certificate authority that can be used to obtain SSL/TLS certificates. They provide a tool called Certbot that can automate the process of obtaining and installing a certificate. Once installed, Certbot can also automatically renew your certificates before they expire.
What is Perfect Forward Secrecy and How Can I Enable It in Node.js?
Perfect Forward Secrecy (PFS) is a property of secure communication protocols in which compromise of long-term keys does not compromise past session keys. This means that even if a server’s private key is compromised, past communications are still safe. In Node.js, PFS can be enabled by configuring your server to use a set of cipher suites that support PFS, such as those provided by the ECDHE or DHE key exchange algorithms.
 Florian Rappl
Florian Rappl is an independent IT consultant working in the areas of client / server programming, High Performance Computing and web development. He is an expert in C/C++, C# and JavaScript. Florian regularly gives talks at conferences or user groups. You can find his blog at florian-rappl.de.
 Almir Bijedic
Almir is an all-rounder when it comes to web - he tried his luck in everything; from setting up an Ubuntu web server, through .NET WWF services all the way to the front-end where Javascript grabbed his full attention lately. When not working on the Web, Almir is exploring the IoT world, and loving it. Otherwise - it's cooking, movies, and the occasional biscuit.