Recently GitHub published a blog post which showed how the different languages have been evolving during the time. The rank represents the languages used in GitHub’s public and private repositories, excluding forks, as detected by a library called Linguist. As evident from it, JavaScript is definitely winning the race, in a wide variety of fields. The programming language is becoming a very popular choice for game programming, robotics, and IoT devices, despite of the very strong competition coming from C, C++, and Java. When JavaScript started powering robots, NodeBots were born. NodeBots are robots that are controlled by Node.js. If you are interested in knowing a little bit more about them, I suggest you to read the article titled An introduction to NodeBots by Patrick Catanzariti . In this tutorial, we’ll make a simple NodeBot which can be controlled from the browser. The source code of the whole project is available on GitHub.
Setting up the Hardware
We’ll be using the following hardware for this project:- Arduino
- 2 Motors
- L298 Motor controller
- A cord connecting Arduino to the computer
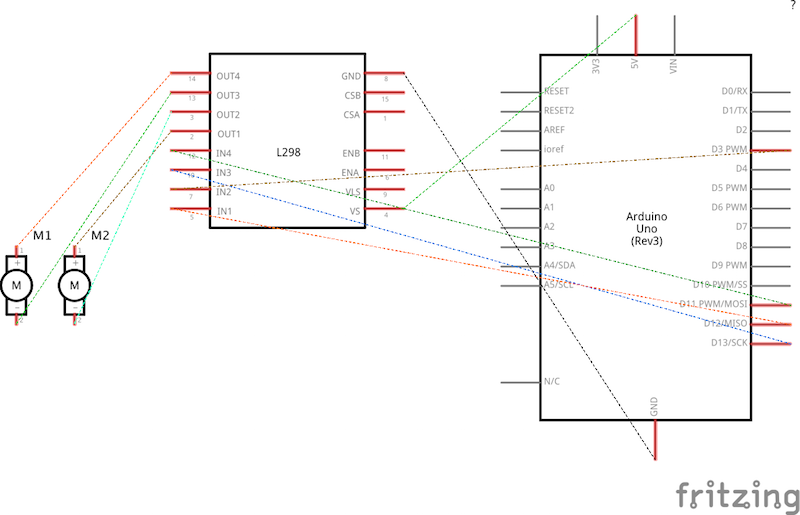
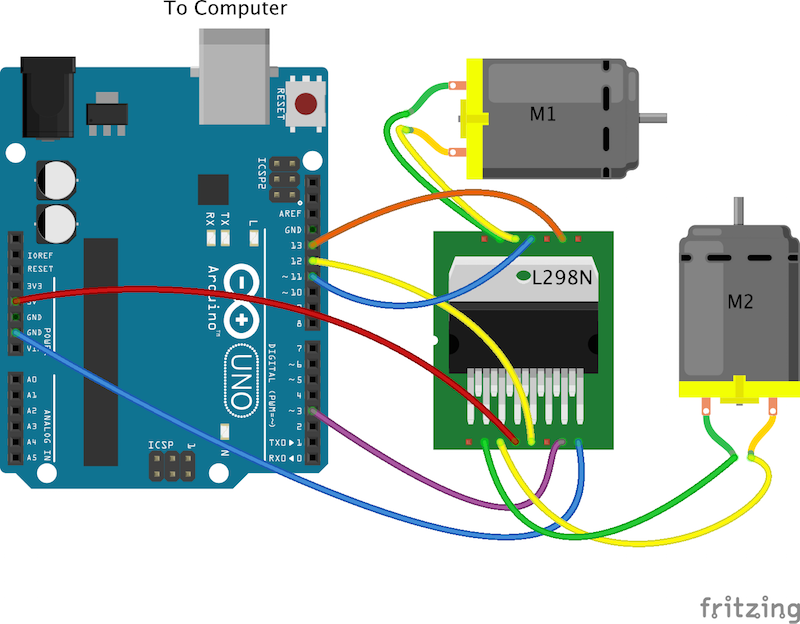 In case you find any difficulties in understanding the pin numbers, refer to the schematic diagram given below.
 I would advice you to select the motors according to your need (for instance, the load it has to bear). If you take a motor of higher voltage rating, then you may have to use an external power source as the voltage provided by Arduino may not be enough.
Once we’re done with the connections, we have to make sure that StandardFirmata is installed on the board. Firmata is a generic protocol for communicating with micro-controllers from software on a host computer. To do that, follow these simple steps:
I would advice you to select the motors according to your need (for instance, the load it has to bear). If you take a motor of higher voltage rating, then you may have to use an external power source as the voltage provided by Arduino may not be enough.
Once we’re done with the connections, we have to make sure that StandardFirmata is installed on the board. Firmata is a generic protocol for communicating with micro-controllers from software on a host computer. To do that, follow these simple steps:
- Download Arduino IDE
- Plug in your Arduino or Arduino compatible microcontroller via USB
- Open the Arduino IDE, select File > Examples > Firmata > StandardFirmata
- Click the “Upload” button.
Getting Started with the Application
To start with the web application, let’s define the software dependencies of our project. To do so, we’ll create apackage.jsonfile that looks like the following:
{
  "name": "nodebot-sample",
  "dependencies": {
    "express": "^4.11.2",
    "johnny-five": "^0.8.53",
    "socket.io": "^1.3.3"
}npm install in the root of the project folder after creating the file so that all the dependencies will be installed. If you aren’t familiar with npm, take a look at the article titled A Beginner’s Guide to npm — the Node Package Manager by Peter Dierx.
Server-Side Code
The server code relies on Node.js and Express. We’ll create a file namedindex.js at the root of our project directory. This file will contain all our server side logic.
var express = require('express');
var app = express();
var io = require('socket.io')(app.listen(8081));
var five = require('johnny-five');

app.use(express.static(__dirname + '/app'));

app.get('/', function (res) {
  	res.sendfile('/index.html');
});

var board = new five.Board({
  	repl:false
});express() function is a top-level function exported by the Express module. express.static() is responsible for serving the static assets to the client side. app.get routes HTTP requests to the specified path with a callback function. The res object represents the HTTP response that an express app sends when it gets a request. The sendFile method sends the file from the specific path to the browser.
We are using Socket.IO to maintain a realtime connection between the client and the server by harnessing the power of WebSockets and johnny-five to help Arduino in communicating with the server. johnny-five is a Firmata Protocol based, IoT and Robotics programming framework.
To start, we create a new instance of Board. Once done, all the logic will be implemented once the board is ready (which means when the ready event is fired). Inside the callback function, we create two instances of a Motor by providing an array with two numbers. Specifically, [3,12] and [11,13] represent the pins of the Arduino to which the respective motors are attached.
board.on('ready', function () {
    var speed, commands, motors;
    motors = {
        a: new five.Motor([3, 12]),
        b: new five.Motor([11, 13])
    };

    commands = null;

    io.on('connection', function (socket) {
        socket.on('stop', function () {
            motors.a.stop();
            motors.b.stop();
        });

        socket.on('start', function () {
            speed = 255;
            motors.a.fwd(speed);
            motors.b.fwd(speed);
        });

        socket.on('reverse', function () {
            speed = 120;
            motors.a.rev(speed);
            motors.b.rev(speed);
        });

        socket.on('left', function () {
            var aSpeed = 220;
            var bSpeed = 50;
            motors.a.fwd(aSpeed);
            motors.b.rev(bSpeed);
        });

        socket.on('right', function () {
            var aSpeed = 50;
            var bSpeed = 220;
            motors.a.rev(aSpeed);
            motors.b.fwd(bSpeed);
        });
    });
});.stop() method lets the motor coast to stop. There is also an alternative method .brake() that forces a motor to stop (and not coast) but it only works for boards with a dedicated brake pin. The .fwd() and .rev() methods are just aliases for .forward() and .reverse(). All of them accept a number as an argument, ranging from 0 to 255, to control the speed. We are using different combinations of forward and reverse speeds to obtain different movements of the motors.
To complete our project, we have to detect when the user has selected a particular option on the client side in realtime. This is where Socket.IO comes into play. The connection event is fired when a new connection with the client is established. Whenever the client emits an event, the .on() method allows us to listen for that event on the server side and perform some actions.
Client-Side Code
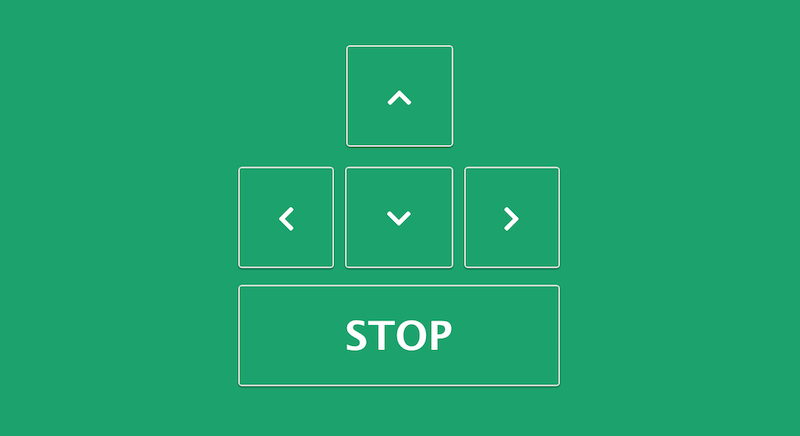 The client side implementation involves the creation of the interface where the user can select the different motions of the motors. We start by creating an
 index.html file inside the app folder present at the root of the directory. In this page, we include the client version of Socket.IO.
<body>
   <div class="container">
       <i class="fa fa-angle-up" id="forward"></i>
       <i class="fa fa-angle-left" id="left"></i>
       <i class="fa fa-angle-down" id="reverse"></i>
       <i class="fa fa-angle-right" id="right"></i>
       <i class="fa stop" id="stop">STOP</i>
   </div>
   <script src="//cdnjs.cloudflare.com/ajax/libs/socket.io/1.3.6/socket.io.min.js"></script>
   <script src="app.js"></script>
</body>window object, which is called io(). socket.emit('right') will send a message back to the server with the event name right. Once the .emit() is invoked on the client, the callback attached with socket.on('right') on the server is executed.
var socket = io();

function moveForward(){
    socket.emit('start');
}
function turnRight(){
    socket.emit('right');
}
function turnLeft(){
    socket.emit('left');
}
function moveReverse(){
    socket.emit('reverse');
}
function stop(){
    socket.emit('stop');
}

document.getElementById('forward').onclick = moveForward;
document.getElementById('right').onclick = turnRight;
document.getElementById('left').onclick = turnLeft;
document.getElementById('reverse').onclick = moveReverse;
document.getElementById('stop').onclick = stop;keypress events to the arrow keys and control the motors using them.
To start the server, open the terminal and run node index.js in the root of the project directory. Now you can visit your webpage at 127.0.0.1:8081 on the browser and start controlling your motors from there. If there are any issues like Board not found, make sure that the connection between the Arduino and the computer is fine and you have correctly uploaded the StandardFirmata from the Arduino IDE to the board.
This project was a very small example of what you can achieve by combining Node.js and Arduino. You can use the power of WebSockets to transfer the data received from the sensors (MPU6050) to the browser in realtime. You can show realtime graphs based on that and control the motors based on the readings you receive. A similar implementation on these principles can be found here which is an extension of the current project. If you are interested in the project, you should definitely check it out.
Conclusions
In this tutorial, we learned to create a basic NodeBot. At the same time we also explored the various possibilities that Node.js offers and how we can use its power to create a link between web applications and robots. I hope you all enjoyed the article and found some more reasons to love JavaScript. Once again, I want to highlight that you can find the source code of the whole project on GitHub.Frequently Asked Questions (FAQs) about Controlling a Motorbot using Arduino and Node.js
How can I install Node.js on my computer to control Arduino?
To install Node.js on your computer, you need to visit the official Node.js website and download the installer suitable for your operating system. Once downloaded, run the installer and follow the prompts to install Node.js and npm (Node Package Manager). After installation, you can verify it by opening a command prompt or terminal and typing ‘node -v’ and ‘npm -v’. Both commands should return a version number, indicating that Node.js and npm are installed correctly.
What is the role of Johnny-Five in controlling Arduino with Node.js?
Johnny-Five is a JavaScript Robotics and IoT platform that provides a framework for programming hardware interaction on devices like Arduino. It simplifies the process of writing code to control hardware components, making it easier for developers to build complex robotics and IoT applications using JavaScript and Node.js.
How can I connect my Arduino board to my computer?
To connect your Arduino board to your computer, you need a USB cable. Plug the USB cable into the Arduino board’s USB port and the other end into your computer’s USB port. Your computer should recognize the Arduino board and install the necessary drivers. If not, you may need to manually install the drivers from the Arduino website.
How can I debug my Node.js code when controlling Arduino?
Debugging Node.js code can be done using several methods. One common method is to use console.log statements to print out variable values and program flow. Another method is to use a debugging tool like Node Inspector, which allows you to set breakpoints and step through your code.
Can I control multiple Arduino boards with Node.js?
Yes, you can control multiple Arduino boards with Node.js. Each board would need to be connected to your computer and assigned a unique port. You would then create separate instances of the Johnny-Five Board class for each Arduino board, specifying the appropriate port for each one.
How can I control other hardware components with Arduino and Node.js?
Controlling other hardware components with Arduino and Node.js involves connecting the components to the Arduino board and writing code to interact with them. The Johnny-Five library provides classes for many common hardware components, making it easier to control them with JavaScript and Node.js.
Can I use other programming languages to control Arduino?
Yes, you can use other programming languages to control Arduino. Arduino itself uses a simplified version of C++, and there are libraries available for many other languages, including Python, Java, and Ruby.
How can I secure my Node.js server when controlling Arduino?
Securing your Node.js server involves several steps, including keeping your Node.js version up to date, using secure HTTP headers, implementing rate limiting to prevent denial-of-service attacks, and using secure session management.
Can I control Arduino with Node.js remotely?
Yes, you can control Arduino with Node.js remotely. This typically involves setting up a web server with Node.js and creating a web interface that sends commands to the Arduino board. The Arduino board would need to be connected to the internet, either directly or through a computer.
What are some common issues when controlling Arduino with Node.js and how can I troubleshoot them?
Some common issues when controlling Arduino with Node.js include problems with installing Node.js or the Johnny-Five library, issues with connecting to the Arduino board, and errors in the JavaScript code. Troubleshooting these issues typically involves checking the installation and connection, testing with simple code to isolate the problem, and using debugging tools to identify and fix errors in the code.
 Ritesh Kumar
Ritesh is a web designer and developer having a degree in electrical engineering from IIT Roorkee. He loves learning about the new web technologies and getting familiar with new people. When he is not coding, you can find him playing video games.