- Part 3 – Building a Chatroom Backend with Node.js, Socket.IO and Mongo
- What are WebSockets? What is Socket.IO?
- Adding Socket.IO to package.json
- Adding Socket.IO to app.js
- Logging a User Joining and Leaving
- Broadcasting a Message Received on the Chat Channel
- Saving Messages to a NoSQL Database
- Emitting the Last 10 Messages Received
- Deploying to Azure
- Conclusion
- Frequently Asked Questions (FAQs) about Building a Node.js Powered Chatroom Web App
This article is part of a web dev tech series from Microsoft. Thank you for supporting the partners who make SitePoint possible.
This Node.js tutorial series will help you build a Node.js-powered real-time chatroom web app fully deployed in the cloud. In this series, you will learn how to setup Node.js on your Windows machine (or just learn the concepts if you’re on Mac), how to develop a web frontend with Express, how to deploy a Node.js Express app to Azure, how to use Socket.IO to add a real-time layer, and how to deploy it all together.
The tutorial will use the optional Visual Studio and the Node.js Tools for Visual Studio plug-in as a development environment. I have provided links to free downloads of both tools. This is a beginner to intermediate-level article –you’re expected to know HTML5 and JavaScript.
Part 1 – Introduction to Node.js
Part 2 – Welcome to Express with Node.js and Azure
Part 3 – Building a Backend with Node.js, Mongo and Socket.IO
Part 4 – Building a Chatroom UI with Bootstrap
Part 3 – Building a Chatroom Backend with Node.js, Socket.IO and Mongo
Welcome to Part 3 of the hands-on Node.js tutorial series: Build a Node.js-powered chatroom web app. In this installment, I will show you how to use your existing express-based Node.js app to create a chatroom backend with WebSocket support.
What are WebSockets? What is Socket.IO?
WebSocket is a protocol designed to allow web applications to create a full-duplex channel over TCP (i.e. to have bi-directional communication) between the web browser and a web server. It is fully compatible with HTTP and uses TCP port number 80. WebSocket has allowed web applications to become real-time and support advanced interactions between the client and the server. It is supported by several browsers including Internet Explorer, Google Chrome, Firefox, Safari and Opera.
Socket.IO is a JavaScript library and Node.js module that allows you to create real-time bidirectional event-based communication apps simply and quickly. It simplifies the process of using WebSockets significantly. We will be using Socket.IO v1.0 to make our chatroom app.
Adding Socket.IO to package.json
package.json is a file that holds various metadata relevant to the project, including its dependencies. npm can use this file to download modules required by the project. Take a look at this interactive explanation of package.json and what it can contain.
Let’s add Socket.IO to the project as a dependency. There are two ways to do that.
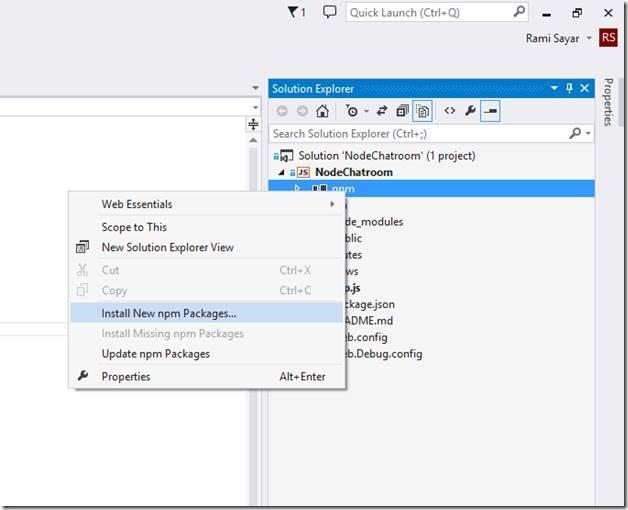
- If you have been following the tutorial series and have a project in Visual Studio setup, right-click on the npm part of the project and select “Install New npm Packages…”
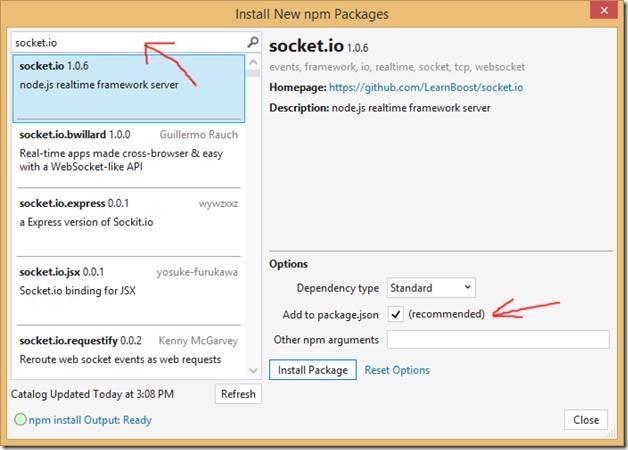
Once the window has opened, search for “socket.io”, select the top result and check the “Add to package.json” checkbox. Click the “Install Package” button. This will install Socket.IO into your project and add it to the package.json file.
package.json
{
  "name": "NodeChatroom",
  "version": "0.0.0",
  "description": "NodeChatroom",
  "main": "app.js",
  "author": {
    "name": "Rami Sayar",
    "email": ""
  },
  "dependencies": {
    "express": "3.4.4",
    "jade": "*",
    "socket.io": "^1.0.6",
    "stylus": "*"
  }
}- If you’re on OS X or Linux, you can achieve the same action as the above by running the following command in the root of your project folder.
npm install --save socket.ioAdding Socket.IO to app.js
The next step is to add Socket.IO to app.js. You can achieve this by replacing the following code…
http.createServer(app).listen(app.get('port'), function(){
  console.log('Express server listening on port ' + app.get('port'));
});
…with:
var serve = http.createServer(app);
var io = require('socket.io')(serve);

serve.listen(app.get('port'), function() {
    console.log('Express server listening on port ' + app.get('port'));
});
This will capture the HTTP server in a variable called serve and pass that HTTP server so that the Socket.IO module can attach to it. The last code block takes the serve variable and executes the listen function which starts the HTTP server.
Logging a User Joining and Leaving
Ideally, we want to log a user joining the chatroom. The following code accomplishes that by hooking a callback function to be executed on every single connection event via WebSocket to our HTTP server. In the callback function, we call console.log to log that a user connected. We can add this code after we call serve.listen.
io.on('connection', function (socket) {
    console.log('a user connected');
});
To do the same for when a user disconnects, we have to hook up the disconnect event for each socket. Add the following code inside after the console log of the previous code block.
socket.on('disconnect', function () {
        console.log('user disconnected');
    });
Finally, the code will look like this:
io.on('connection', function (socket) {
    console.log('a user connected');
    socket.on('disconnect', function () {
        console.log('user disconnected');
    });
});
Broadcasting a Message Received on the Chat Channel
Socket.IO gives us a function called emit to send events.
Any message received on the chat channel will be broadcast to all the other connections on this socket by calling emit with the broadcast flag in the callback.
socket.on('chat', function (msg) {
    socket.broadcast.emit('chat', msg);
});
Finally, the code will look like this:
io.on('connection', function (socket) {
    console.log('a user connected');
    socket.on('disconnect', function () {
        console.log('user disconnected');
    });
    socket.on('chat', function (msg) {
        socket.broadcast.emit('chat', msg);
    });
});
Saving Messages to a NoSQL Database
The chatroom should save chat messages to a simple data store. Normally, there are two ways to save to a database in Node; you can use a database-specific driver or you can use an ORM. In this tutorial, I will show you how to save the messages to MongoDB. Of course, you can use any other database you like, including SQL databases like PostgreSQL or MySQL.
You should make sure you have a MongoDB to connect to. You can use a third-party service to host your MongoDB such as MongoHQ or MongoLab. Take a look at this tutorial to see how you can create a MongoDB using the MongoLab Add-On in Azure. You can stop reading when you get to the section “Create the App”, just make sure to save the MONGOLAB_URI somewhere you can access easily later.
Once you have created a MongoDB and you have the MONGOLAB_URI for the database – Under Connection info that you have copied to your clipboard – you will want to ensure that the URI is available to the application. It is not best practice to add sensitive information such as this URI into your code or into a configuration file in your source code management tool. You can add the value to the Connection Strings list in the Configuration menu of your Azure Web application (such as in the tutorial you used) or you can add it to the App Setting list (with Name CUSTOMCONNSTR_MONGOLAB_URI). On your local machine, you can add it to the environment variables with the name CUSTOMCONNSTR_MONGOLAB_URI and value of the URI.
The next step is to add support for MongoDB to our project. You can do that by adding the following line to the dependencies object in package.json. Make sure to save your changes to the file.
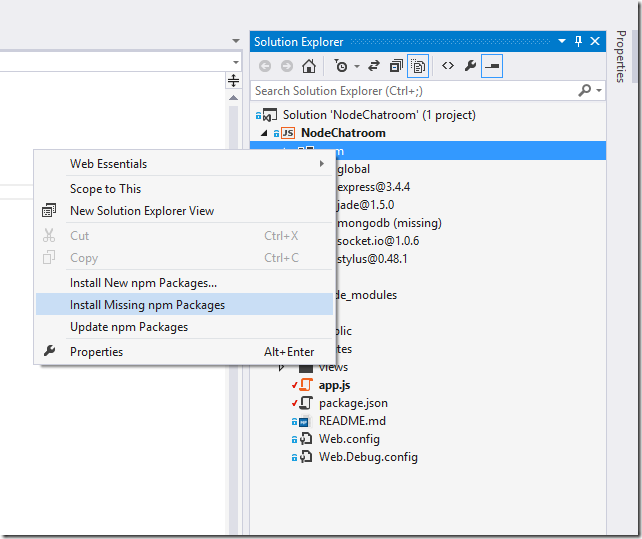
"mongodb": "^1.4.10",Right-click on the npm part of the project in the Solution Explorer to reveal the right-click context menu. Click “Install missing packages” from the content menu to install the MongoDB package so that it can be used as a module.
We want to import that module to be able to use the MongoDB client object in app.js. You can add the following lines of code after the first require('') function calls, such as on line 11.
var mongo = require('mongodb').MongoClient;We want to connect to the database using the URI we have in the CUSTOMCONNSTR_MONGOLAB_URI environment variable. Once connected, we want to insert the chat message received in the socket connection.
mongo.connect(process.env.CUSTOMCONNSTR_MONGOLAB_URI, function (err, db) {
    var collection = db.collection('chat messages');
    collection.insert({ content: msg }, function(err, o) {
        if (err) { console.warn(err.message); }
        else { console.log("chat message inserted into db: " + msg); }
    });
});
As you can see in the above code, we use the process.env object to get the environment variable value. We go into a collection in the database and we call the insert function with the content in an object.
Every message is now being saved into our MongoDB database.
Emitting the Last 10 Messages Received
Of course, we don’t want our users to feel lost once joining the chatroom, so we should make sure to send the last 10 messages received to the server so at the very least we can give them some context. To do that, we need to connect MongoDB. In this case, I am refraining from wrapping all of the socket code with one connection to the database so that I can still have the server working even if it loses the database connection.
We will also want to sort and limit my query to the last 10 messages, we will use the MongoDB generated _id as it contains a timestamp (although in more scalable situations, you will want to create a dedicated timestamp in the chat message) and we will call the limit function to limit the results to only 10 messages.
We will stream the results from MongoDB so that I can emit them as soon as possible to the chatroom as they arrive.
mongo.connect(process.env.CUSTOMCONNSTR_MONGOLAB_URI, function (err, db) {
    var collection = db.collection('chat messages')
    var stream = collection.find().sort({ _id : -1 }).limit(10).stream();
    stream.on('data', function (chat) { socket.emit('chat', chat.content); });
});
The above code does the job as explained in the previous paragraphs.
Deploying to Azure
You can redeploy to Azure by following the past tutorials (such as part 2).
Conclusion
In conclusion, we have a chat system capable of broadcasting a message received via WebSockets to all other connected clients. The system saves the message to the database and retrieves the last 10 messages to give context to every new user who joins the chatroom.
Stay Tuned for Part 4!
Part 4 — Building a Chatroom UI with Bootstrap is here. You can stay up-to-date on this and other articles by following my twitter account.
More Learning for Node on Azure
For more in-depth learning on node, my course is available here on Microsoft Virtual Academy.
Or some shorter-format videos on similar node subjects:
This article is part of the web dev tech series from Microsoft. We’re excited to share Project Spartan and its new rendering engine with you. Get free virtual machines or test remotely on your Mac, iOS, Android, or Windows device at modern.IE.
Frequently Asked Questions (FAQs) about Building a Node.js Powered Chatroom Web App
How can I ensure the security of my chatroom web app built with Node.js, MongoDB, and Socket.io?
Security is a crucial aspect of any web application. For a chatroom web app built with Node.js, MongoDB, and Socket.io, you can implement several security measures. Firstly, use HTTPS instead of HTTP to ensure all communications between your server and clients are encrypted. Secondly, validate all incoming data to prevent SQL injection attacks. Thirdly, use JWT (JSON Web Tokens) for user authentication. Lastly, regularly update all your dependencies to their latest versions to avoid potential security vulnerabilities.
Can I integrate other databases with Node.js for my chatroom web app?
Yes, Node.js is highly flexible and can integrate with various databases. While MongoDB is a popular choice due to its scalability and flexibility, you can also use other databases like MySQL, PostgreSQL, or SQLite depending on your specific needs. The choice of database largely depends on your application’s data requirements and the specific features of the database.
How can I scale my Node.js chatroom web app to handle more users?
To scale your Node.js chatroom web app, you can use a load balancer to distribute incoming traffic across multiple servers. You can also use the clustering module in Node.js to create child processes that all share server ports. Additionally, consider using a NoSQL database like MongoDB, which can easily scale horizontally to handle more data.
Can I use other real-time technologies instead of Socket.io for my chatroom web app?
Yes, there are several other real-time technologies you can use instead of Socket.io. These include WebSockets, Server-Sent Events (SSE), and third-party services like Pusher or Firebase. Each of these technologies has its own strengths and weaknesses, so the choice depends on your specific needs.
How can I test my Node.js chatroom web app to ensure it’s working correctly?
Testing is an essential part of the development process. For a Node.js chatroom web app, you can use testing frameworks like Mocha or Jest to write unit tests and integration tests. You can also use tools like Postman or Insomnia for API testing. Additionally, consider using end-to-end testing tools like Cypress or Puppeteer to simulate user interactions and ensure your app works as expected.
How can I deploy my Node.js chatroom web app to a live server?
There are several platforms that allow you to deploy your Node.js chatroom web app. These include Heroku, AWS, Google Cloud, and Azure. Each platform has its own deployment process, but generally, you’ll need to create an account, set up a new project, and follow the platform’s instructions to deploy your app.
Can I add multimedia support to my Node.js chatroom web app?
Yes, you can add multimedia support to your Node.js chatroom web app. This can be done by integrating third-party services like Cloudinary or AWS S3 for storing and retrieving multimedia files. You can also use Socket.io to send and receive multimedia data in real-time.
How can I add user authentication to my Node.js chatroom web app?
User authentication is a crucial feature for any chatroom web app. For a Node.js app, you can use Passport.js, a popular middleware for handling user authentication. It supports various authentication strategies, including local username and password, OAuth, and JWT.
Can I use other frontend frameworks with Node.js for my chatroom web app?
Yes, Node.js is backend technology and can work with any frontend framework or library. While the tutorial uses plain HTML and CSS, you can use frontend frameworks like React, Angular, or Vue.js to build more complex and interactive user interfaces.
How can I handle errors in my Node.js chatroom web app?
Error handling is an important part of any web application. In Node.js, you can use middleware to handle errors. This involves creating a special function that takes four arguments: error, request, response, and next. You can then use this function to log errors, send error responses to the client, or even redirect users to an error page.
 Rami Sayar
Rami Sayar is a technical evangelist at Microsoft Canada focusing on web development (JavaScript, AngularJS, Node.js, HTML5, CSS3, D3.js, Backbone.js, Babylon.js), open data and open source technologies (Python, PHP, Java, Android, Linux, etc.) Read his blog or follow him on Twitter.