Explain like I'm 5: Microservices in Node.js

Microservices are an architectural approach based on building an application as a collection of small services.
Let’s think of an application as a store. Applications are traditionally “monolithic” which means they are built as a single, autonomous unit --think of your favorite big-box store, selling everything from bananas to lawn furniture.

Everything is contained inside the unit. Let’s imagine that the person in this image - I’ll call him Jeff - is going inside the store to buy chewing gum and t-shirts. He can get a shopping cart to carry his purchases, look at products in different aisles, and pay at the checkstand before leaving--essentially, everything he needs is inside the store. These could also just as easily be components of an online Lego store application 👇.

All of this is run within a single process, and if our Lego store becomes very popular and we want to expand the business, we will have to add more Lego blocks in the same unit... and in the case of the online store, add more servers in order to scale it out.
So, every change (even minor changes) in our Lego store (physical or online) can be slow or tedious as it affects the entire system. In the case of Jeff’s store, a modification can require the removal or addition of multiple Lego blocks, affecting the entire structure. In the monolithic online store, a modification made to a small section of code might require building and deploying an entirely new version of software. So, scaling specific functions or components of the application, also means you have to scale the entire system.
Other problems with a monolithic approach in an online application are:
- Inflexibility: it cannot be built using different technologies
- Potentially unreliable: if even one feature of the system does not work, then the entire system does not work
- Unscalable: applications cannot be scaled easily, since each time the application needs to be updated, the complete system has to be rebuilt
- Not suitable for continuous development: many features of an application cannot be built and deployed at the same time
- Slow development: As you can likely guess from the preceding points, development in monolithic applications takes a lot of time, since each feature has to be built individually, one after the other, rather than allowing multiple features to be worked on concurrently
This is where microservices come to the rescue!

Instead of containing everything in a single unit, the microservices-based application is broken down into smaller, lightweight pieces based on a logical construct. The application consists of independent small (micro-) services, and when we deploy or scale the app, individual services get distributed within a set of machines which we call “a cluster” in the service fabric world.
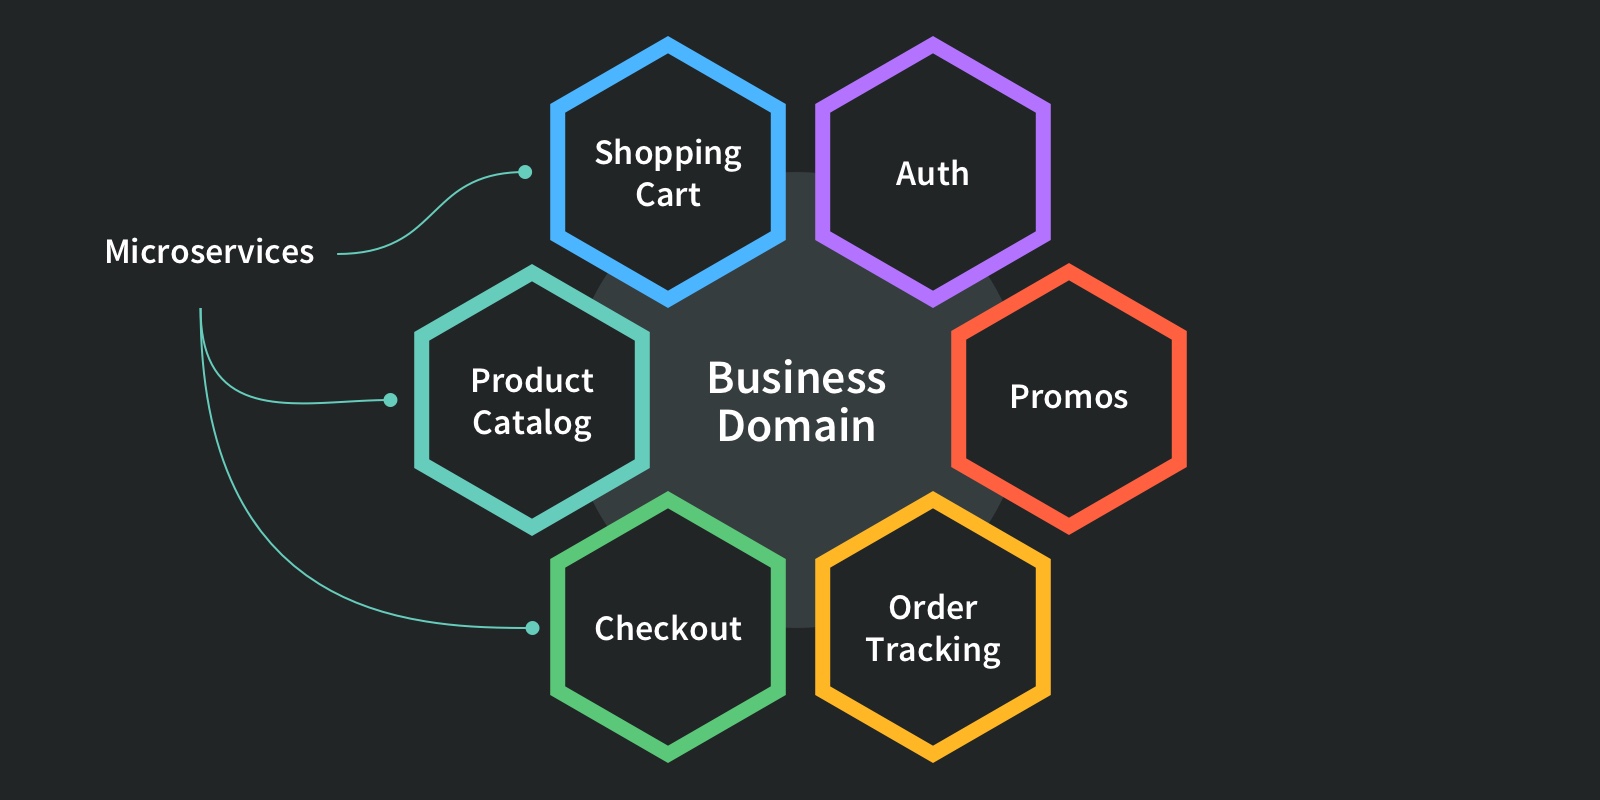
So in our Lego store example, perhaps one microservice contains a shopping cart, another one a product catalog, while another handles checkout, and so on. This approach allows developers to embrace compact and specialized tools that get each job done properly. Microservices are exactly that, scaled to enterprise level.
Each service has its own unique and well-defined role, runs in its own process, and communicates via HTTP APIs or messaging. Each microservice can be deployed, upgraded, scaled, and restarted independently of all the sibling services in the application. They are typically managed by an automated system, making it possible to deploy frequent updates to live applications without affecting the end-users.
Following this pattern, Jeff’s store will be very different: now he won’t have one big store where he can find everything he needs, but there would have multiple stores and each store will be independent and have specific functions. The first store may contain only Lego castles, another one bridges, and another one, Lego rockets 🚀.

All of the Lego stores will be part of a “Lego shopping mall” or “cluster,” and if I want to expand, scale, upgrade, or modify only the store selling rockets, the castle store (and the rest) won’t be affected.
In other words, developers identify the separate service “pieces” that are logically closely related and necessary parts of a project. Then, they choose from the options available that meet their particular needs, from open source to enterprise solutions, and knit everything together into a functional application.
Advantages of using microservices:
- Allows us to build, operate and manage services independently, and we can easily scale them out based on the resources they need.
- Microservices take a lot of infrastructure risk out of the project straight away. With the infrastructure made almost invisible, microservice teams can iterate quickly.
- Each developer on a team can avoid getting tangled up in the underlying infrastructure, and focus on their piece of the project. Then, in production, if individual project modules don’t work exactly right together, it’s easy enough to isolate, disassemble and reconfigure them until they do. If shoppers aren’t big fans of the mall’s specialty ketchup store, a shoe store can be built in its place. It offers better resource utilization and cost optimization
- Microservices have their own load balancer and execution environment to execute their functionalities, and at the same time, capture data in their own databases.
- Finally, microservices offer language and platform freedom, so teams can choose the best language for the job at hand (even if that’s .NET for one team and Node.js for another team).
Drawbacks of microservices:
- Microservices are not automatically the right solution for every project. When you are running multiple instances of the same service or worker, you don’t necessarily need microservices. A well-built monolithic system can scale just as well for some classes of problems.
- One of the big problems with microservices is “orchestration”, which means how to integrate the services with a guide to drive the process, much like a conductor in an orchestra. Integrating microservices can be quite complex.
- Another complex process is “discovery” which is how applications and (micro)services locate each other on a network.
- Moving away from a monolithic app architecture means the loss of an opinionated workflow that previously glued all the pieces together.
- There is a risk in getting a very fragmented system where developers need to spend a lot of time and effort on gluing together services and tools, and where there’s a lack of common patterns and platforms that makes it difficult to work across different projects.
- Microservices can also require increased testing complexity and possibly increased memory/computing resources.
- It’s possible to create un-scalable microservices. It all comes down to how well you apply the fundamental principles. It’s all too easy to jump into shopping for all the microservices you want to apply without first truly considering the problem set you’re applying them to
Creating Microservices with Node.js
In this example, we’re going to create a microservice using Node.js which connects to an external API.
The requirement for this service is to accept two Zip Codes of two Lego stores and return the distance between them in miles.
Initial Steps
- Have Node.js installed
- Run
npm initin the root folder for the project. This will create a package.json file that will prompt some questions about the package, if you are not sure how to answer you can use the default. - We are going to use two packages, Express and Require that can be installed like this:
$ npm install express request --save
Let’s look at the structure of the folders. There are two files and a folder created by the npm init command. These are package.json, package-lock.json, and node_modules. When we installed the express and request packages, their dependencies were downloaded and saved in node_modules.
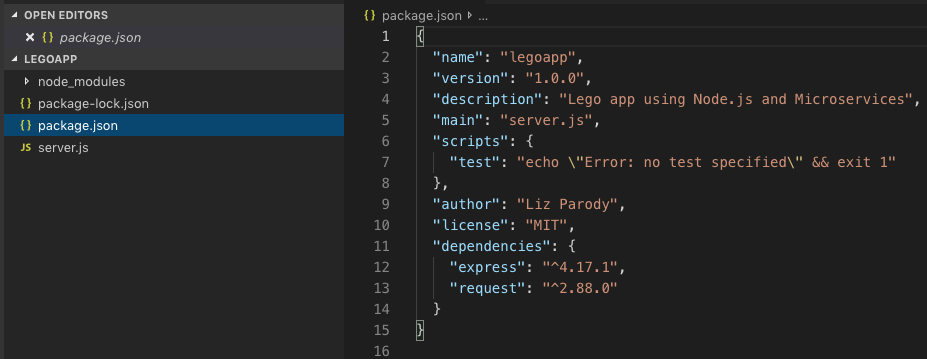
The primary file in our project is named server.js. And your package.json should look similar to this ☝️.
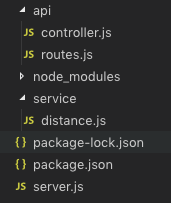
Then we create two folders, api for files that will support the API, and service for the logic to connect to a third-party API.
Let’s build our service!
Creating a Server to Accept Requests
Create a file in the root folder for your project called server.js which will be our primary file. This file contains the code below.
const express = require('express')
const app = express();
const port = process.env.PORT || 3000;

const routes = require('./api/routes');
routes(app);
app.listen(port, function() {
   console.log('Server started on port: ' + port);
});
This file is creating our server and assigns routes to process all requests.
We first require express into the file, and use it to create a new app object const app = express(); then we specify the port, in this case, we use the environment variable called PORT, and if the variable isn’t defined, it will use the default port: 3000.
Then we bring the routes object from the routes.js file in the api folder. We’ll pass the app to the routes object, and that sets the routes for our application. Finally, we’ll tell the app to start listening on the port we defined and to display a message to the console when this process is complete.
Defining the routes
The next step is to define the routes for the microservices and then assign each to a target in the controller object (that will control the flow of data in the application). We’ll build the controller in the next step. We’ll have two endpoints. One endpoint called “about” that returns information about the application. And a “distance” endpoint that includes two path parameters, both Zip Codes of the Lego store. This endpoint returns the distance, in miles, between these two Zip Codes.
'use strict';

const controller = require('./controller');

module.exports = function(app) {
   app.route('/about')
       .get(controller.about);
   app.route('/distance/:zipcode1/:zipcode2')
       .get(controller.getDistance);
};
The ‘use strict’ directive at the top of the file is used by new versions of Javascript to enforce secure coding practices. The first thing we’ll do is to create a controller object which we’ll define in the next step.
Module.exports allows us to declare functions inside a module, and have them available for use in another file. This file constitutes the routes module, which we imported into our primary server.js file and used it to define the routes for our express app.
This function adds two routes to the app. The first route listens for GET requests on the /about endpoint. These requests are handled by the about function in the controller. The second route listens for GET requests on the /distance endpoint. The getDistance function in the controller handles these requests. Two parameters are also specified. These are labeled zipcode1 and zipcode2 respectively.
Let’s build the controller to handle those requests.
Adding Controller Logic
Within the controller file, we’re going to create a controller object with two properties. Those properties are the functions to handle the requests we defined in the routes module.
'use strict';

var properties = require('../package.json')
var distance = require('../service/distance');

var controllers = {
   about: function(req, res) {
       var aboutInfo = {
           name: properties.name,
           version: properties.version
       }
       res.json(aboutInfo);
   },
   getDistance: function(req, res) {
           distance.find(req, res, function(err, dist) {
               if (err)
                   res.send(err);
               res.json(dist);
           });
       },
};

module.exports = controllers;
We have two distinct parts to our controller. We’ll go through the code for the about functionality first. At the top, we create an object called properties which references the package.json file which npm created when it bootstrapped the project. This file is in JavaScript Object Notation or JSON for short. This format affords us the ability to import and use the information it contains.
Within the controllers object, we define a property called about. This property is a function which accepts request and response objects. We’ll only use the response object for this function. Using the name and version information from the package.json file, we’ll build a new object and return it as the response.
For the getDistance functionality, we’ll start by bringing in the distance module. We’ll pass the request and response objects to the find function within this module. This function also includes a callback function. This function accepts an error object (err) and a distance object (dist). If there is an error in the response, we return that with our response; otherwise, we send back the results of the find function.
Making the External Call
We’re ready for the final piece of the puzzle. This file handles the call to a third-party API. We’ll use the distance API provided by ZipCodeAPI.com. (You need an API key to use this, and it is free if you register. You can also use the key from the example if you want to test your service, but this key frequently expires during the day).
I set my key as an environment variable on my system and named it ZIPCODE_API_KEY. The default key in the code is an expired test key from the ZipCodeAPI website.
var request = require('request');

const apiKey = process.env.ZIPCODE_API_KEY || "hkCt1nW1wF1rppaEmoor7T9G4ta7R5wFSu8l1dokNz8y53gGZHDneWWVosbEYirC";
const zipCodeURL = 'https://www.zipcodeapi.com/rest/';

var distance = {
   find: function(req, res, next) {
       request(zipCodeURL + apiKey
               + '/distance.json/' + req.params.zipcode1 + '/'
               + req.params.zipcode2 + '/mile',
       function (error, response, body) {
           if (!error && response.statusCode == 200) {
               response = JSON.parse(body);
               res.send(response);
           } else {
               console.log(response.statusCode + response.body);
               res.send({distance: -1});
           }
       });

   }
};

module.exports = distance;
We’re using the request package to execute the external HTTP request, and we already discussed the api Key above. Ensure that you update it unless you want to start by testing the error conditions.
The find function accepts request, response and next objects as parameters. The request object accepts the URL of the service we’re calling and then defines a callback function to handle the response.
If there are no errors, and the status of the response is HTTP Status code 200, then the function parses out the body of the response into an object called response and returns it on the resp object. Since the ZipCodeAPI returns with a JSON response, we could forward this directly. Parsing it out allows us the option of doing more with the response if we choose to.
We log failures to the console, and then a result of -1 is sent on the response object. You may opt to create an error object to return as well.
Finally, we export the distance object, which allows the controller to instantiate it and call its functions as needed.
Execution
Assuming there aren’t any typos, your application should be ready to execute. Open a console window and run the following command:
npm start
Assuming it starts correctly, and the port you define is 3000, you can now open your browser and navigate to:
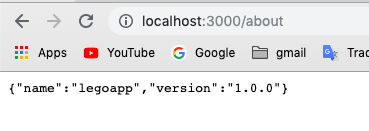
http://localhost:3000/about when you will see the name of the app and the version.
Now if you add two parameters, the two zip codes, you will see something like this:
http://localhost:3000/distance/84010/97229

And that’s it! Using microservices to know the distance between two zip codes!
Conclusion
In microservices, every single service is independently deployable, scalable and updatable, this is what makes microservices such an appealing architectural approach to the industry.
A microservice is loosely coupled and interacts with other microservices for well-defined interfaces using protocols like http, they remain consistent and available in the presence of failure, meaning even if the machine goes down that host a microservice, the functionality provided by the service should still be offered by the application.
While microservices are great, there is quite some work involved to build a scalable microservice application on a platform as you need to consider things like cluster management, service orchestration, inter-service communication and so on, and you also need to put a lot of effort into following DevOpsbest practices.
Not to mention that microservices can also require increased testing complexity and possibly increased memory/computing resources. Thus, despite the abundant potential benefits, those knowledgeable in the field caution that microservices are not automatically the right solution for every project.
- Lego is a registered trademark