

This article attempts to demystify the use of orbs to quickly get started with the CircleCI platform. Orbs enable you to share, standardize, and simplify configurations across your projects. You may also want to use orbs as a reference for config best practices. Refer to this orb introduction for a high-level overview. You can also refer to the CircleCI orbs registry for the complete list of available orbs.
Technologies used
This article assumes that you have a fundamental understanding of the following technologies and tools:
- Docker - Used to create, deploy, and run applications using containers. Docker provides repeatable development, build, test, and production environments.
- CircleCI - Used for continuous integration and continuous deployment (CI/CD).
- Kubernetes - Used for automating deployment, scaling, and management of containerized applications across clusters of hosts. This lowers the cost of cloud computing expenses and simplifies operations and architecture.
- Git - A distributed version-control system for tracking changes in source code during software development.
- Google Kubernetes Engine (GKE) - Google’s cloud solution for running Kubernetes clusters.
GKE setup
Kubernetes is a vendor-agnostic cluster and container management tool, open-sourced by Google in 2014. It provides a “platform for automating deployment, scaling, and operations of application containers across clusters of hosts.” Above all, this lowers the cost of cloud computing expenses and simplifies operations and architecture. For a quickstart to GKE, see the docs.
If you don’t have a Google Cloud Platform account, you can get one here. Once we are logged in to our account, we need to create a project with the id circle-ci-demo.
Next, we need to download and install the Cloud SDK which is a command-line interface for Google Cloud Platform products and services that contains gcloud, a tool which we will use later.
From the command line, confirm that the project actually exists by entering this into your terminal:
gcloud projects list

Initialize the gcloud environment by entering this into your terminal:
gcloud init
Authenticate it by entering this:
gcloud auth login
kubectl is a command line interface for running commands against Kubernetes clusters. Let’s install it by entering this into your terminal:
gcloud components install kubectl
Create a container cluster on GKE with the name circle-ci-cluster. You can do this from the GCP console, but it can also be done from the command line by entering this:
gcloud container clusters create circle-ci-cluster
We can confirm successful cluster creation with this command:
gcloud container clusters list
Your output will be similar to the output below:

To run kubectl commands against a cluster created in GCP Console from another computer, or by another member of the project, you need to generate a kubeconfig entry in your environment. Generate a kubeconfig entry by running the following command:
gcloud container clusters get-credentials circle-ci-cluster
To ensure that the cluster has been set correctly, run the command:
kubectl config current-context
Your output will be similar to the output below:

Docker setup
Docker is an open-source tool that automates the deployment of an application inside of a software container. The use of containers to deploy applications is called containerization. Containerization has become popular because containers are flexible, lightweight, interchangeable, portable, scalable, and stackable. You can read more about Docker in the linked webpage.
Dockerizing a simple Node.js application
Our project requires a Dockerfile to dockerize our simple nodejs application. A Dockerfile is a text document that contains all the commands a user could call on the command line to assemble an image. Below is the Dockerfile used in the project:
# Set the base image to use for subsequent instructions
FROM node:alpine

# Add metadata to an image
LABEL app="simple-node-application"

# Directive to set environmental variables key to value pair
ENV NPM_CONFIG_LOGLEVEL warn

# Set the working directory for any subsequent ADD, COPY, CMD, ENTRYPOINT,
# or RUN instructions that follow it in the Dockerfile
WORKDIR /usr/src/app

# Copy files or folders from source to the dest path in the image's filesystem.
COPY package.json /usr/src/app/
COPY . /usr/src/app/

# Execute any commands on top of the current image as a new layer and commit the results.
RUN npm install --production

# Define the network ports that this container will listen on at runtime.
EXPOSE 3000

# Configure the container to be run as an executable.
ENTRYPOINT ["npm", "start"]
We can now build and tag an image with:
docker build -t circleci-gke:v1 .
Confirm that the image was successfully created by running this command from your terminal:
docker image
Your output will be similar to the output below:

Test the image locally by running this command from your terminal:
docker run -p 3000:3000 circleci-gke:v1
You can now access the application on your browser by visiting https://127.0.0.1:3000.

The next step is to tag and push the image to a registry for easier management. Developers, testers, and CI/CD systems such as CircleCI need to use a registry to store images created during the application development process. We can tag the image with the following command:
docker tag circleci-gke:v1 gcr.io/circle-ci-demo/circleci-gke:v1
Then we can push the image to Google’s Container Registry (GCR) with:
docker push gcr.io/circle-ci-demo/circleci-gke:v1
Now that we have pushed our working, containerized Docker image to a registry, we are ready to deploy the application to our circle-ci-cluster cluster.
Configuring Kubernetes manifests for deployment
Kubernetes uses YAML for configuration. We will need a Kubernetes Service of type LoadBalancer to make our Deployment accessible to the outside world.
A Kubernetes Service is an abstraction which defines a logical set of pods and a policy by which to access them. More on Kubernetes Services here.
Kubernetes Deployments manage stateless services running on your cluster. Their purpose is to keep a set of identical pods running and upgrade them in a controlled way – performing a rolling update by default. More on kubernetes Deployments here.
Create a folder to hold the .yaml files for the Kubernetes Service and Deployment. For this example, I named the folder admin. Create two files in the folder with the contents from below:
apiVersion: apps/v1beta1
kind: Deployment
metadata:
  name: production-circle-demo
  labels:
    app: simple-backend
spec:
  selector:
    matchLabels:
      app: ci-deploy
      tier: backend
  strategy:
    type: Recreate
  template:
    metadata:
      labels:
        app: ci-deploy
        tier: backend
    spec:
      containers:
        - image: gcr.io/circle-ci-demo/circleci-gke:v1
          name: rusty-pangolin
          ports:
            - containerPort: 3000
              name: ci-deploy
apiVersion: v1
kind: Service
metadata:
  name: circle-service
  labels:
    app: circle
spec:
  ports:
    - port: 3000
  selector:
    app: ci-deploy
    tier: backend
  type: LoadBalancer
Since our Kubernetes manifests are in the folder admin, we can validate both of them by running the following command against the admin folder:
kubectl apply --validate=true --dry-run=true -f admin/
Your output will be similar to the output below:

Now we are all set to deploy our application. Deploy it with this command:
kubectl apply --validate=true -f admin/
Your output will be similar to the output below:

To access the application, get the external IP with the command:
kubectl get services

You can access the application at http://<EXTERNAL-IP>:3000. In my case, that was http://35.246.104.239:3000/.
How will we automatically checkout the application from GitHub, build it, test it, and update the running instance on GKE? We will do this with CircleCI.
Configuring CircleCI
Now that we have a basic working deployment to GKE, we will need a way to update the application once changes have been pushed to our VCS of choice. We will be integrating CircleCI with GitHub. CircleCI configuration lives in the .circleci directory in the project’s root folder in the form of a .yml file, i.e., the path to the configuration is .circleci/config.yml.
Using CircleCI orbs
We won’t need to write any custom scripts to deploy our application to GKE. We will save massive amounts of time by importing pre-built commands, jobs, and executors into our configuration file. We will invoke the following orbs in this project using the orbs key:
-
node: circleci/node@1.0.1- Used to install all the application dependencies. -
gcr: circleci/gcp-gcr@0.0.2- An orb for working with GCR. -
gcp-gke: circleci/gcp-gke@0.1.0- An orb to work with the GKE.
Orbs consist of the following elements:
- Commands
- Jobs - A set of executable commands or steps.
- Executors - These define the environment in which the steps of a job will be run, e.g., Docker, Machine, macOS, etc., in addition to any other parameters of that environment.
For this project, the config.yml file contains the following lines of code:
version: 2.1
orbs:
  node: circleci/node@1.0.1
  gcp-gke: circleci/gcp-gke@0.1.0
  gcr: circleci/gcp-gcr@0.0.2
jobs:
  build:
    description: Install npm
    # machine option runs your jobs in a dedicated, ephemeral VM that has the following specifications:
    machine: true
    steps:
      - checkout
      # Install node
      - node/install
      # Install npm
      - node/install-npm
      # Download and cache dependencies
      - node/with-cache:
          steps:
            - run:
                name: Install application dependencies
                command: npm install
          # Save cache
          cache-key: package.json
          # Ignore non-checksum cache hits
          use-strict-cache: true
  Build-Push-Image-Docker:
    description: Build and push image to Google Container Registry
    machine: true
    steps:
      - checkout
      - gcr/gcr-auth
      - gcr/build-image:
          image: circle-gke
          tag: "v2" #Change version number e.g to 'v3' when updating application
      - gcr/push-image:
          image: circle-gke
          tag: "v2" #Change version number e.g to 'v3' when updating application

  deploy:
    description: Deploy application to Google Kubernetes Engine
    machine: true
    steps:
      # Install `gcloud` and `kubectl` if not already installed.
      - gcp-gke/install
      # Initialize the `gcloud` CLI.
      - gcp-gke/init
      # Update a deployment Docker image.
      - gcp-gke/rollout-image:
          deployment: circle-ci-cluster
          container: dominic-backend
          image: gcr.io/circle-ci-demo/circle-gke:v2 # change version when updating
workflows:
  build_update_deploy:
    jobs:
      - build
      - Build-Push-Image-Docker:
          requires:
            - build
      - deploy:
          requires:
            - Build-Push-Image-Docker
Push the changes with your CircleCI config file to GitHub.
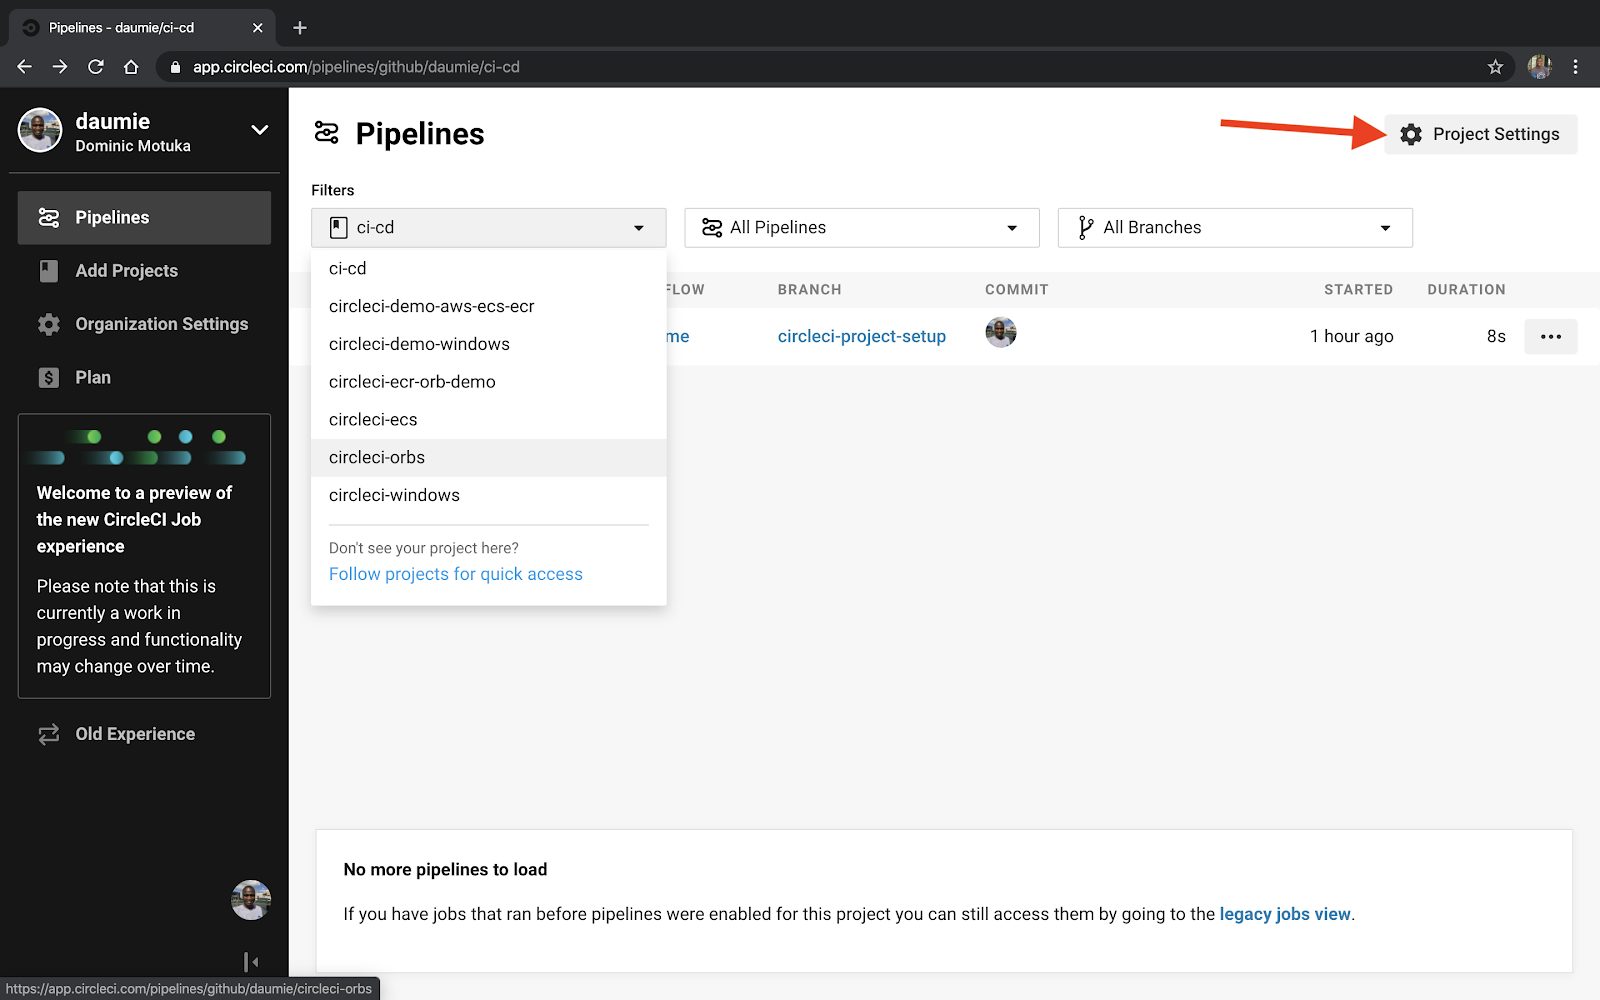
Create a CircleCI account if you don’t have one. You can sign up with GitHub. From the CircleCI dashboard click Add Project and add the project from the list shown.
Before we make any changes in CircleCI, we’ll need a way to communicate with GCP. In our case, we need CircleCI to push the created image to GCR and update the deployed instance with the new image. We’ll use a service account on GCP. Create the service account using these instructions. Give the service account Editor permission to the project:

Below is a service account key structure:

Note: This is an example Service Account (not in use). You should NEVER commit service accounts to code repositories as malicious attackers can gain access to your cloud platform’s resources.
Copy the service account contents and add them as environment variables for your project by clicking the cog icon at the top right.
Under build settings, click Environmental Variables.

Add the service key as GCLOUD_SERVICE_KEY. You will also need to add the GOOGLE_COMPUTE_ZONE. You can get this by running the command:
gcloud container clusters describe circle-ci-cluster
Note: Use the cluster that you created.

For my cluster, at the bottom, the zone can identified as europe-west2-a. Depending on your location, this can be different.
For GOOGLE_PROJECT_ID, we can grab it from the console directly from the project-info card:

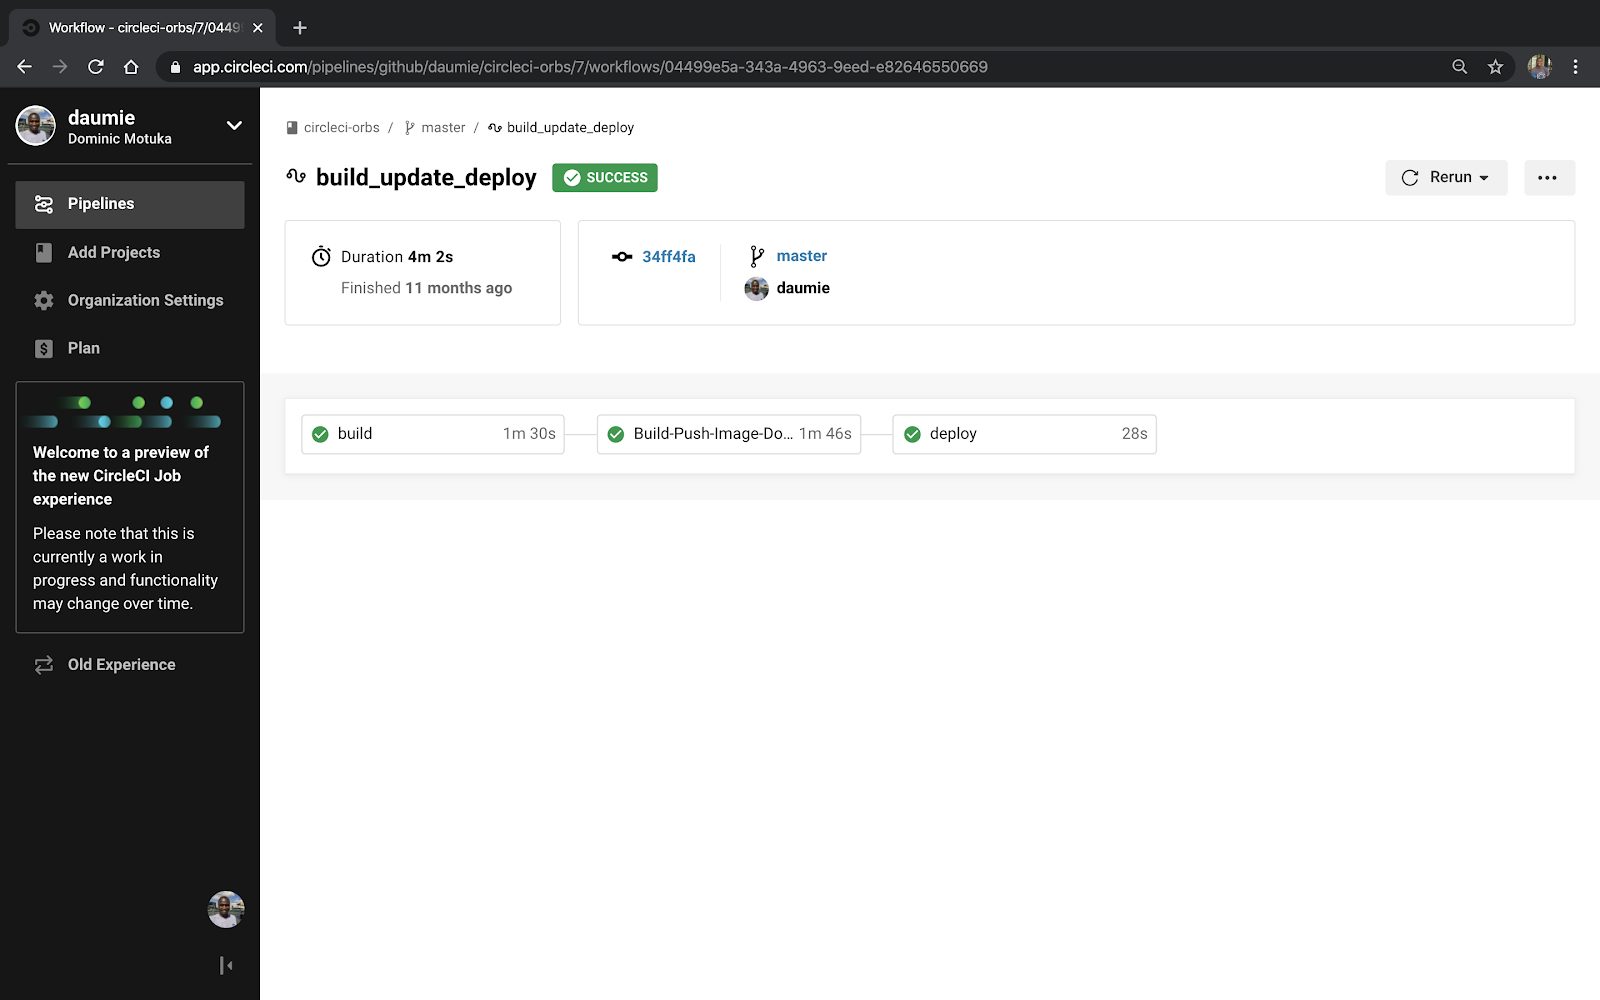
Now we have the CircleCI environment set. We can trigger a new build to test that our pipeline works. Your workflow will be similar to the one below:
Accessing the application on GKE
You can get the applications external IP by running the command:
kubectl get services

For example, I had to access the application on http://35.246.118.41:3000/.

Conclusion
Using CircleCI orbs improves productivity by simplifying how we write our CircleCI configuration. Orbs can also be shared, which saves time by using pre-built commands, jobs, and executors in our configuration files.
Orbs are not limited to CircleCI + GKE deployments. You can go through the list of available orbs in the registry to find the ones that align with your choice of cloud platform, programming language, and more.
Dominic Motuka is a DevOps Engineer at Andela with 4+ years of hands-on experience supporting, automating, and optimizing production-ready deployments in AWS and GCP, leveraging configuration management, CI/CD, and DevOps processes.


