
So, this morning you woke up with the idea to develop a way to store and label interesting articles you’ve read. After playing with the idea, you figure a Telegram chatbot is the most convenient solution for this problem.
In this guide, we’ll walk you through everything you need to know to build your first Telegram chatbot using JavaScript and Node.js.
To get started, we have to register our new bot with the so-called Botfather to receive our API access token.
Bot Registration with @BotFather
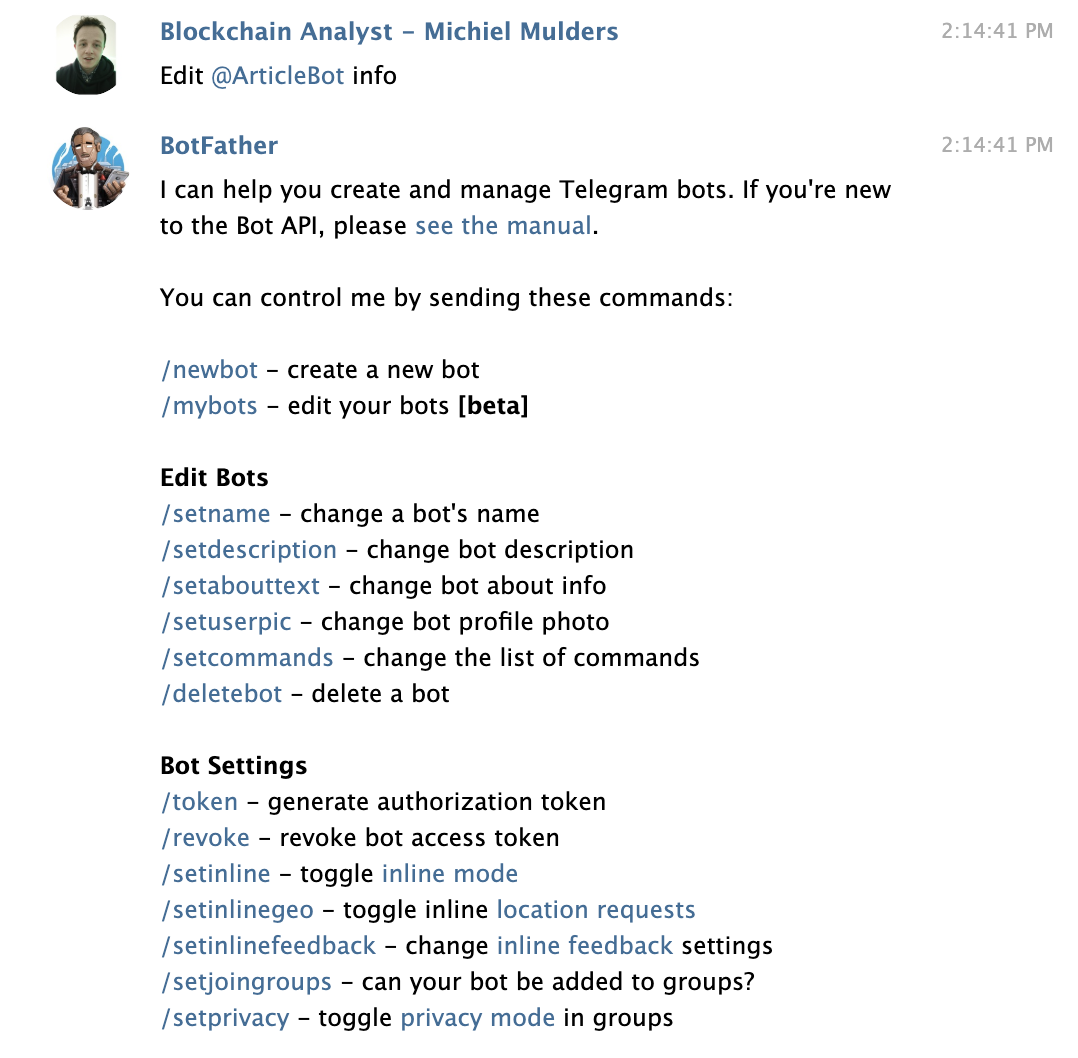
The first step towards our very own Telegram bot is registering the bot with the BotFather. The BotFather is a bot itself that makes your life much easier. It helps you with registering bots, changing the bot description, adding commands, and providing you with the API token for your bot.
The API token is the most important step, as this allows you to run the code that can perform tasks for the bot.
1. Finding the BotFather
The BotFather can be found on Telegram by searching for ‘BotFather’. Click on the official BotFather, indicated with the white checkmark icon in the blue circle.
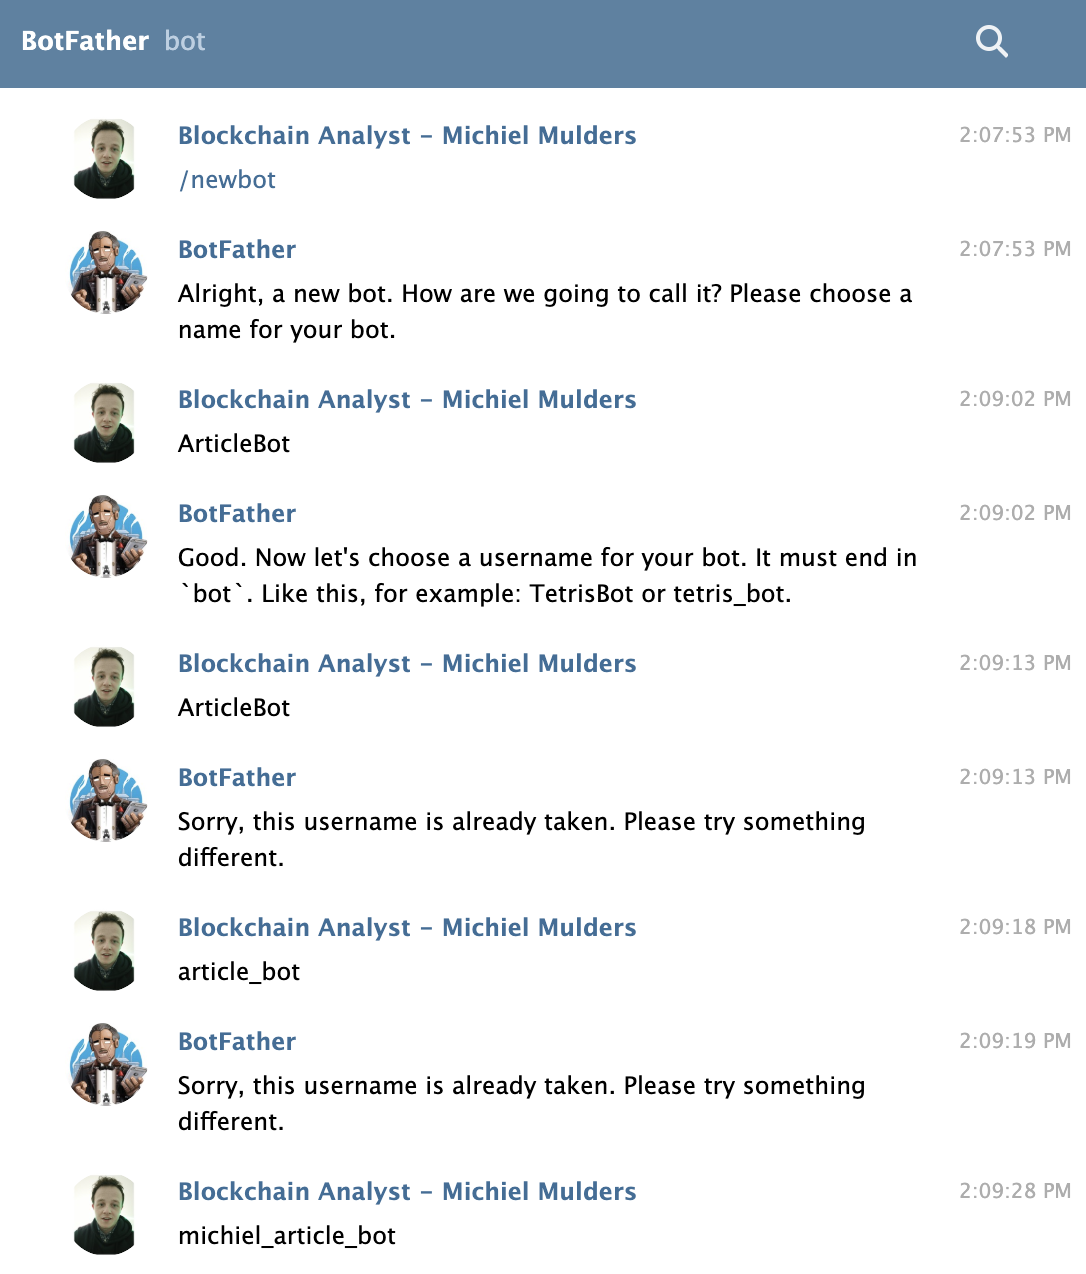
2. Registering a New Bot
Now we’ve found BotFather, let’s talk to him! You can start the conversation by typing /newbot. BotFather will ask you to choose a name for your both. This name can be anything and doesn’t have to be unique. To keep things simple, I named my bot ArticleBot.
Next, you will be prompted to input a username for the bot. The username must be unique and end in bot. Therefore, I chose michiel_article_bot, as that username was not yet taken. This will also be the username you use for looking up the bot in Telegram’s search field.
FatherBot will return a success message with your token to access the Telegram HTTP API. Make sure to store this token safely, and certainly don’t share it with anyone else.

3. Modifying the Bot
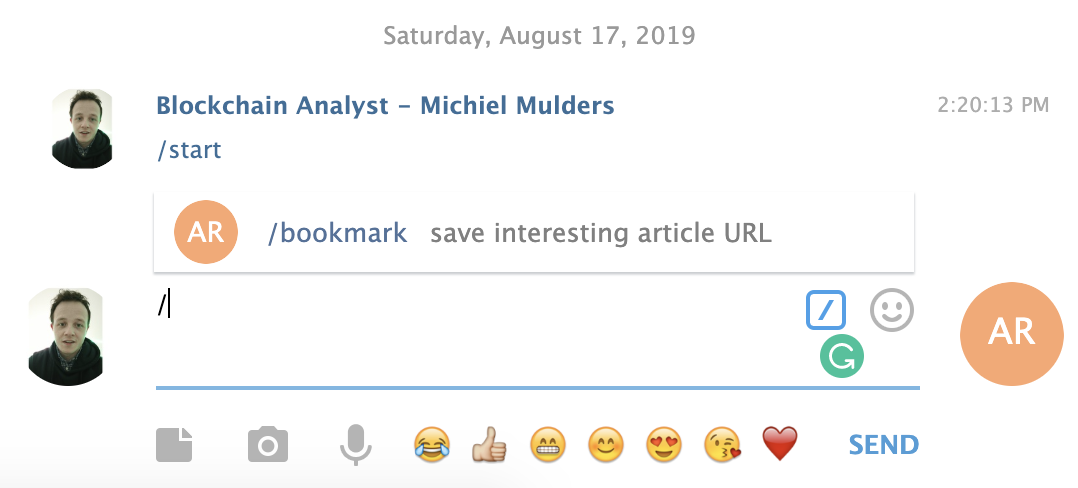
We can further modify the bot by adding a description or setting the commands we wish the bot to know. You can message the bot with the text /setcommands. It will show you how to input the commands with the format command1 - Description.
For my bot, I set the command bookmark - save interesting article URL.

If you look up your bot now, you will see a command icon in the chatbox that shows you the available commands. You can create many more commands that do work and not list them via BotFather. However, from a UX viewpoint, I recommend registering all available commands with BotFather.
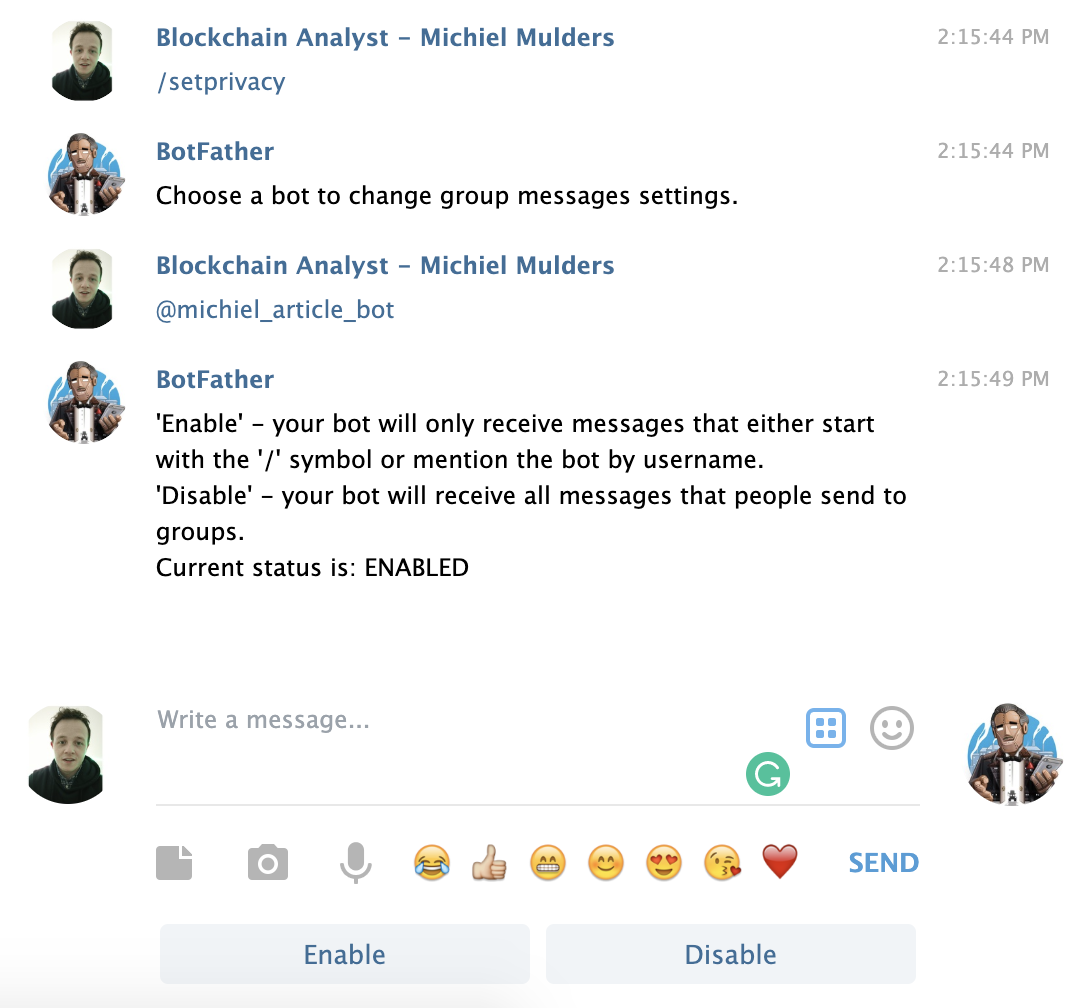
We can set the privacy of the bot with /setprivacy. You can either enable or disable it. By default, the privacy value is set to enabled, which means your bot will only receive messages that start with the / symbol or by mentioning the bot’s username.
This setting can be disabled which means that your bot can receive all messages that are sent to a group. You will have to add a bot to your group for it to receive all these messages.
A list of all available commands can be found here:
Finally, we are all set to get started coding. Make sure you have the API access token ready.
Coding Your First Bot Command
First of all, during this tutorial, we will be using the following code I’ve prepared.
It’s a simple Node.js project that has only two dependencies: dotenv and node-telegram-bot-api. The first package is used for creating a .env config file that will hold our API access token. The second package acts as a Node.js wrapper for the Telegram Bots API, which we will be using for this tutorial.
1. Setting Up the Project
To get started, clone the GitHub repository and open the project in your favorite editor. Next, create a .env file in the root of your project and add a single line — TOKEN=yourtoken. Replace yourtoken with the token you have received from BotFather.
To make sure the connection works, navigate to the root of the project in your terminal and run npm start. The npm start command will run your app.js file and should connect to your bot. If you don’t see any errors, we are good to go!
2. Create the First Bot Command
First of all, we have to create the bot by passing it our API access token and setting the polling option to true. This means the bot will check for incoming messages at regular intervals.
require('dotenv').config();
const TelegramBot = require('node-telegram-bot-api');

const token = process.env.TOKEN;

// Created instance of TelegramBot
const bot = new TelegramBot(token, {
   polling: true
});
Now the bot has been created, let’s take a look at the following snippet of code that represents our /bookmark command. We set a listener for incoming text messages, onText, and specify to look for a message that starts with /bookmark, as we specify this in the regex string.
When a message starts with /bookmark, our code will execute. First of all, we store the chat ID, as we want to be able to send a message back to this user’s chat.
Next, we check if the user has used the command correctly. We expect a URL to be passed with the command like this: /bookmark www.google.com.
If there is no URL specified, we send a message back to the stored chatID telling the user to provide us with a URL. If they do send a URL, we store the URL and send them a success message.
// Listener (handler) for telegram's /bookmark event
bot.onText(/\/bookmark/, (msg, match) => {
   const chatId = msg.chat.id;
   const url = match.input.split(' ')[1];
   // 'msg' is the received Message from Telegram
   // 'match' is the result of executing the regexp above on the text content
   // of the message

   if (url === undefined) {
       bot.sendMessage(
           chatId,
           'Please provide URL of article!',
       );
       return;
   }

   URLs.push(url);
   bot.sendMessage(
       chatId,
       'URL has been successfully saved!',
   );
});
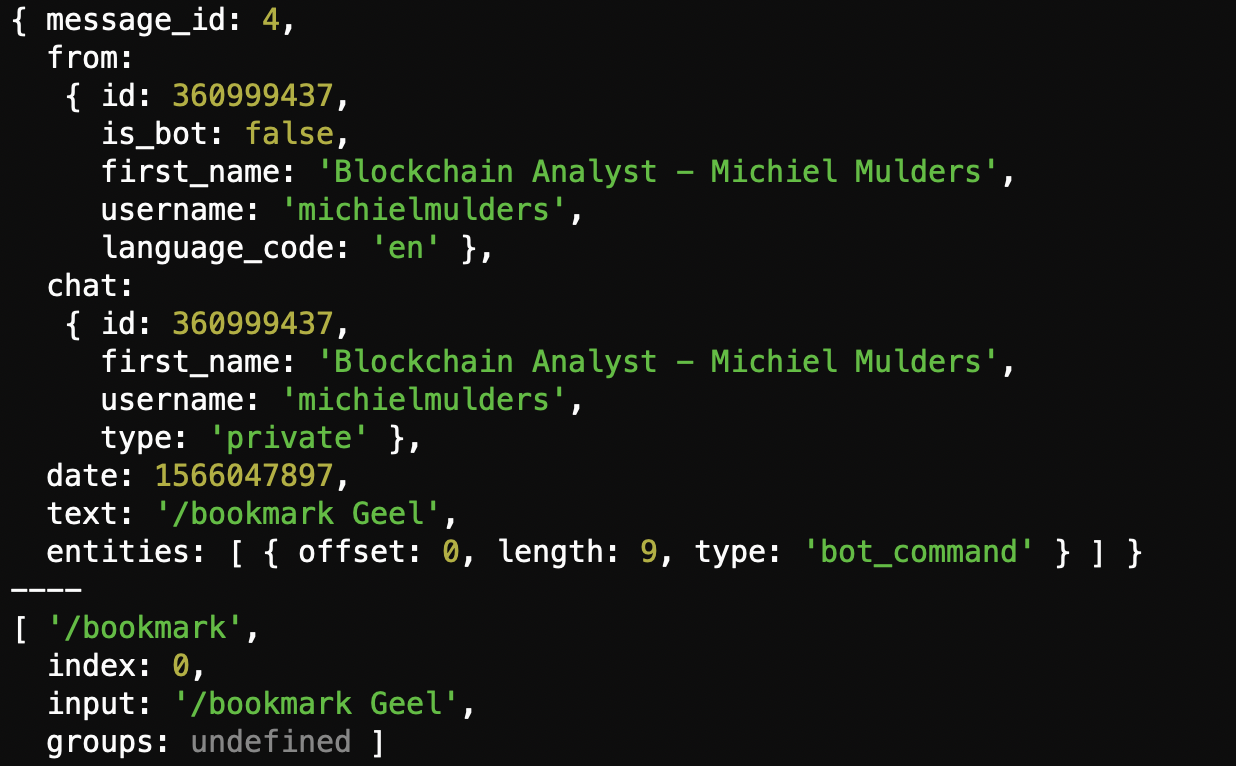
You might have noticed we are using two parameters for the callback function msg and match. The msg property represents the full message you receive whereas match represents the result from the regular expression we have defined. The image below shows you the full msg, and after ---- it shows you the match.
When we try out our command in the chat with the bot, we receive the following result:
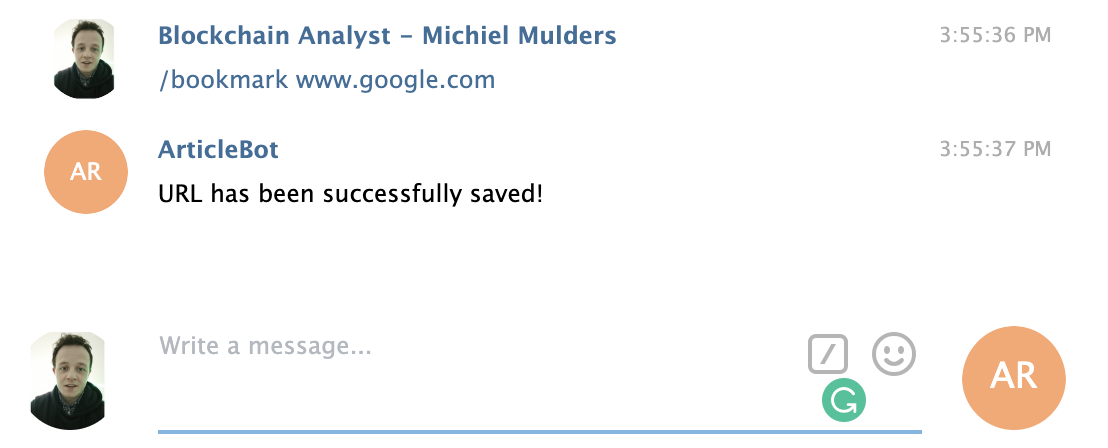
If you see the same result, congratulations! You have just created your first bot command. Let’s take a look at more advanced options like sending keyboards with predefined options.
3. Keyboard Options
Now we know how to create a custom command, let’s take a deeper look at the keyboard options. It is possible to send a predefined keyboard with your command to limit the options of the user. It can be as simple as restricting the user to answer with Yes or No.
3.1 Normal Keyboard
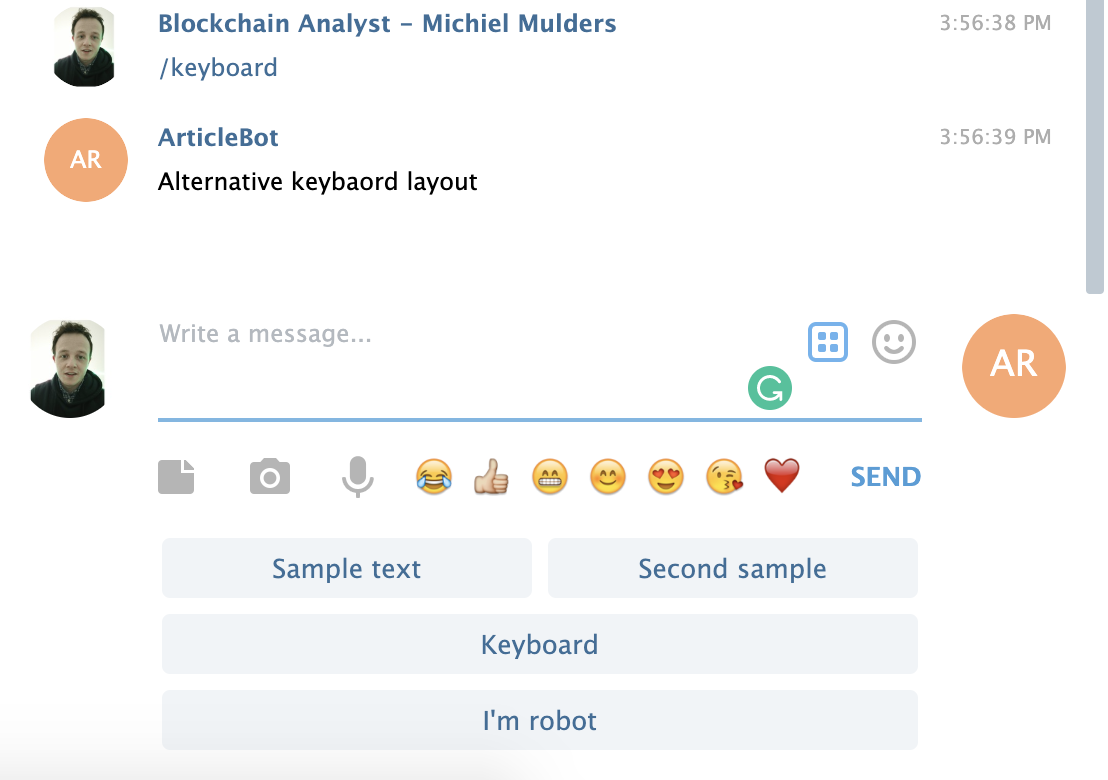
Let’s take a look at the following snippet of code. We have added a third parameter to our bot.sendMessage function. This object defines the options for our keyboard. If you take a closer look at reply_markup.keyboard, you find an array that contains more arrays. Every array here represents a row with options. This helps you with formatting options that are more important or have longer button text.
// Listener (handler) for showcasing different keyboard layout
bot.onText(/\/keyboard/, (msg) => {
   bot.sendMessage(msg.chat.id, 'Alternative keybaord layout', {
       'reply_markup': {
           'keyboard': [['Sample text', 'Second sample'], ['Keyboard'], ['I\'m robot']],
           resize_keyboard: true,
           one_time_keyboard: true,
           force_reply: true,
       }
   });
});
This piece of code gives the following result when sending a message /keyboard to our bot.
Further, we can also define inline keyboards with extra data per option.
3.1 Inline Keyboard
An inline keyboard will be shown in the chat, and not under your message input box. As we want to label the URLs we submit, we can do this by showing the user the available categories. This is how our keyboard looks now:
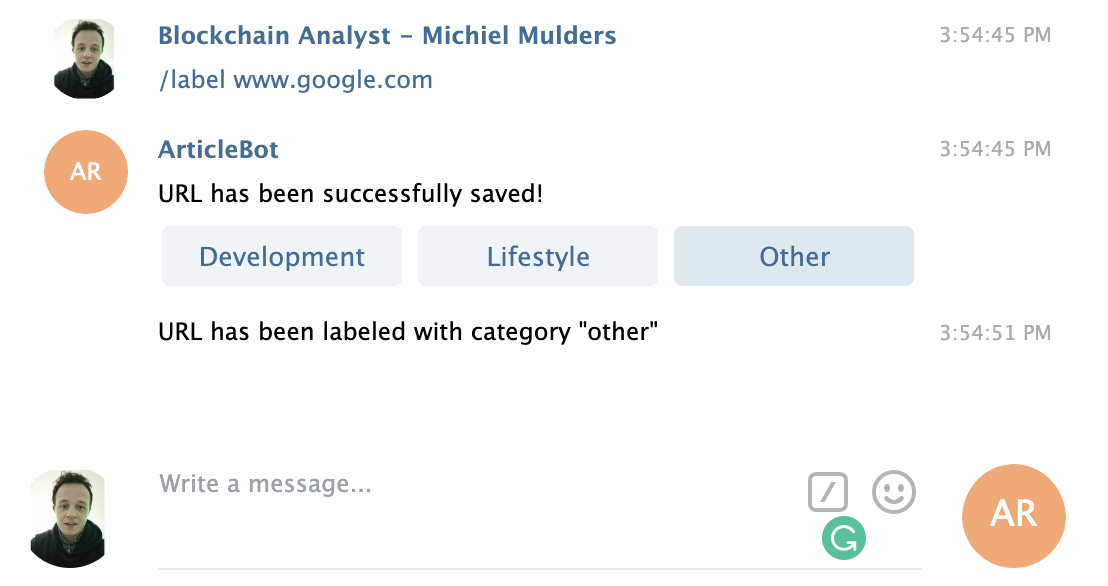
Let’s take a look at the code underneath. The reply_markup now defines the property inline_keyboard. The rest of the markup remains the same. Every array represents a row. However, instead of just passing text, we can also pass an object with text and callback_data to know what option you have selected.
// Listener (handler) for telegram's /label event
bot.onText(/\/label/, (msg, match) => {
   const chatId = msg.chat.id;
   const url = match.input.split(' ')[1];

   if (url === undefined) {
       bot.sendMessage(
           chatId,
           'Please provide URL of article!',
       );
       return;
   }

   tempSiteURL = url;
   bot.sendMessage(
       chatId,
       'URL has been successfully saved!',
       {
           reply_markup: {
               inline_keyboard: [[
                   {
                       text: 'Development',
                       callback_data: 'development'
                   }, {
                       text: 'Lifestyle',
                       callback_data: 'lifestyle'
                   }, {
                       text: 'Other',
                       callback_data: 'other'
                   }
               ]]
           }
       }
   );
});
The next section explains how to use the handler for receiving callback data.
3.2 Callback From Keyboard
In case we want to receive callback data, we have to listen to this type of event.
// Listener (handler) for callback data from /label command
bot.on('callback_query', (callbackQuery) => {
   const message = callbackQuery.message;
   const category = callbackQuery.data;

   URLLabels.push({
       url: tempSiteURL,
       label: category,
   });

   tempSiteURL = '';

   bot.sendMessage(message.chat.id, `URL has been labeled with category "${category}"`);
});
The message property on callbackQuery contains the whole message from the user. The data property contains our category callback data.
You might have spotted a design error by now. What if we have two commands that send back callback data? You might get some very weird behavior or replies.
Therefore, it is recommended to send back a stringified JSON object that also holds a label to identify which command the callback data belongs to. Take a look at the following best practice:
// Inline keyboard options
const inlineKeyboard = {
   reply_markup: {
       inline_keyboard: [
           [
               {
                   text: 'YES',
                   callback_data: JSON.stringify({
                       'command': 'mycommand1',
                       'answer': 'YES'
                   })
               },
               {
                   text: 'NO',
                   callback_data: JSON.stringify({
                       'command': 'mycommand1',
                       'answer': 'NO'
                   })
               },
           ]
       ]
   }
};
You can use the data from the command option to switch to this command’s specific business logic.
We are well on our way to becoming Telegram Bot jedis. To become a fully-learned master, let’s explore data requests.
3.3 Data Requests – Phone Number
It is possible to request data, such as a person’s phone number or geolocation. For this tutorial, we showcase how to request a phone number with an alternative keyboard.
// Keyboard layout for requesting phone number access
const requestPhoneKeyboard = {
"reply_markup": {
"one_time_keyboard": true,
"keyboard": [[{
text: "My phone number",
request_contact: true,
one_time_keyboard: true
}], ["Cancel"]]
}
};
// Listener (handler) for retrieving phone number
bot.onText(/\/phone/, (msg) => {
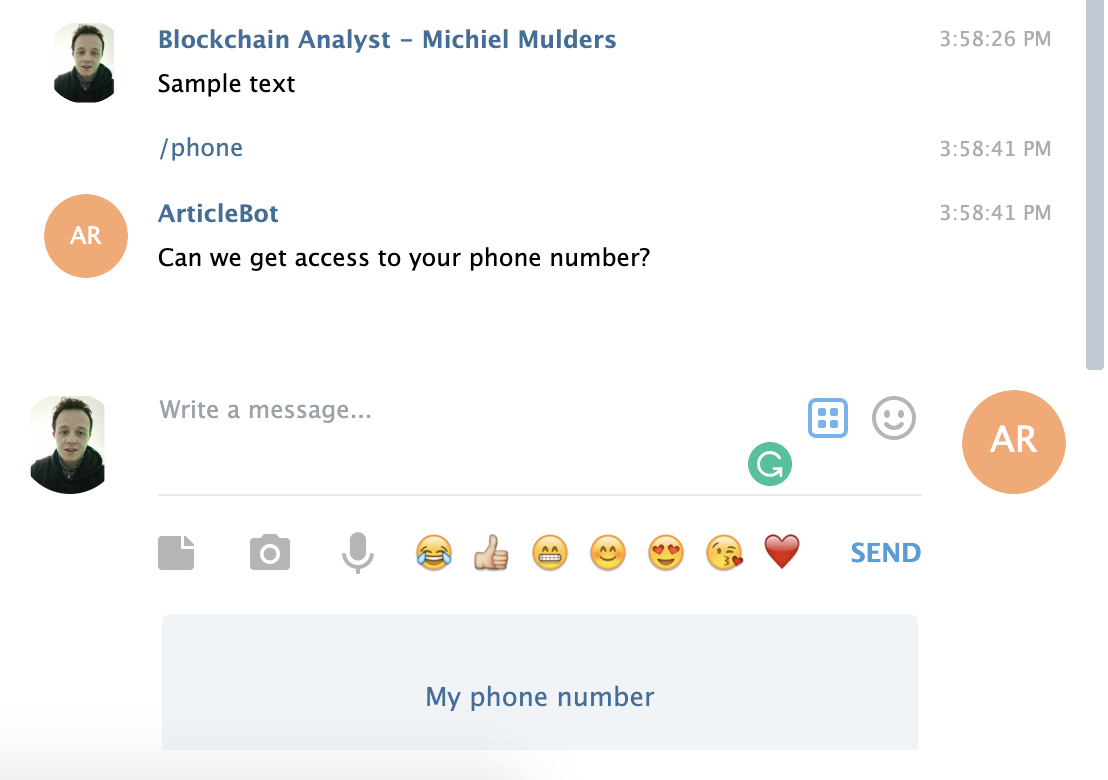
bot.sendMessage(msg.chat.id, 'Can we get access to your phone number?', requestPhoneKeyboard);
});
The user will receive the following request in his chat:
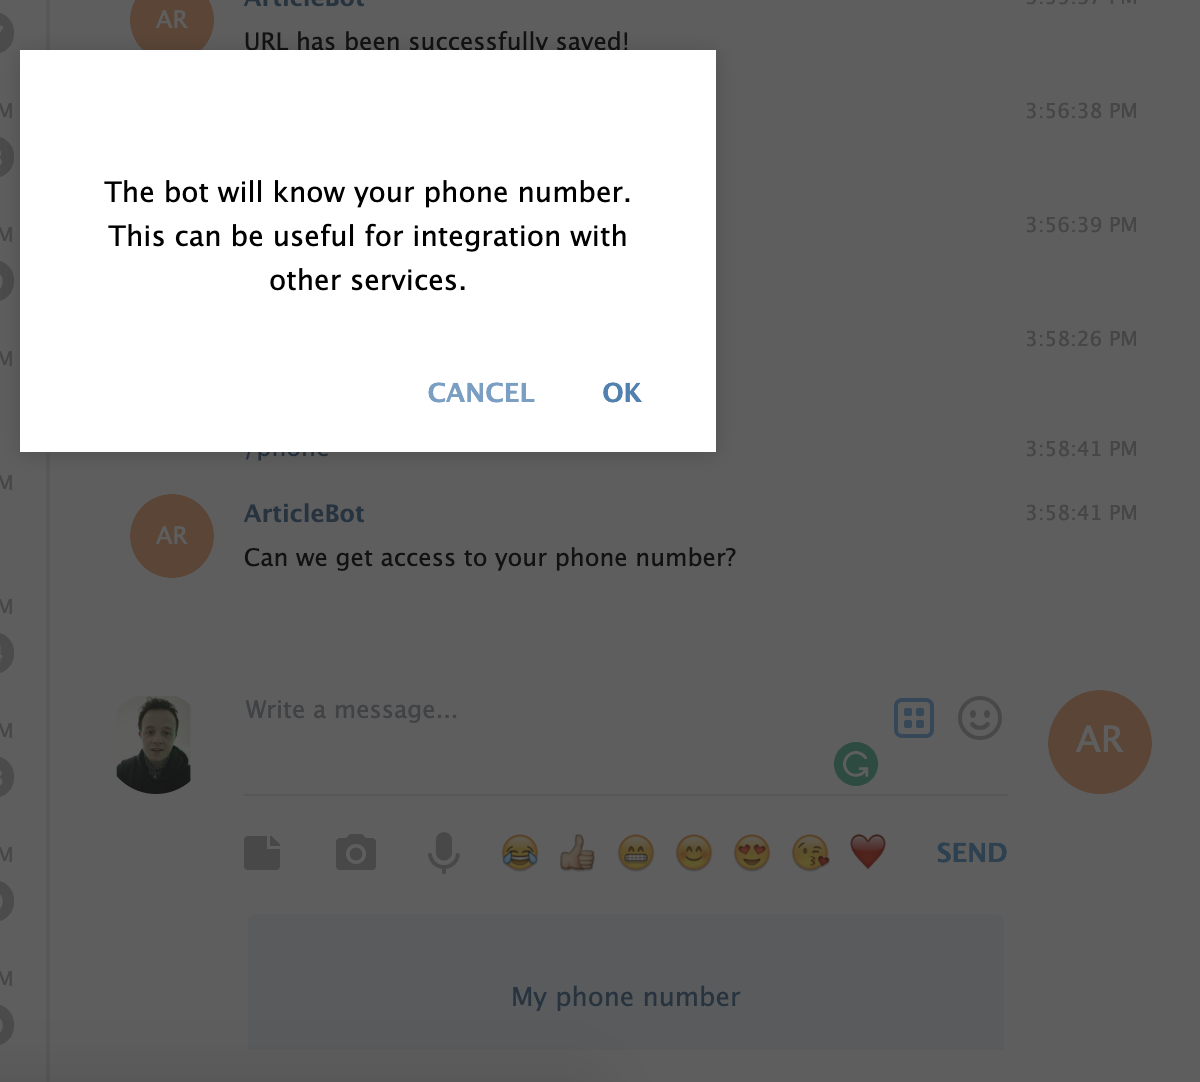
When you click the button My phone number, you get the following phone number request:
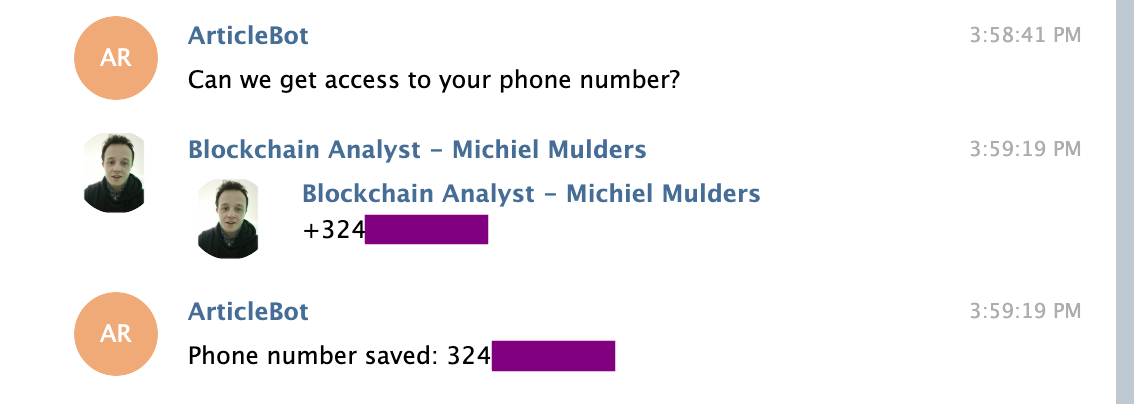
This is how it looks after we give access:
Finally! You are a fully-learned Telegram Bot jedi. For now, more information and resources can be found here:
- The difference between private and public messages
- Different types of events
- Tutorials by Hosein2398 on GitHub
Stay tuned here, too — we’ll be back next month with a tutorial that delves deeper into the Telegram API’s advanced features.
Frequently Asked Questions (FAQs) about Building Your First Telegram Chatbot with Node.js
What are the prerequisites for building a Telegram chatbot with Node.js?
To build a Telegram chatbot with Node.js, you need to have a basic understanding of JavaScript and Node.js. You also need to install Node.js and npm (Node Package Manager) on your computer. Additionally, you need to create a bot on Telegram using BotFather, which will provide you with a token that you’ll use to interact with the Telegram API.
How can I create a bot on Telegram using BotFather?
BotFather is a bot on Telegram that allows you to create new bots. To create a new bot, start a chat with BotFather, then follow the prompts. You’ll be asked to choose a name and username for your bot. Once you’ve done this, BotFather will provide you with a token, which you’ll use to interact with the Telegram API.
How can I interact with the Telegram API using Node.js?
To interact with the Telegram API using Node.js, you can use the node-telegram-bot-api package. This package provides a simple and powerful interface for the Telegram API. You can install it using npm, then require it in your code. You can then create a new bot using the token provided by BotFather, and use the methods provided by the package to interact with the API.
How can I handle messages sent to my bot?
The node-telegram-bot-api package provides an onText method, which you can use to handle text messages sent to your bot. This method takes a regular expression and a callback function as arguments. The callback function is called whenever a message that matches the regular expression is received. The message object is passed to the callback function, which you can use to respond to the message.
How can I send messages from my bot?
To send messages from your bot, you can use the sendMessage method provided by the node-telegram-bot-api package. This method takes two arguments: the chat ID of the recipient, and the text of the message. You can get the chat ID from the message object passed to the callback function of the onText method.
How can I deploy my bot?
Once you’ve built your bot, you can deploy it to a server so that it can run continuously. There are many options for this, including cloud platforms like Heroku, AWS, and Google Cloud, as well as traditional hosting providers. The exact process will depend on the platform you choose, but generally involves pushing your code to the platform, then starting the bot using the platform’s tools.
How can I handle different types of messages, like photos or stickers?
The node-telegram-bot-api package provides methods for handling different types of messages. For example, you can use the onPhoto method to handle photo messages, or the onSticker method to handle sticker messages. These methods work similarly to the onText method, taking a callback function that is called when a message of the corresponding type is received.
How can I add custom commands to my bot?
You can add custom commands to your bot using the command method provided by the node-telegram-bot-api package. This method takes a string and a callback function as arguments. The string is the name of the command, and the callback function is called when the command is received. You can use the message object passed to the callback function to respond to the command.
How can I handle inline queries?
Inline queries allow users to interact with your bot directly from the text input field of a chat. The node-telegram-bot-api package provides an onInlineQuery method, which you can use to handle inline queries. This method takes a callback function, which is called when an inline query is received. You can use the inline query object passed to the callback function to respond to the query.
How can I debug my bot?
Debugging your bot can be done in several ways. One common method is to use console.log statements in your code to print out information about the state of your bot. You can also use debugging tools like the Node.js debugger or Chrome DevTools. Additionally, the node-telegram-bot-api package provides an onError method, which you can use to handle any errors that occur while your bot is running.
 Michiel Mulders
Fullstack Blockchain Developer at TheLedger.be with a passion for the crypto atmosphere.