Writing A Multiplayer Text Adventure Engine In Node.js: Adding Chat Into Our Game (Part 4)

Email Newsletter
Weekly tips on front-end & UX.
Trusted by 200,000+ folks.


 Flexible CMS. Headless & API 1st
 Register!
Any platform that allows for collaborative play between people will be required to have one very particular characteristic: the ability for players to (somehow) talk to each other. That is exactly why our text-adventure engine built in Node.js would not be complete without a way for the party members to be able to communicate with each other. And because this is indeed a text adventure, that form of communication will be presented in the form of a chat window.
So in this article, I’m going to explain how I added chat support for the text client as well as how I designed a quick chat server using Node.js.
Other Parts Of This Series
Back To The Original Plan
Lack of design skills aside, this has been the original wireframe/mock-up for the text-based client we built in the previous part of the series:
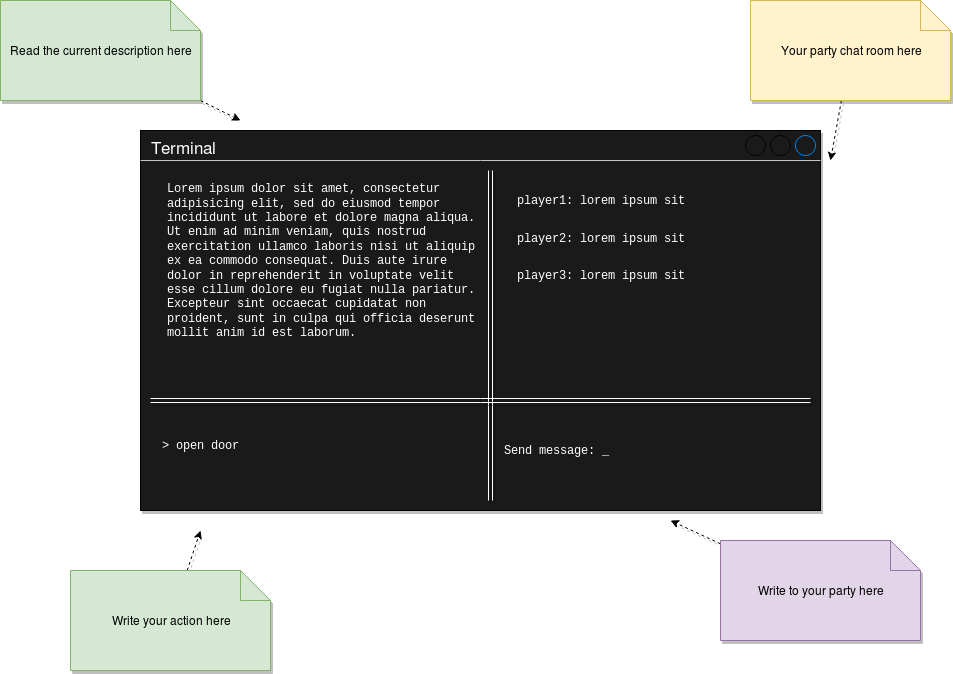
The right side of that image is meant for inter-player communications, and it’s been planned as a chat since the beginning. Then, during the development of this particular module (the text client), I managed to simplify it into the following:
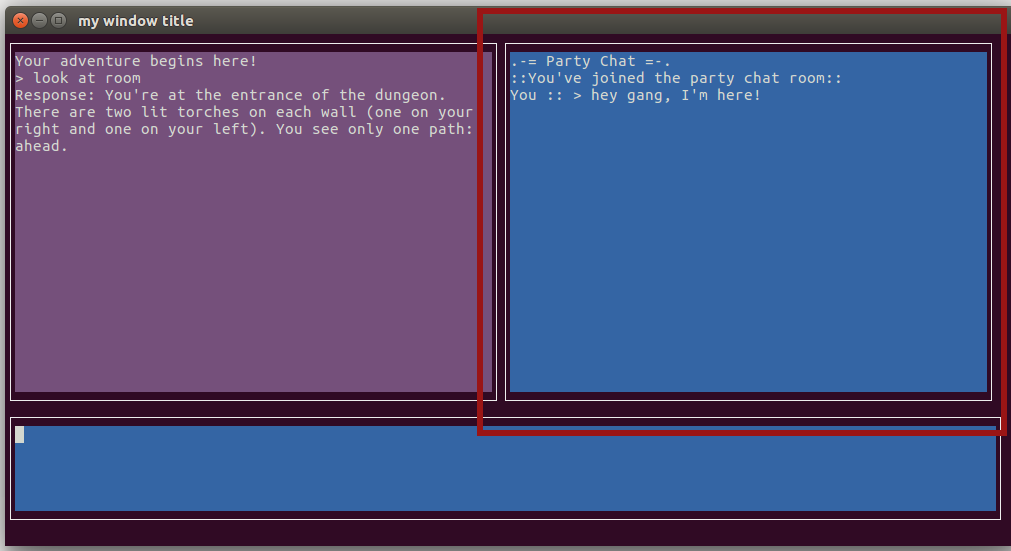
Yes, we already covered this image in the previous installment but our focus was the left half. Today, however, our focus will be on the right half of what you’re seeing there. In other words:
- Adding the ability to reactively pull data from a third-party service and update a content window.
- Adding support to the command interface for chat commands. Essentially changing the way commands work out of the box and adding support for things, such as “sending a message to the rest of the team”.
- Create a basic chat server on the back-end that can facilitate team communication.
Let me start with the last one before moving on to how to modify our existing code.
Creating The Chat Server
Before even looking at any code, one of the first things one should do is to quickly define the scope of any new project. Particularly with this one, we need to make sure we don’t spend a lot of time working on features we might not need for our particular use case.
You see, all we need is for the party members to be able to send messages with each others, but when one thinks of a “chat server”, other features often come in mind (such as chat rooms, private messages, emojis and so on).
So in order to keep our work manageable and get something out that works, here is what the chat server module will actually do:
- Allow for a single room per party. Meaning, the actual room for a party will be auto-created when the game itself is created and the first player starts playing. All subsequent party members will join the same room, automatically and without a choice.
- There will not be support for private messages. There is no need to be secretive in your party. At least not in this first version. Users will only be able to send messages through the chat, nothing else.
- And to make sure everyone is aware, the only notification sent to the entire party, will be when new players join the game. That’s all.
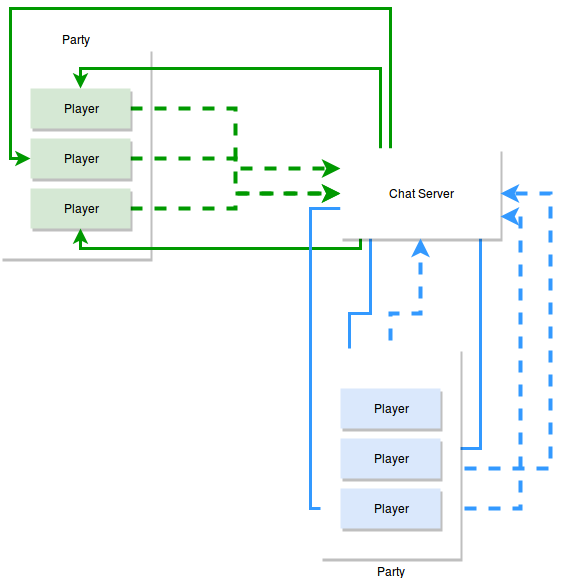
The following diagram shows the communication between servers and clients. As I mentioned, the mechanics are quite simple, so the most important bit to highlight here is the fact that we’re keeping conversations contained within the same party members:
The Tools For The Job
Given the above restrictions and the fact that all we need is a direct connection between the clients and the chat server, we’ll solve this problem with an old fashion socket. Or in other words, the main tool we’ll be using is socket.io (note that there are 3rd party services providing managed chat servers, for instance, but for the purposes of this, going there would the equivalent of killing a mosquito with a shotgun).
With socket.io we can establish a bidirectional, real-time, event-based communication between the server and the clients. Unlike what we did with the game engine, where we published a REST API, the socket connection provides a faster way of communication.
Which is exactly what we need, a quick way to connect clients and server, exchanging messages and sending broadcasts between them.
Designing A Chat Server
Although socket.io is quite magical when it comes to socket management, it’s not a full chat server, we still need to define some logic to use it.
For our particularly small list of features, the design of our server’s internal logic should look something like this:
- The server will need to support at least two different event types:
- New message
This one is obvious, we need to know when a new message from a client is received, so we’ll need support for this type of event. - New user joined
We’ll need this one just to make sure we can notify the entire party when a new user joins the chat room.
- New message
- Internally, we’ll handle chat rooms, even though that concept will not be something public to clients. Instead, all they will send is the game ID (the ID players use to join the game). With this ID we’ll use socket.io’s rooms feature which handles individual rooms for us.
- Because of how socket.io works, it keeps an in-memory session open that is automatically assigned to the socket created for each client. In other words, we have a variable automatically assigned to each individual client where we can store information, such as player names, and room assigned. We’ll be using this socket-session to handle some internal client-room associations.
A Note About In-Memory Sessions
In-memory storage is not always the best solution. For this particular example, I’m going with it because it simplifies the job. That being said, a good and easy improvement you could implement if you wanted to take this into a production-ready product would be to substitute it with a Redis instance. That way you keep the in-memory performance but add an extra layer of reliability in case something goes wrong and your process dies.
With all of that being said, let me show you the actual implementation.
The Implementation
Although the full project can be seen on GitHub, the most relevant code lies in the main file (index.js):
// Setup basic express server
let express = require('express');
let config = require("config")
let app = express();
let server = require('http').createServer(app);
let io = require('socket.io')(server);
let port = process.env.PORT || config.get('app.port');

server.listen(port, () => {
  console.log('Server listening at port %d', port);
});

let numUsers = 0;


io.on('connection', (socket) => {
  let addedUser = false;

  // when the client emits 'new message', this listens and executes
  socket.on(config.get('chat.events.NEWMSG'), (data, done) => {
    let room = socket.roomname
    if(!socket.roomname) {
        socket.emit(config.get('chat.events.NEWMSG'), "You're not part of a room yet")
        return done()
    }

    // we tell the client to execute 'new message'
    socket.to(socket.roomname).emit(config.get('chat.events.NEWMSG'), {
      room: room,
      username: socket.username,
      message: data
    });
    done()
  });

  socket.on(config.get('chat.events.JOINROOM'), (data, done) => {
      console.log("Requesting to join a room: ", data)

      socket.roomname = data.roomname
      socket.username = data.username
      socket.join(data.roomname, _ => {
          socket.to(data.roomname).emit(config.get('chat.events.NEWMSG'), {
            username: 'Game server',
            message: socket.username + ' has joined the party!'
          })
          done(null, {joined: true})
      })
  })

  // when the user disconnects.. perform this
  socket.on('disconnect', () => {
    if (addedUser) {
      --numUsers;

      // echo globally that this client has left
      socket.to(socket.roomname).emit('user left', {
        username: socket.username,
        numUsers: numUsers
      });
    }
  });
});
That is all there is for this particular server. Simple right? A couple of notes:
- I’m using the config module to handle all my constants. I personally love this module, it simplifies my life every time I need to keep “magic numbers” out of my code. So everything from the list of accepted messages to the port the server will listen to are stored and accessed through it.
- There are two main events to pay attention to, just like I said before.
- When a new message is received, which can be seen when we listen for
config.get('chat.events.NEWMSG'). This code also makes sure you don’t accidentally try to send a message before joining a room. This shouldn’t happen if you implement the chat client correctly, but just in case these type of checks are always helpful when others are writing the clients for your services. - When a new user joins a room. You can see that event on the
config.get('chat.events.JOINROOM')listener. In that case, all we do is add the user to the room (again, this is handled by socket.io, so all it takes is a single line of code) and then we broadcast to the room a message notifying who just joined. The key here is that by using the socket instance of the player joining, the broadcast will be sent to everyone in the room except the player. Again, behavior provided by socket.io, so we don’t have to add this in.
- When a new message is received, which can be seen when we listen for
That is all there is to the server code, let’s now review how I integrated the client-side code into the text-client project.
Updating The Client Code
In order to integrate both, chat commands and game commands, the input box at the bottom of the screen will have to parse the player’s input and decide on what they’re trying to do.
The rule is simple: If the player is trying to send a message to the party, they’ll start the command with the word “chat”, otherwise, they won’t.
What Happens When Sending A Chat Message?
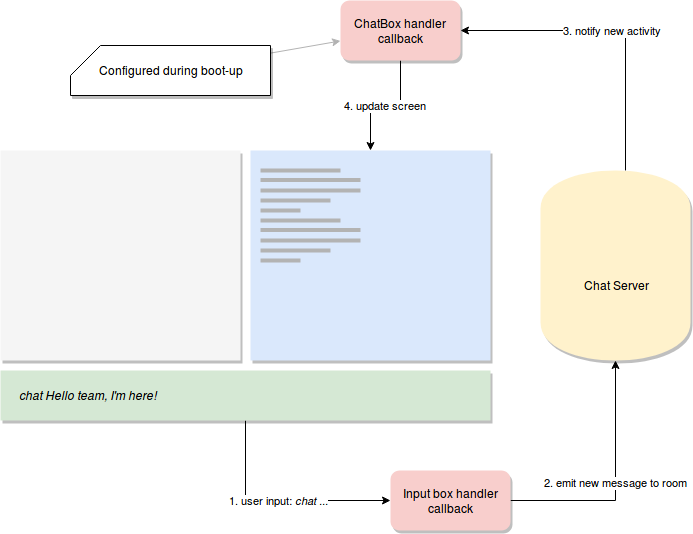
The following list of actions takes place when the user hits the ENTER key:
- Once a chat command is found, the code will trigger a new branch, where a chat client library will be used and a new message will be sent (emitted through the active socket connection) to the server.
- The server will emit the same message to all other players in the room.
- A callback (setup during boot-time) listening for new events from the server will be triggered. Depending on the event type (either a player sent a message, or a player just joined), we’ll display a message on the chat box (i.e the text box on the right).
The following diagram presents a graphic representation of the above steps; ideally, it should help visualize which components are involved in this process:
Reviewing The Code Changes
For a full list of changes and the entire code working, you should check the full repository on Github. Here, I’m quickly going to glance over some of the most relevant bits of code.
For example, setting up the main screen is where we now trigger the connection with the chat server and where we configure the callback for updating the chat box (red box on the top from the diagram above).
setUpChatBox: function() {
        let handler = require(this.elements["chatbox"].meta.handlerPath)
        handler.handle(this.UI.gamestate, (err, evt) => {
            if(err) {
                this.UI.setUpAlert(err)
                return this.UI.renderScreen()
            }

            if(evt.event == config.get('chatserver.commands.JOINROOM')) {
                this.elements["chatbox"].obj.insertBottom(["::You've joined the party chat room::"])
                this.elements["chatbox"].obj.scroll((config.get("screens.main-ui.elements.gamebox.autoscrollspeed") ) + 1)
            }
            if(evt.event == config.get('chatserver.commands.SENDMSG')) {
                this.elements["chatbox"].obj.insertBottom([evt.msg.username + ' said :> ' + evt.msg.message])
                this.elements["chatbox"].obj.scroll((config.get("screens.main-ui.elements.gamebox.autoscrollspeed") ) + 1)
            }
            this.UI.renderScreen()
        })

    },
This method gets called from the init method, just like everything else. The main function for this code is to use the assigned handler (the chatbox handler) and call it’s handle method, which will connect to the chat server, and afterwards, setup the callback (which is also defined here) to be triggered when something happens (one of the two events we support).
The interesting logic from the above snippet is inside the callback, because it’s the logic used to update the chat box.
For completeness sake, the code that connects to the server and configures the callback shown above is the following:
const io = require('socket.io-client'),
    config = require("config"),
    logger = require("../utils/logger")


// Use https or wss in production.
let url = config.get("chatserver.url")
let socket = io(url)


module.exports = {

    connect2Room: function(gamestate, done) {
        socket.on(config.get('chatserver.commands.SENDMSG'), msg => {
            done(null, {
                event: config.get('chatserver.commands.SENDMSG'),
                msg: msg
            })
        })
        socket.emit(config.get("chatserver.commands.JOINROOM") , {
            roomname: gamestate.gameID,
            username: gamestate.playername
        }, _ => {
            logger.info("Room joined!")
            gamestate.inroom = true
            done(null, {
                event: config.get('chatserver.commands.JOINROOM')
            })
        })

    },

   handleCommand: function(command, gamestate, done) {
        logger.info("Sending command to chatserver!")

        let message = command.split(" ").splice(1).join(" ")

        logger.info("Message to send: ", message)

        if(!gamestate.inroom) { //first time sending the message, so join the room first
            logger.info("Joining a room")
            let gameId = gamestate.game

    socket.emit(config.get("chatserver.commands.JOINROOM") , {
                roomname: gamestate.gameID,
                username: gamestate.playername
            }, _ => {
                logger.info("Room joined!")
                gamestate.inroom = true
                updateGameState = true

                logger.info("Updating game state ...")
                socket.emit(config.get("chatserver.commands.SENDMSG"), message, done)
            })
        } else {
            logger.info("Sending message to chat server: ", message  )
            socket.emit(config.get("chatserver.commands.SENDMSG"), message, done)
        }

    }
}
The connect2room method is the one called during setup of the main screen as I mentioned, you can see how we set up the handler for new messages and emit the event related to joining a room (which then triggers the same event being broadcasted to other players on the server-side).
The other method, handleCommand is the one that takes care of sending the chat message to the server (and it does so with a simple socket.emit). This one is executed when the commandHandler realizes a chat message is being sent. Here is the code for that logic:
module.exports = {
    handle: function(gamestate, text, done) {
        let command = text.trim()
        if(command.indexOf("chat") === 0) { //chat command
            chatServerClient.handleCommand(command, gamestate, done)
        } else {
            sendGameCommand(gamestate, text, done)
        }
    }
}
That is the new code for the commandHandler, the sendGameCommand function is where the old code now is encapsulated (nothing changed there).
And that is it for the integration, again, fully working code can be downloaded and tested from the full repository.
Final Thoughts
This marks the end of the road for this project. If you stuck to it until the end, thanks for reading! The code is ready to be tested and played with, and if you happen to do so, please reach out and let me know what you thought about it.
Hopefully with this project, many old-time fans of the genre can get back to it and experience it in a way they never did.
Have fun playing (and coding)!
Further Reading on SmashingMag:
- Building A Pub/Sub Service In-House Using Node.js And Redis
- Building A Node.js Express API To Convert Markdown To HTML
- Get Started With Node: An Introduction To APIs, HTTP And ES6+ JavaScript
- Keeping Node.js Fast: Tools, Techniques, And Tips For Making High-Performance Node.js Servers


